
Tyranny of Dragons
Introduction
Player Backstories
Campaign Overview
Greed of Dragons
Chapter 1: Dragon at Dragonspear
Introduction
Daggerford
Attack Plan
Events Unfolding
The Sun Rises
Chapter 2: Follow the Cult
Marauder's March
Wishing Well Cave
Lizard Marsh
The Slippery Mermaid
Lost in Waterdeep
Continuing North
Chapter 3: Secrets of the Mere
The Mere of Dead Men
Carnath Roadhouse
Death's Deal
Frogs Against the Throne
Castle Naetyr
Chapter 4: The Black Wyrmspeaker
Rezmir the Black
The Lonely Moor
Hunting Lodge
Hot Pursuit
Zaratan Castle
Power of Dragons
Chapter 5: Waterdeep: The Crown of the North
The City of Splendors
Interesting Places
Interesting Faces
Skullport
City Politics
The Council of Waterdeep
Allies and Enemies
Side Adventures
Chapter 6: The Draakhorn
Icewind Dale
Treaty with the Frost Giants
Oyaviggaton
Chapter 7: Charming the Elves
The High Forest
The Eldreth Veluuthra
The Misty Forest
Green Wyrmspeaker
Chapter 8: Storming Skies
Baldur's Gate
Dragon of Storms
Twisted Experiments
The Throne of Thunder
Chapter 9: The Coast Burns
The Cult Strikes Back
Dragon Attack: Berdusk
Dragon Attack: Bryn Shander
Dragon Attack: Candlekeep
Dragon Attack: Phandalin
Dragon Attack: Soubar
Dragon Attack: Triboar
Chapter 10: Converting the Serpents
The Yuan-ti
Civil War of Najara
The Princess of the Serpents
The Prince of Zehir
Deadly Politics
Chapter 11: The White Dragon Mask
Silverymoon
Silver Marches
Cloud Giants of the Evermoors
The Many-Arrows Kingdom
Chapter 12: Eye of Myrkul
The Black Death
Back to Castle Naetyr
Uthtower
Chapter 13: Corruption in the City
The Grand Game
Dragon Heist
Claugiyliamatar's Plots
Chapter 14: Doom of the Desert
The Storm Giants
Ascore
Anarath
Iymrith, Dragon of the Statues
Chapter 15: Power of Thay
Rath Modar
Arcane Assets
The Thay Strike Neverwinter, Yet Again
Chapter 16: Winter Storm
Arauthator and Arveiaturace
The White Dragon Orb
Luskan Frozen Over
Skyreach Castle
Chapter 17: Abomination
Jaxanaedegor
Chapter 18: The Orogoth Plots
House Orogoth
Taking Back the Dragon Masks
The High Moor
Orogoth
The Dungeon of Swords
Chapter 19: The City of Bone
Blue Wyrmspeaker
The Dark Elves
Slaves Amassed
The City of Bone
Skull Citadel
Terror of Dragons
Chapter 20: Crimson Skies
This is War
Armies of Tiamat
The Cult’s Strategies
Side Missions
Chapter 21: Metallic Dragons, Arise
Metallic Dragons
Metallic Council
Trial of Brass
Trial of Copper
Trial of Bronze
Trial of Silver
Trial of Gold
Draconic Support
Chapter 22: Dangerous Dealings
What is Victory Worth?
Jarant, the Serpent King
Hekaton, the Storm King
Zariel, Lord of the First
Szass Tam, Absolute Ruler of Thay
Imvaernarhro, Inferno of the Star Mounts
The Old Cult of the Dragon
Chapter 23: Tiamat’s Return
Forces of Good
Forces of Evil
The Approach
The Well of Dragons
The Queen of Dragons Returns
Resolution
Knowledge of Dragons
Chapter 23: Northwestern Faerûn
The Sword Coast
Savage Frontier
The Frozenfar
Silver Marches
High Forest
Backlands
Najara
Elturgard
Sunset Vale
The Northdark
Chapter 24: Factions of the Land
Emerald Enclave
Harpers
Lords’ Alliance
Order of the Gauntlet
Zhentarim
Other Factions
Chapter 25: The Cult of the Dragon
History
Beliefs
Mission
Hierarchy
The Obsidian Talon
The Ivory Talon
The Jade Talon
The Cobalt Talon
The Crimson Talon
The Old Cult
Chapter 26: Dragonkind
Draconic Nature
Dragon Biology
Draconic Magic
Dragon Harvesting
Dragon Hoards
Black Dragons
Blue Dragons
Green Dragons
Red Dragons
White Dragons
Metallic Dragons
Miscellaneous Dragons
Appendix A: Player Options
Appendix B: New Spells
Appendix C: Magic Items
Appendix D: Statblocks
Appendix E: Handouts
Appendix F: Miscellaneous Tables
Title Page Art Credit
Tiamat by Chris Rahn
Introduction
Player Backstories
The party will start at 3rd level. All character creation options in NyteShark's Character Creation document are available, except for Fey creature type races.
Every player must create a backstory for their character. Specific connections need to be incorporated into the character's backstory, and each backstory should be at least 1 page. In-depth backstories allow the DM to weave your character into major aspects of the campaign's story.
Connection to Adventure
Every character must have what it takes to be, or to become, an adventurer.
Motivation. Your character must have both the desire and ability to answer the call to adventure. While responsibility can still influence them, they should be alright with adventuring for long periods of time.
Morality. Your character must NOT be of an evil alignment. They must also have a personality somewhat conducive to working with others, following basic law, and pursuing goodness.
Flaw. You must include at least one flaw into your character. This flaw must not majorly conflict with either of the above connections.
The Call. The campaign begins the evening of the 1st of Kythorn (June), 1492 DR, in a town called Daggerford, in the River Shining Tavern. You must determine how your character came to be there.
Connection to Personality
If a player is having difficulty creating a personality or background for their character, refer them to Xanathar's Guide to Everything, which has many helpful tips and guides.
Connection to the Realms
Every character needs to be from the Forgotten Realms. There are a number of ways you can tie your backstory into the world. The Forgotten Realms wiki has troves of information, and if you need direction, reach out to the DM.
Hometown. Your character must have been born and raised in or near the Sword Coast region, in location(s) canon in lore. In addition to a town or city, you can choose to have been part of a local business, religion, or nobility.
Relationships. Your character must be connected to NPCs in some fashion, whether it be as family, friends, mentors, rivals, or enemies. These NPCs can be custom made by you or canon in lore.
Faction (Optional). Your character can be a part of a major faction canon in lore, such as the Harpers, Order of the Gauntlet, Emerald Enclave, or Zhentarim. You can instead be part of a minor (local) faction or guild canon in lore.
Religion (Optional). Your character does not have to believe in or worship a deity. If you do, it must be a deity canon in lore. The nature of their worship is not restricted to standard practice for that religion.
Connection to Dragons
While not commonly discussed, cults lie hiding in the dark corners of the Realms. One cult in particular each character must have heard about: the Cult of the Dragon.
Cultists. Your character must have had a past experience with the Cult of the Dragon, the nature of which can vary greatly, and does not need to be a major part of your story.
Dragon. Your character must have had a past experience with a dragon, the nature of which can vary greatly, and does not need to be a major part of your story.
Rumors. Your character will start with one tidbit of information concerning either the Cult of the Dragon or dragonkind itself. This information will be provided by the DM and is determined by the nature of the above connections.
Connection to Treasure
Each player must choose two or more specific objects, magical or non-magical in nature. They can be custom made or canon in lore. They must not be consumable items. Each player will also start with twice their starting gold.
Starting Treasure. Your character will start with a treasure of great personal importance. If magical, it must be of common or uncommon rarity. If not, it can be worth up to 1,000 gp. However, your character should not be willing to die over this item.
Legendary Treasure. There are many tales of legendary treasures in the Realms. Your character must have heard of such a treasure and have a desire to obtain it, if the possibility arises. This treasure must be a magical item of legendary rarity.
Campaign Overview
This campaign will include three major arcs. The first consists of Chapters 1--4, the second Chapters 5--19, and the third Chapters 20--23. Chapters 24--27 do not include an arc, but rather information for the DM to reference throughout the campaign.
Greed of Dragons
The first arc is quite linear. The party begins in Daggerford when it is raided and looted, and must follow the trail of the cult through the Lizard Marsh, Waterdeep, the Mere of Dead Men, and through a teleportation circle to Zaratan Castle. There, they face off with the Black Wyrmspeaker and a young black dragon for a hoard worth a million gold pieces.
The party starts at 2nd level, and should reach 6th level after Chapter 4.
Power of Dragons
The second arc is a sandbox. It consists of one setup Chapter followed by fourteen mission Chapters, with each mission associated with one of the five Talons of the Cult of the Dragon. Though each chapter has a suggested character level for the party to begin at, they can be shuffled around or adjusted as needed.
The order of the missions is not fixed, and elements of one Chapter might take place between or during other Chapters, such as Chapters 5 and 12. The order of the following Chapters can be shuffled with each other: Chapters 6, 7, and 8; Chapters 10, 11, 12, and 13; Chapters 14, 15, 16, 17; and Chapters 18 and 19.
Each mission should provide the party with enough experience points to advance one level. After Chapter 19, they should each be 20th level.
Terror of Dragons
The endgame of Tyranny of Dragons, the third arc wraps up loose ends while solidifying the Cult of the Dragon's power. The party must defend the Sword Coast and forge dangerous alliances before mounting a final assault on the Well of Dragons. There, they face off with Tiamat, the Queen of Dragons.
The party will no longer be receiving experience, but will be given legendary allies, boons, and magic items instead.
Knowledge of Dragons
Not an arc of the story, these Chapters provide critical information about cities, landmarks, NPCs, politics, the Cult of the Dragon, and dragonkind itself. Every other Chapter in the book will reference information from here.
Included are six Appendixes that are referenced throughout the book.
The Cult of the Dragon's Goal
The Cult of the Dragon's overall goal is the summoning of Tiamat into Faerûn. To do so, they need the ritual power of a sect of the Red Wizards of Thay as well as hoard worthy of the Queen of Dragons and a multitude of people to sacrifice by the day the ritual begins: the Day of Ruin.
The Party's Role
The party gets wrapped up in the first major raid of the Cult of the Dragon. Once they follow the initial mission to its end, they are approached by the Council of Waterdeep and asked to help against the cult's machinations. As their missions grow more and more dangerous, the party grows more and more powerful. At the climax of the adventure, they must rush to the Well of Dragons and stop the cult from summoning Tiamat, the Queen of Dragons.
Greed of Dragons
While the Cult of the Dragon has primarily been working in the shadows, they have been preparing a major raid to collect a hoard of treasure.
The Obsidian Talon, led by the Black Wyrmspeaker Rezmir, has planned to raid Daggerford, a major town along the Trade Way and a waypoint of trade of commerce. At the same time, she is conducting a series of smaller raids across the Savage Frontier and stealthily moving the acquired wealth through Waterdeep to the Mere of Dead men.
Secrecy surrounds these raids, and has strategically been timed to take place while Waterdeep's attention is focused on an orc horde approaching form the north. The only cultists that know where to find Rezmir are the Wearers of Purple, each operating their own cell of the Obsidian Talon under Rezmir's direction.
From Waterdeep, the treasure will travel north to the Mere of Dead Men, where Rezmir awaits at Castle Naetyr. She will oversee the transfer of the treasure through a teleportation circle to the Lonely Moor, roughly 700 miles away. There, Rezmir will accompany the treasure to a crawling castle that will meander its way to the Well of Dragons.
Chapter 1: Dragon at Daggerford
The Wearer of Purple conducting this raid is a human woman named Frulam Mondath. She has enlisted the help of a black dragon from the Lizard Marsh to assist her attack on Daggerford, and plans to use suprise and overwhelming force to seize every treasure within the town.
The party begins in a tavern here in Daggerford, and is present when the attack begins. They must do what they can to protect the town and survive the night, but even they will be robbed of their Starting Treasures.
The cult is successful, and most of Daggerford's treasure is taken away. With Waterdeep unable to lend aid, the Duchess of Daggerford calls upon the party to pursue the raiders and retrieve what was lost.
Chapter 2: Follow the Cult
Rezmir has taken steps to ensure the secrecy of the cult's activities, but not everyone in the cult has been so careful.
With a bit of searching, the party is able to follow the cult's tracks to the Lizard Marsh, onto a sailing vessel named the Slippery Mermaid, through Waterdeep, and to the Mere of Dead Men.
The party is assumed to have stolen away on the Slippery Mermaid before it departs from the Lizard Marsh. When they arrive, it is raining and mildly stormy, concealing the vessel's detour into Skullport. Here, the spoils of many of Rezmir's smaller raids are combined with this loot, and the Zhentarim help the cult move it all up to Waterdeep, where it is transfered onto carts and smuggled out of the city through the north gate.
Chapter 3: Secrets of the Mere
The carts stop at the Carnath Roadhouse along the edge of the Mere of Dead Men. Here, the loot is smuggled through a tunnel to lizardfolk who take the treasure to Castle Naetyr. At the Castle, Rezmir commands multiple cells of the cult in the machinations of her plan.
While the party is traveling through the Mere, they are stopped a most peculiar of creatures: Voaraghamanthar, the Black Death. Here, he asks the party to fetch him an object from the castle, promising a painful death if they refuse. The object is the first of the Twin Crowns of Myrmoran, the Twinned Crown of Yarlith. The Cult of the Dragon has promised to hand it over if Voaraghamanthar allows the cult passage through their mere, but the dragon is suspicious, and sees the party as a means to cheat the crown from the cult.
Additionally, the bullywugs the cult has enslaved desire to rise up and rebel, and hopes the party will help them fight back.
Whatever actions the party takes, they can pursue Rezmir through a secret teleportation circle beneath the castle to where the hoard is gathered.
Chapter 4: The Black Wyrmspeaker
When the party arrives at the Lonely Moor, they find a hunting lodge that the Cult of the Dragon has just departed from. Inside are answers, a traitorous Wearer of Purple, and a four-armed troll.
Once that is dealt with and they depart from the moor, they must rush to climb aboard the back of a massive zaratan elemental, upon which a castle has been built. The zaratan, guided by a stone giant, begins traveling before the party arrives. To board it, they must quickly tame mounts
Rezmir the Black awaits within the top floors of the castle, satisfied that her plots are nearing their end. Here the party must face her. While she has many of the answers the party desires, she will protect the cult's secrets until her dying breath.
The hoard itself is worth about 1 million gold pieces, and is protected by a young black dragon named Aswidorg. He will fiercely protect his hoard to the death.
Zaratan Castle itself is watched over a stone giant named Valgusk who is not loyal to the Cult of the Dragon. He shares a connection to the zaratan and guides its path, and serves the cult not out of wealth, of fear, or of obligation, but rather out of boredom. Valgusk does not know the cult's plans or even where his final destination is.
When this arc reaches its resolution, the party will have the opportunity to return with the hoard and possibly even the Black Dragon Mask.
Chapter 1: Dragon at Daggerford
Introduction
The party begins as patrons in the River Shining Tavern. While they may or may not already know each other, they will be the only current patrons that rise to against the Cult of the Dragon's Attack. Together, they must survive the raid.
Daggerford
Daggerford is a small but consequential town located in the Delimbiyr Vale within the greater Sword Coast. While it is primarily a farming community, and considered by some to be a mere stopover, the town has great ambitions to grow and be seen as an alternative to their northern neighbor of Waterdeep.
Despite its modest size and somewhat inflated sense of importance, Daggerford is resilient. It is something of a relic from the old kingdom of Delimbiyr, too stubborn to fall even when a series of wars, crusades, and other conflicts threatened the entirety of the Sword Coast. Daggerford's coat-of-arms is a silver dagger covered in blood atop a field of dark blue.
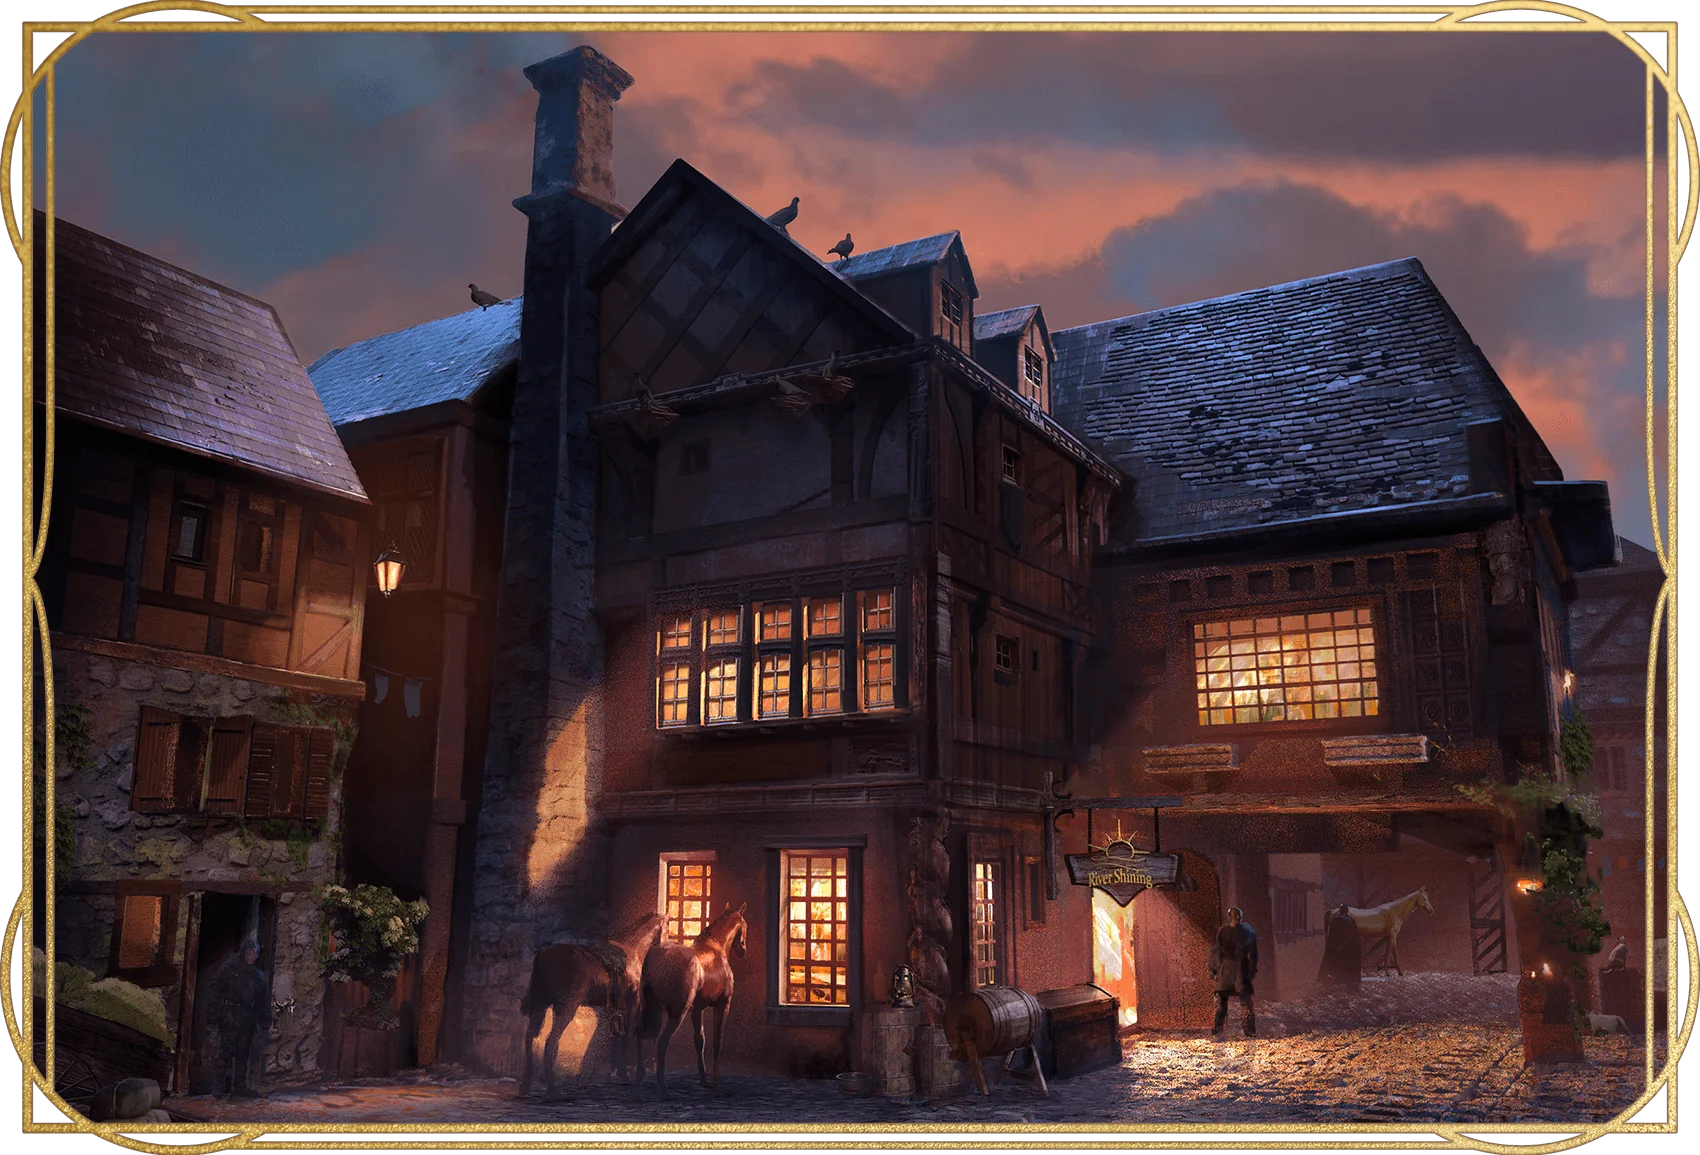
Art Credit
River Shining Tavern by Robin Olausson
Within Daggerford reside multiple religions of interest. These include a tower once dedicated to Lathander but now reveres Amaunator, a bountiful temple of Chauntea, a shrine of Tempus, and a shrine of Tymora. In addition, the town is home to several businesses and guildhalls.
Residing in Daggerford are several retired adventurers that will rise to aid Daggerford in its time of need. Those present at the time of the attack include: Commander Sherlan Miller, Priest Curren Corvalin, Sir Darfin Floshin, and Sir Isteval,
Population: 1300 (primarily dwarves, halflings, and humans). Defenses: 100 militia guards (50 on duty), a handful of retired adventurers. Imports: green wood. Exports: apples, furs, garments.
D1. River Shining Tavern
The River Shining Tavern is a large building made from wood. Though aging, the structure remains solid. Most of the clientele of the tavern have plenty of coin to spend. Patrons include rich merchants, traveling nobles, and prominent citizens of Daggerford. It makes up for its expensive prices with a legendary menu, quality service, and comfortable beds.
Tonight, over thirty patrons are currently present in the tavern, but not Sir Darfin Floshin or Sir Isteval. There is about 10,000 gp worth of coins and treasure here tonight.
The Tale of Peredus the Great
"Peredus the Glorius,
His stature quite impervious,
Aside a well stood standing thus,
Without a hint of wariness.
Standing full of watchfulness,
Eldritch sword in readiness,
Great defender Peredus,
Would save us from the villainous.
Bandits struck with heinousness,
Scales and hides of fearlessness,
Fear them not did Peredus,
Stepped forward in defense of us.
Our caravan in exodus,
Fled the site so dangerous,
While great defender Peredus,
Fought bandits who had ambushed us.
The bandits were too numerous,
They overwhelmed great Peredus,
With woulds to his mortalness,
And knowing of their gustibus,
He cast himself into darkness,
He cast himself into darkness...”
— Lyrics of the Peredus the Great
Originating over 100 years ago, the tale of Peredus holds an undiscovered secret: his alleged magical blade. Peredus perished choosing his own death: casting himself down the Willow Wishing Well. The Sword of Peredus still lies there today, and this ballad hints to its location.Though the Hero of Daggerford of 1372 DR found and wielded the blade, they returned it to the well when they retired.
A dwarf bard is telling this ballad while playing a lute in the River Shining Tavern.
Kaga Delimbiyr
The same family has owned the River Shining Tavern for decades----the Delimbiyr family. The current owner is named Kaga (neutral good male human commoner). He also serves as the establisment's head chef during busier times, such as this night.
Lady Belinda Anteos
The most wealthy woman in Daggerford, aside from the Duchess, is a member of the Waterdhavian Anteos family, a noble family of prominent traders and money changers. Lady Belinda Anteos (lawful neutral female human noble) is over 50 years old and tonight has 1,000 gp worth of coins in her purse and wears another 2,500 gp worth of fine jewelry and accessories.
Her husband Lord Willon Anteos (lawful neutral male human noble) is also present, and can be found by his wife's side.
Sir Darfin Floshin
One of of the retired adventurers that has settled here in Daggerford, Sir Darfin Floshin is a wizard that helps protect Daggerford when in danger. However, his abilities have dwindled in his old age. For centuries, Darfin had acted together with his father as advisor to the dukes of Daggerford. When his father died, Darfin was freed from his duties, yet chose to remain in Daggerford.
Sir Darfin Floshin is a lawful good male sun elf mage with the earthbind and slow spells prepared in place of the fly and ice storm spells.
Sir Isteval
Once a powerful adventurer, Sir Isteval is a famed paladin of Lathander that has retired his oath, being well past his prime. He now serves as a noble-hearted mentor to those who seek him out. Two decades ago, Isteval lost his leg in a battle with a green dragon. Now, he uses one of that dragon's bones as a walking stick.
Sir Isteval is a lawful good male human knight with a walking speed of 20 ft. and is equipped with a +1 greatsword and +1 plate armor.
D2. Fairfortune Hall
Located along the the northern perimeter of the drill field, Fairfortune Hall is a shrine of Tymora. It is tended to by a halfling named Curran Corvalin, who is currently present.
Curran Corvalin
Curran Corvalin is an exceptionally wealthy retired adventurer who was known for his exceeding luck. In truth, he is a Chosen of Tymora who believes he is mundane. After casually discovering a deceased relatives fortune, he moved to Daggerford. Six years ago, he was captured by the Red Wizards of Thay and taken to the Doomvault for testing, but was subsequently freed by a group of adventurers.
Curran Corvalin is a chaotic good male halfling priest with the Lucky feat and the Chosen of Tymora trait, and he is CR 3. He also carries two vials of holy water, two potions of healing, and one spell scroll of revivify.
Chosen of Tymora. Curren Corvalin has advantage on every ability check, attack roll, and saving throw.
D3. Marketplace
With Daggerford being a main stop along the road south of Waterdeep, it is a juncture of trade and commerce. During the day, over a dozen merchant carts set up shop to buy and sell goods with both townsfolk and travelers. With a wide variety of merchandise, a buyer is likely to find whatever they might be looking for at a reasonable price. Eight members of the town militia guard the grounds day and night.
D4. Sword Coast Trader's Bank
Owned by a wealthy Waterdhavian noble family, the Sword Coast Trader's Bank serves as a moneylending and loaning center. A strong iron vault guards the bank's wealth, and only Lady Belinda Anteos and Lord Willon Anteos have the keys. Both can be found tending to the bank during the day. Two members of the militia stand guard here day and night.
D5. Ducal Castle
The Ducal Castle, also known as Daggerford Castle, is the ancestral home of the Daggerford family, as well as the seat of power for the dukes and duchesses that serve as Daggerford's heads-of-state.
The stone keep is three stories tall and surrounded by a stone wall that is about two-thirds its height.
Between the keep and the castle walls is a small courtyard that holds the duchess's smithy, the stables, several gardens, and their private grounds. The gate leading out to the rest of town remains open to its citizens at all times.
Duchess Morwen Daggerford
Morwen Daggerford was the sister of the duke of Daggerford around 1485 DR and became Duchess herself the following year. She is a member of the Lords' Alliance. On the surface Morwen is not an amiable person, but in truth she has a noble heart. She worships Tempus, and having trained with the militia, she is adept with the sword. A few years ago, she was captured and replaced by a succubus, but returned to power after the succubus was slain by a group of heroes.
Lady Morwen Daggerford is a lawful good female human noble with a Strength score of 14, 27 hit points, a silvered +1 dagger (a symbol of Daggerford) and is CR 1/2.
D5a. Cisterns
A collection of connected cisterns lie beneath the hill Ducal Castle was built on. They collect and store rainwater for the town's use. The current water level in each cistern is 10 feet deep, and the bottom of the tunnels that connect them is 6 inches below the surface of the water, making them traversable.
Within the cisterns, a panel in the wall can be opened by pulling a level, revealing a tunnel. The lever is hidden and requires a DC 15 Intelligence (Investigation) check to find. The Duchess is the only person who knows of its existence.
The tunnel used to be a part of an ancient structure, but the connections to the rest of the catacombs have become impassable rubble. The current tunnel continues and eventually connects to the surface half of a mile north. Unknown to the Duchess, the majority of this tunnel has collapsed after 100 feet from the cisterns, rendering it impassable as well. Before this rubble, 2 gray oozes wait.
D6. Guard Barracks
A large building adjacent to the Drill Field, the Daggerford Militia is headquartered here. Inside are beds, equipment, and a mess hall for the soldiers to use as needed.
Daggerford Militia
Members of the militia (lawful good guards, AC 13) were issued a suit of studded leather armor and given a spear. They dressed in colors of green and grey.
There are 100 total members of the militia, with 50 on duty at any given moment. The western gate is guarded by 6 members, while the northern and southern gates have 2 each. Another 4 patrol the outer walls. Within the town, 8 moderate the Marketplace, 2 protect the Sword Coast Trader's Bank, 10 train at the Drill Field, 6 patrol the streets of the town, and the rest on duty patrol the lands beyond the outer walls.
Commander Sherlan Miller
The commander and of the Daggerford Militia and constable to the Duchess, Sherlan Miller is the great-great-great-grandchild of the famous and powerful Commander Sherlan Spearslayer. Sherlan Miller preferred her role as commander, feeling she did not suit the diplomatic role of a constable. She spends her time in the Drill Field training with the militia.
Sherlan Miller is a lawful neutral female human veteran who has inherited Sherlan Spearslayer's +2 spear.
Wizard's Tower
Incorporated into a watchtower along the northern wall protecting Daggerford is a three story tall wizard's tower made of blue stone. The owner was a human archmage named Delfen Ondabarl. He, along with several other, retired to Daggerford once his adventuring years were finished. That was nearly 150 years ago.
Presumed dead in 1385 DR, he mystically and suddenly returned to the town in 1485 DR, appearing not a day older. Delfen never explained what transpired in his past 100 years. However, he is not present the night of the raid. The wards he has placed on his tower prevent Thoss Fyurnen from toppling it.
D7. Farmlands
Two clusters of farms flank Daggerford: the Eastern Farmlands to the east and the Western Farmlands to the west, both half of a mile away. Both are patrolled by members of the Daggerford Militia and are considered some of the calmest and safest stretches of land along the Trade Way. Together, the Farmlands feed much of Daggerford.
D7a. Eastern Farmlands
Several farms and a graveyard have been built on this large hillside. They hold lush apple orchards and cattle ranches.
Churlgo Farm. The most prominent farm here is owned by an elderly halfing woman here named Eustachia Churlgo (lawful good commoner). She has several children and grandchildren, but many have moved out and currently live elsewhere. Among those who remain include Paldo Churlgo and his teenage son Milo Churlgo (lawful good male halfling commoner and noncombatant).
The farm was established by Eustachia's great-great-great-grandfather Garrith Churlgo and is infamous for its cow-milk cheese. Many find Churlgo Cheese downright revolting, many find it delectably delightful, and all find it extremely stinky.
D7b. Western Farmlands
Several farms have been built along a small stream that eventually merges with the Delimbiyr River. They hold lush apple orchards and corn and grain fields.
Willow Wishing Well. In the deepest section of the stream is a small island dotted with several trees, including a single large willow. An old well hides here, and 50 feet down the well opens up into a large underground cave home to a pool of freshwater and a species of harmless giant mushrooms. Hidden here under the silt is the Sword of Peredus.

Attack Plan
The whole of the Cult of the Dragon is not present. In fact, only a cell of the Obsidian Talon is here, led by Frulam Mondath, a Wearer of Purple. Her mission was given to her by the Black Wyrmspeaker Rezmir: strike Daggerford, loot every last valuable, and bring it back to her in the Mere of Dead Men.
While Rezmir does not care about casualties, Frulam Mondath recognizes that if too many civilians die during this attack, it will draw major unwanted attention from the Lords' Alliance. This raid's purpose is treasure, not intimidation or destruction.
The raid begins when the moon rises (about 2 hours before midnight) and lasts for 3 hours.
Cultist Forces
The morning before the raid, the majority of the cult's forces override the Western Farmlands while preventing anyone from fleeing to Daggerford to warn them. During the day, they make their final preparations.
Frulam Mondath
The leader of this cell of the Cult of the Dragon, Frulam Mondath is a Wearer of Purple. She is the mastermind behind this raid, and directs her forces while remaining outside of Daggerford in the Farmlands. She is the only person in this raid who knows where to find Rezmir.
Frulam Mondath is a lawful evil female human and a 5th-level Draconic Bloodline Sorcerer (black dragon lineage).
Marr Coalborne
The half-son of Thoss Fyurnen, Marr Coalborne is a warrior and a bully. Trained with the sword and shield, he has served under his father for years. When the Cult of the Dragon approached Thoss to recruit him for this raid, Marr was eager to assist and pledged his loyalty to the cult.
Marr Coalborne is a neutral evil male half-black dragon veteran. The other half of his bloodline is human.
Cultists
Only 50 members of the Cult of the Dragon have assembled for the raid on Daggerford. Of the group, there are 34 dragon cultists, 14 dragonclaws, Marr Coalborne, and Frulam Mondath. They are all members of the Obsidian Talon.
Frulam led the dragon cultists and dragonclaws to the Western Farmlands from their hidden underground camp a few hours before nightfall. When they arrived, they dispatched the farmers and patrolling militia and hid in farmhouses to observe Daggerford until the raid began.
Kobolds
Over 100 kobolds have been rallied from the Lizard Marsh. They have little structure, but worship Thoss Fyurnen as a god and will follow any order from the cultists. They argue with and annoy the hired marauders.
Marr helped the cult rally kobolds from the Lizard Marsh and arrived with them at the Western Farmland just after the sun set this night. The trek took all day, and after a short rest while waiting for the raid to begin, they are eager to pillage and loot Daggerford.
Thoss Fyurnen
Bribed into joining the raid by Frulam Mondath, Thoss Fyurnen is a black dragon tasked with intimidation, aerial support, and breaching fortifications. Even so, Thoss isn't too energized during the raid, as Frulam persuaded him to not kill too many civilians. If his hit points are reduced to below half their maximum during the night, Thoss retreats back to his lair in the Lizard Marsh. It takes him 1 hour to fly from there to Daggerford (and vice versa).
Thoss Fyurnen is a chaotic evil male adult black dragon. He is immune to the paralyzed and unconscious conditions, has the Magic Resistance trait, and is CR 15.
Hired Marauders
To flush out their numbers, the Cult of the Dragon hired 100 marauders from Julkoun and Secomber, two towns a few days travel up the Delimbiyr River. Half of these marauders are pretending to be regular civilians of Daggerford when night falls.
The cult did not disclose their identity to those they hired, but many of the marauders have their suspicions. They are still loyal to the coin.
Tracking Casualties
There will be casualties on both sides of the battle tonight. Track the total number of each group, subtracting from that number as the appropriate forces are killed during the night: militia guards, marauders, kobolds, dragon cultists, and dragonclaws.
Frulam Mondath, Marr Coalborne, Thoss Fyurnen, Sir Isteval, and Duchess Morwen Daggerford should not die tonight, as they have parts to play in later chapters.
Step 1- Sabotage Defenses
When the moon fully rises over the mountains to the east, the first step of the cult's attack will begin. Within the town, 50 marauders have spent the day pretending to be regular citizens. Now, they act, taking out the town militia that guard the gates.
From within Daggerford, 22 marauders break into west gate, killing the 6 guards who stand watch there, while two groups of 10 marauders each give the north and south gate the same treatment (which each only have 2 guards on watch). The same moment these gates are seized, Thoss Fyurnen approaches from the west.
Step 2a- Dragon Attack
Thoss Fyurnen blends in with the night sky, being a black dragon. Still, a few townsfolk who are awake and outside of their homes spot him in the moonlight as he approaches from the west. They will be to late to warn the town.
When Thoss is 100 feet from Daggerford's outer wall, he lets out an earthshaking roar. This roar serves two purposes: to intimidate the people of Daggerford and to let the hidden marauders know the raid has begun.
Thoss is carrying two large wooden cart in his talons. Packed within are a total of 16 marauders and Marr Coalborne. Once Thoss enters the town, he places both carts in the road outside of the River Shining Tavern before taking to the skies again.
The black dragon's next targets are along the town's outer wall. Any watchtowers that are manned or gates that are closed will receive Thoss's acid breath attack one by one, allowing the cult's ground forces to enter the town unimpeded.
Step 2b- Burn Farmlands
From her vantage point at the Eastern Farmlands, Frulam Mondath dictates the attack. As soon as she sees Thoss's form in the night sky, she takes 20 kobolds, 4 dragon cultists, 1 dragonclaws, to the Eastern Farmlands and orders 20 kobolds, 10 dragon cultists, and 6 dragonclaw to remain with her at the Western Farmlands. She sends the rest of her forces to rush the town gates. In the meantime, the cult burns both Farmlands to the ground.
The cult's ground forces will approach the town through all three gates: half through the west gate and the rest split between the north and south gates. By this point all of the gates have been seized by marauders inside Daggerford, and the outside forces can enter unimpeded.
Step 3- First Strike
Right now, there are three large troves of treasure for the cult to loot. The first is the Sword Coast Trader's Bank, the second is the Castle Vaults, and the third is the River Shining Tavern. The first two will be handled later in the night because they aren't going anywhere, but the wealth of the tavern lies in its patrons. Robbing them while the town plunges into chaos gives the raiders a chance to claim a haul of treasure before the patrons flee to safety.
River Shining Tavern
Led by Marr Coalborne, a group of 16 marauders break into the River Shining Tavern, where the party resides. Another 8 marauders pretending to be patrons wait inside, joining Marr as soon as he enters.
Marr is willing to kill a few patrons to get what he wants, especially if it frightens the others into submission. Once he is in control of the tavern, Marr directs the marauders to go around the place collecting every shiny thing into sacks and haul them out. The marauders drop the loot off at the closest gate, which is controlled by the marauders at this point.
The cult gains coins worth 5,000 gp and treasures worth an additional 5,000 gp from the River Shining Tavern.
Step 4- Loot Everything
At this point, the raid is in full swing. The town militia had been caught off guard, but still managed to eliminate 10 marauders, 15 kobolds, and 5 dragon cultists before retreating. Of the 50 guards currently on duty, many are slain, and only 10 of them make it to the keep.
Now, each of the three entrances to Daggerford are guarded by 8 marauders, 4 dragon cultists, and 1 dragonclaw. Besides Marr Coalborne and his remaining 16 marauders, there are now 34 marauders, 45 kobolds, 8 dragon cultists, and 4 dragonclaws in Daggerford, with Thoss Fyurnen still flying overhead.
Everything the raiders successfully loot is taken and dropped off outside the city gates, and the kobolds and dragon cultists from the Western Farmlands come down to haul it back to Frulam Mondath.
Marketplace
The Marketplace is where most of the coin within Daggerford changes hands, and during the night all of the merchants' coins and goods are locked tight within their carts and chests, watched by 8 militia guards.
Frulan Mondath has sent 12 marauders, 10 kobolds, and 4 dragon cultists to loot the Marketplace. They dispatch the guards stationed here and begin looting, using the dragon cultist's acid magic to break any locks. The raiders are then intercepted by Sir Darfin Floshin and Sir Isteval and are forced to retreat. When both knights return to Ducal Castle, the raiders return to finish the looting.
The knights each suffer 15 points of damage, and 6 marauders, 6 kobolds, and 2 dragon cultists are killed by the time the Marketplace is cleared.
If the cult successfully loots the Marketplace, they gain coins worth 10,000 gp and treasures worth an additional 15,000 gp.
Treasures
People buy many trinkets, baubles, and other items to enjoy or show off. These can include artworks, fine dishware, gemstones, jewelry, merchandise, or even well crafted weapons and armor. The raiders take whatever treasures they think are valuable.
Not every treasure needs to be identified, but if needed, roll on the Treasures table in Appendix F.
Fairfortune Hall
Frulam Mondath has directed 6 marauders, 10 kobolds, 4 dragon cultists, and 1 dragonclaw to assault Fairfortune Hall. When they arrive, the shrine is locked up with 50 commoners and Priest Curran Corvalin inside. The raiders will gather wood and hay around the building to create flames in an attempt to smoke them out. Fairfortune Hall's walls are made of stone, so the building will not burn down, and because of the shrine's lack of windows and the raider's poor planning, it takes them a full hour to properly smoke the civilians out. If the raiders are successful, they slay 10 commoners and send the rest running to Ducal Castle.
If the cult successfully loots Fairfortune Hall, they gain coins worth 2,000 gp and treasures worth 3,000 gp.
Sword Coast Trader's Bank
Frulam Mondath has ordered Marr Coalborne, 16 marauders, 2 dragonclaws, and Thoss Fyurnen to break into the Sword Coast Trader's Bank. When they arrive, it is guarded by 2 town guards and is locked tight, but no one is inside. They kill the guards and Thoss Fyurnen uses his breath weapon to melt through the bank's walls, allowing the raiders to pilfer its contents.
If the cult successfully loots the Sword Coast Trader's Bank, they gain coins worth 35,000 gp.
Everything Else
Frulam Mondath has dispatched 20 marauders, 25 kobolds, and 1 dragonclaw to systematically move through the town, breaking into homes and taking all of the treasure they can.
The dragonclaw oversees and directs 5 groups of 4 marauders and 5 kobolds each around the town. These groups take an hour to loot everything they can, dropping off what they find at the gates every ten minutes. The party might encounter one of these roving groups while moving through the town.
If the cult successfully loots the rest of Daggerford, they gain coins worth 25,000 gp and treasures worth 25,000 gp.
Step 5- Assault the Keep
Marr Coalborne approaches the keep with 16 marauders, eight of which each hold a commoner hostage. 30 kobolds follow behind, but don't interfere yet.
Marr challenges the citizens in the keep to a showdown: one of them must face him in one-on-one combat to the death. If they refuse, he kills the hostage commoners, and the raiders assault the keep. If they accept and win, the commoners are spared, and the raiders will all leave immediately. If they accept and lose, they must hand over everything in the castle vaults, but the commoners are still spared, along with the survivors in the keep.
Whatever outcome, Marr and his forces are true to his word. If Marr is defeated, his allies drag his body away and stabilize him.
If the raiders do end up assaulting the keep, they must contend with the 25 guards still defending it, as well as Duchess Morwen Daggerford, Sir Isteval, and the party members. The battle could go either way, but in any case, the Duchess, the knight, and the half-dragon all survive.
If the cult is successful in seizing everything in the castle vaults, they gain coins worth 25,000 gp and treasures worth 50,000 gp.
Step 6- Return to the Farmlands
Cultists, kobolds, and marauders finish hauling everything to the Western Farmlands, where 20 kobolds, 10 dragon cultists, 6 dragonclaws, and Frulam Mondath are waiting. Together, they throw everything down the nearby well into the the cave below.
About 75 marauders will have survived the night. The cultists pay them each 100 gp each, taken from the night's winnings. They allow the marauders to each keep a few trinkets they found, but nothing too valuable.
Willow Wishing Well
The loot dropped down the well lands in a small cave, and is then gathered up by 20 lizardfolk who have been waiting here all night by order of the cult. The lizardfolk are from the Lizard Marsh, and swam up a secret underwater tunnel to this cave. They pack up everything into waterproof barrels and sacks and guide it all back down the tunnel to the cultist's underground camp.
Step 7- Scatter
Once the loot is dropped and the marauders are paid, the surviving raiders scatter.
Marauders. The marauders run east past Daggerford into the Sword Hills. Their trail can be followed without making a check.
Cultists and Kobolds. The kobolds are thrown in the Delimbiyr River and forced to swim back to the Lizard Marsh, and are soon followed by the cultists themselves. They try to hide their trail to the river, which requires a DC 13 Wisdom (Survival) check to follow.
Thoss Fyurnen. If the black dragon hasn't already returned to the Lizard Marsh in the west, he does so now.
Events Unfolding
While the previous section told the plans for the raid from the cult's perspective, this section details how the night will go for the party. They must escort civilians to safety, protect who they can from the raiders, and survive the night, which culminates in a showdown of champions.
The Dragon Roars
When marauders seize the gates and the dragon appears in the western night sky, the few townsfolk who bear witness begin to panic. Before this panic has a moment to spread, the dragon roars, shaking the earth and air around Daggerford (see Attack Plan - Step 2a). This subjects every creature within the city not allied with the cult to the dragon's Frightening Presence action. This roar is what plunges the entire town into chaos.
Townsfolk rush around the streets in a frenzy while trying to make their way to the protection of Castle Ducal. This chaos prevents the town militia from martialling as fast as they could, giving the outside raiders time to enter Daggerford.
Moments after the dragon roars, he puts down two large wooden carts filled with marauders and a half-dragon in front of the River Shining Tavern before taking off back to the skies.
The Tavern is Robbed
The dragon's roar is heard echoing through the walls of the tavern, sending everyone into a terrified quiet. A moment passes, and a heavy thud can be heard outside the building. Then, a half-black dragon equipped with splint mail, a shield, and a longsword barges into the tavern, immediately followed by 16 marauders. 8 patrons rise and draw their weapons, leveling them at the others around them; they were marauders in hiding (see Attack Plan - Step 3).
The half-dragon then shouts for all the patrons to hear: "My name is Marr Coalborne, and this is a robbery! No one needs to be hurt, if you just hand over all your valuables." After a pause, an older human man, Lady Anteos's husband, stands up and begins telling the intruders off, only to receive Marr's acid breath attack in response, killing him. Marr invites anyone else to try to take a stand. Make it clear to the party that attempting to fight back at this point will only result in an early grave.
The marauders go table by table stuffing every valuable thing each patron has into sacks, including the party's gold and Starting Treasures, and then begin to leave. When only 8 marauders and Marr remain, a sun elf named Sir Darfin Floshin and a human paladin named Sir Isteval burst in through the back door, Sir Darfin casting a slow spell on the remaining intruders and Sir Isteval using his Leadership trait to buff the party, helping them fight back. Marr retreats.
The party's loot is already taken away when the battle happens, and the two retired adventurers call upon the party to guide these townsfolk to the Ducal Castle while they separate and continue through the town.
Retreat to the Keep
Now that the raid has begun, the town has fallen into chaos. Many civilians have already fled to the walls of Ducal Castle, and now the party must guide the patrons of the River Shining Tavern there as well.
Even though the dragon roars above and will occasionally land on a building, he does not end up facing the party or the civilians following them.
Family in Danger
On their way to the keep, the party encounters 8 kobolds harassing a family of four commoners: a mother, a father, a child, and a baby. If the party challenges the kobolds, they turn their attention away from the family and throw insults at the party. Being cowards, the kobolds will only attack if the party strikes first and flee if four or more of them are killed. Alternatively, the party can attempt a DC 11 Charisma (Intimidation) check; on a success, the kobolds flee into the town.
The civilians will follow the party to the keep.
Shoring up the Defenses
Most of the town populace makes it to the keep, and now hide within the castle itself or in the courtyard surrounding it. Already present are Duchess Morwen Daggerford and Commander Sherlan Miller. Soon after the party arrives, Sir Darfin Floshin and Sir Isteval show up with 50 or so more civilians.
Only 10 of the 50 on-duty town militia members make it back to the castle, the rest either killed or knocked unconscious somewhere in town. From the populace, the militia is able to muster an additional 50 guards, but they are wary to venture back out while the dragon flies overhead.
However, Commander Sherlan Miller will command three teams of 5 guards each to use the cisterns to infiltrate the town and search and rescue civilians while avoiding confrontation with the raiders. Over the course of the next hour, these teams will occasionally return civilians to safety.
Another 10 guards are posted to the top of the courtyard's walls to fire arrows at the dragon if he gets too close to the keep. Their goal is to keep the dragon's attention away from the keep and the civilians hiding here.
The remaining militia and the handful of resident healers that reside in Daggerford tend to anyone in need of healing or solacing. They have twenty healer's kits on hand. While they are not willing to lend any of these kits to the party, they will gladly heal the party members of any injuries they might have already suffered. Now, and at any point during the raid when the party returns to the castle, a character can spend 10 minutes with the healers to recover all lost hit points.
Know Your Enemy
Sir Isteval finds and thanks the party for their valor, but tells them that the night is far from over. He calls upon them to continue to lend their aid. If the party accepts, he introduces them to Duchess Morwen Daggerford who thanks the party again before reviewing the current state of the town's defenses.
The Duchess has already used a sending stone to contact Waterdeep, but due to a orc horde approaching from the northeast and an incident within the city, they are not able to send immediate aid to Daggerford's defense. However, a detachment of griffon riders will arrive at down.
As the dragon continues to ravage the town, a grim look overcomes Sir Isteval. He will inform the party that he has faced this dragon before, and will tell them his name: Sjachmalsvir, better known as Thoss Fyurnen. He tells them he will craft a plan to deal with him and that they should focus on helping the Duchess.
The Duchess asks the party if they'd rather help the guards on the courtyard walls and watch the town or help the guards tending to the civilians. Whatever their choice, they should remain at the keep for now.
Fairfortune Hall in Flames
One hour after the attack begun, those on top of the wall will begin to see smoke rising from Fairfortune Hall on the other side of town. At about the same time, a team of guards returning to the keep will inform the Duchess that several dozen civilians have holed up in Fairfortune Hall, but are in need of help (see Attack Plan - Step 4).
The Duchess then asks if the party will sneak through town and help evacuate Fairfortune Hall. She tells them the guards will assist them in guiding the civilians back once they have secured the Hall.
If the party agrees, she tells them they can use the cisterns to sneak out of the keep.
Roving Raiders
On the way to the Hall, the party encounters a roving band of raiders: 4 marauders and 5 kobolds. They carry four partially filled sacks, each with 100 gp worth of coins and treasures.
The party can either sneak past them (DC 13 Dexterity (Stealth) group check) or engage them in combat. If 5 or more raiders are killed, the rest flee into the town with what loot they can carry.
To The Hall
Fairfortune hall faces south towards the Drill Field, and is surrounded by a 3-foot wide alleyway on its other three sides. The building's only set of doors in a front set of double doors, but it does have two windows on each side (half of which are broken). All of these possible entrances are currently blocked with wooden furniture on the inside. A Small bell tower that doubles as a chimney rises from the room at the back of the building, and a Small creature can squeeze down the chimney into the Hall.
Raiders have gathered bundles of wood and straw around each of the windows, and a wood plank has been placed over the chimney. The straw was lit with a torch and is burning; this is what has created the pillars of smoke rising from the building. Those raiders are currently in the Drill Field (6 marauders, 10 kobolds, 4 dragon cultists, and 1 dragonclaw) and are arguing about what to do next while gathering more wood and straw. Sneaking past the front of the building requires a DC 13 Dexterity (Stealth) check to avoid being spotted.
Shoving open the front door and the furniture behind it requires a DC 17 Strength check. The furniture blocking the windows and door, as well as the front doors itself, are Large objects made of wood. If destroyed, the way becomes passable for any Medium or smaller creature.
Fairfortune Hall has two rooms: the first is a chapel with a dozen wooden pews (which have been moved to block the windows and front doors); the second is a preparation room in which only the priest is typically allowed. In the chapel, 50 commoners quietly huddle together, terrified to make a sound. The resident priest, Curran Corvalin, is the most level-headed person present, and if he learns the party is trying to enter, he will move furniture to allow them to enter through a window or door. He then replaces the furniture.
Once inside, Curran Corvalin tells them the raiders will be back to break into the Hall very soon. He'll use his magic to assist the party when they come.
Objects
Objects have statistics, including HP, AC, damage resistances and immunities, and hardness (the minimum damage a single instance of damage must deal in order to affect the target's HP).
The different levels of Hit Points equals the the object's size (Tiny/Small/Medium/Large).
Use the statistics below if your party needs to destroy a piece of wooden furniture or a section of a stone wall. If an object was specifically crafted to defend against attacks, double its maximum HP.
Canvas/Rope Hit Points: 1/5/10/15 AC 11 Hardness 0
Immunities: psychic Resistances: bludgeoning Vulnerabilities: fire, slashing
Wood Hit Points: 5/10/15/25 AC 15 Hardness 5
Immunities: psychic Resistances: bludgeoning, piercing Vulnerabilities: fire
Stone Hit Points: 15/25/35/55 AC 17 Hardness 10
Immunities: poison, psychic Resistances: bludgeoning, piercing, slashing Vulnerabilities: thunder
Iron Hit Points: 10/20/30/45 AC 19 Hardness 10
Immunities: poison, psychic Resistances: bludgeoning, piercing, slashing Vulnerabilities: acid
The Raiders Surround
A minute after the party makes their way inside Fairfortune Hall, the raiders from the Drill Field attack. They surround the building, breaking the rest of the unbroken glass while whooping and hollering. While the kobolds claw at the door and blocked windows, the marauders and cultists add more fuel to the fires in an attempt to smoke everyone out. If the party hasn't moved the wooden plank covering the chimney, the building will fill up with smoke in 10 minutes, causing everyone within to begin suffocating.
After 1 minute, the raiders break down the front door, clearing the way for creatures to move in and out of the building. The first wave of raiders to enter includes 4 marauders, 6 kobolds, and 2 dragon cultists. After three rounds, the rest of this group of raiders join the fight (2 marauders, 4 kobolds, 2 dragon cultists, and the dragonclaw). Once two-thirds of the raiders are defeated, the rest flee to the Drill Field.
The Duchess sent 15 guards to help the party escape; they arrive once the raiders begin to flee the Hall into the Drill Field. They engage the remaining raiders, but as soon as the battle begins, Thoss Fyurnen lands and uses his Acid Breath on everyone in the Drill Field. There are no survivors, and Thoss Fyurnen takes off once more.
The party witnesses this, and is left to carefully guide the civilians back through the town on their own. Have the party make a DC 13 Dexterity (Stealth) group check; on a failure, they encounter another band of roving raiders (4 marauders and 5 kobolds). Otherwise, they make it back to the keep safely.
Veterans' Strike
The party returns and are now recognized as heroes to all within the keep. The healers have just enough healers kits to heal the party back up to full hit points before they run out.
With Thoss Fyurnen as the most formidable enemy tonight, Sir Isteval has provided Duchess Morwen Daggerford a plan to take care of him. Sir Isteval will sneak over the north outer wall to lure the dragon away and engage it in combat. Sir Darfin Floshin will join him, offering to cast the earthbind spell to ground the dragon. Commander Sherlin Miller and Priest Curran Corvalin will join as well, and the Duchess will send an additional 10 guards with them. The strike takes place two hours after the raid began.
The party is not expected to join this strike, and is even encouraged not to if they offer.
A Bitter Victory
After the party returns, they can choose to view the battle between the veterans and Thoss Fyurnen from the walls of the keep. If they do, they will witness the battle taking place 300 feet north of Daggerford.
A moment later, everyone will see the dragon take to the sky, wounded, and traveling west. Thoss Fyurnen has retreated.
About ten minutes later, a single survivor returns to the keep: Sir Isteval. The others had all perished during the fight, except for Curran Corvalin, who was abducted. The dragon also took the +2 spear Commander Sherlin Miller wielded. Sir Isteval had survived, but was reduced to 10 hit points.
The knight tells everyone that they can mourn once the night is over, but for now there is still work to do.
Champion Showdown
As the third hour of the raid finishes, the raiders noticeably begin hauling their loot out of town. However, a large group of them gather together and begin to march to the keeps front gate, stopping just outside of the range of the guards on the keep's walls (see Attack Plan - Step 5).
Marr Coalborne walks forward from the group, sword in sheath. Following him are 16 marauders holding 8 commoners hostage, weapons ready. The rest of the raiders present include 30 kobolds and 10 marauders.
Marr hollers out a challenge to the group. "Send your strongest warrior forth! We will duel in a battle of champions! If you win, we leave this town. If we win, you hand over every coin, jewel, and treasure in the castle vaults. And if you refuse," He gestures to the hostages behind him, "they die, and we attack. So what will it be?"
If the party stalls for longer than 10 minutes, Marr takes it as a refusal of his challenge. If the showdown begins and anyone interferes, Marr and the raiders attack the keep.
Duchess Morwen Daggerford is stubborn, but will not chose the treasure in the castle vaults over the lives of those in the keep. Even with 30 guards remaining, she believes the casualties will be too great to risk fighting back. She calls for 10 of the guards to begin hauling everything from the vaults up to the courtyard before turning to the party. "After everything you have already done for Daggerford, I do not expect you to put your life on the line once more. But, I will still ask: will one of you go and stand against that monster?"
If no one accepts, Sir Isteval steps forward, offering to fight. While heavily wounded, he knows that even in the face of insurmountable odds, he will fight. If for some reason Sir Isteval cannot step forward, the Duchess will accept the challenge instead.
It is very unlikely for any opponent within the keep to stand against Marr Coalborne and win. Whichever champion is reduced to 0 hit points first loses, and their body is quickly retrieved by their allies and stabilized. Whatever the outcome, Marr and the raiders honor his word. Whether or not they are able to take the treasure, they are the last raiders to leave Daggerford.
Anyone who succeeds on a DC 13 Wisdom (Perception) check while on the keep's walls sees the raiders retreating to the west.

The Sun Rises
After the raiders leave, some civilians are too scared to leave the protection of the keep while others rush back to their homes to assess the damage. The Duchess, and Sir Isteval, if conscious, somberly thank the party for their help.
The Duchess immediately begins ordering the remaining militia to sweep through the town and secure the perimeter of Daggerford. She asks the staff of the manor to go through after and assess the damage and losses of the town.
Of the 1,300 citizens of Daggerford, there were less than 100 casualties, and most were members of the militia. However, nearly every valuable thing has been looted from the town. If the party checks with the Duchess after a day or two, she can tell them that Daggerford lost roughly 200,000 gp worth of coins and treasures (minus whatever the party might have been able to protect during the night).
Funeral for the Fallen
As the sun rises, Sir Isetval goes to the place he and his allies fought against Thoss Fyurnen. There, he offers a mournful prayer to Lathander. If he encounters the party, he will inform them that this evening he will be holding a funeral for all who died tonight, and asks if they will join him. He also asks the party to look for Curran Corvalin if they ever go after Thoss Fyurnen.
The funeral is held at dusk at the Eastern Farmlands graveyard. Most of Daggerford's populace attend. As it concludes, Sir Isteval offers these final words: "Remember the fallen, but do not look back. We cannot change what has happened, but we can change the future."
Griffon Riders of Waterdeep
In the morning, 6 griffons, 5 griffon calvary riders, and 1 griffon calvary knight named Savra Belabranta (neutral good human female) arrive with six crates of supplies, food, water, and essentials. Savra Belabranta worships Tyr and is a member of the Order of the Gauntlet.
Savra informs the Duchess that their group will continue to ferry supplies to Daggerford, but that they do not have the forces to pursue the raiders as of now.
Duchess's Request
Once the Duchess learns the Griffon Riders won't follow the raiders, she finds the party. She calls upon them to follow the thieves and retrieve the stolen gold and treasure, promising them 10% of whatever they can return. Duchess Morwen also asks the party to find out where they're taking the money and why.
Daggerford can only currently offer to replenish whatever basic supplies, weapons, or armor that the party lost during the night. Until the party departs, they can rest free of charge at the River Shining Tavern.
Art Credit
The Wormworld Saga - Chapter 2, Panel 1 by Daniel Lieske
Chapter 25: The Cult of the Dragon
Mission
The Cult of the Dragon's final goal is the summoning of Tiamat into Faerûn. To do so, they need the ritual power of a sect of the Wizards of Thay as well as hoard worthy of the Queen of Dragons and a multitude of sacrificed souls by the day the ritual begins: the Day of Ruin.
During the course of the adventure, the cult is working to gather and protect a number of components: treasure, sacrifices, support, and the Dragon Masks.
Gather Treasure
As a part of the summoning ritual, the cult must gather a hoard worth 10 million gold pieces. To do so, they have a few tactics.
Raid, Pillage, and Plunder. The Cult of the Dragon will take the majority of their treasure through violence by raiding towns and villages throughout the Sword Coast. With dragons on their side, they can pillage lesser towns with ease. Most of the treasure they require will be gathered this way.
Threats, Extortion, and Blackmail. As the cult gains political power and influence, they will use fear and intimidation to extort any population they can. Many will gladly give up their treasure when under the threat of a dragon attack, if it means their lives will be spared.
Taxes, Fundraising, and Donations. As the cult's support grows, so do their numbers. There will be several benefactors that will give large donations to the Cult of the Dragon of their own free will. Additionally, they will collect slivers of wealth from within their own ranks.
Gather Sacrifices
As a part of the summoning ritual, the cult must sacrifice 10,000 humanoid souls. To gather these sacrifices, they have a few tactics.
Slavery. The cult will cut deals with the drow of the underdark and the yuan-ti of Najara to gather a multitude of slaves. These will make up the cult's workforce until the Day of Ruin.
Abduction. When the cult claims dominion over areas of land as they get closer to their goal, they will abduct and steal individuals from their homes, travelers on the road, and survivors of their battles.
Cultists. When the time comes, the cult will require lower-ranking members of the cult to give up their lives for the ritual. This information will not be revealed to many cultists until that day.
Gather Support
For both of the above components of the ritual, the Cult of the Dragon will cultivate a political presence. Initially, this will hide under the alias the Church of the Scaly Way, but as they grow bolder, they will openly preach, recruit, and fundraise in smaller cities as the Cult of the Dragon.
The Mask of the Dragon Queen
The ritual also requires the Mask of the Dragon Queen, an extremely powerful magical artifact. The Mask of the Dragon Queen is constructed when the five Dragon Masks are brought together. Currently a Dragon Mask is worn by each of the five Wyrmspeakers of the Talons of the cult.
Summon Tiamat
As these components are being gathered, opposition to the Cult of the Dragon will grow. Eventually, the fight against the cult will become a war.
When the Day of Ruin arrives, the cult will have become a fledgling empire, and at its heart, the Well of Dragons. Here, the cult will perform a powerful ritual to bring the Dragon Queen into the Material Plane.
Hierarchy
The Cult of the Dragon is split into five large factions that work with (an sometimes against) each other to further the cult's objective. Each of these five factions are associated with one of the primary five types of chromatic dragons.
| Cult Faction | Dragon Type | Wyrmspeaker |
|---|---|---|
| The Obisidian Talon | Black | Rezmir |
| The Ivory Talon | White | Varram |
| The Jade Talon | Green | Nerovain |
| The Cobalt Talon | Blue | Galvan |
| The Crimson Talon | Red | Severin |
The leader and most powerful member of each Talon of the cult is called a Wyrmspeaker. The next in line are the Wearers of Purple, individuals in charge of leading the smaller cells of each Talon under the Wyrmpeakers directive. Below them, the ranking of cultist is as follows, from most powerful to least powerful: dragonsoul, dragonfang, dragonwing, dragonclaw, and dragon initiate (called dragon cultist).
When a cultist is first initiated into the Cult of the Dragon's ranks, they are given a special tattoo called a dragonblood tattoo. They can only ascend the ranks if promoted by a Wearer of Purple, but not beyond the rank of dragonsoul. A cultist, usually a dragonsoul, can only be promoted to a Wearer of Purple by the Wyrmspeaker of that Talon. If a Wyrmspeaker falls, then Severin the Red must select which Wearer of Purple will rise to take their place.
Wyrmspeakers
Each Talon of the Cult of the Dragon is led by a single individual: a wyrmspeaker. Together, the five wyrmspeakers make up the Inner Circle of the cult and the five Dragon Masks. Of the five, the Red Wyrmspeaker Severin Silrajin is the primary leader of the Cult of the Dragon and the true mastermind behind the plot to summon Tiamat.
Appendix B: New Spells
Draconic Bolt
cantrip evocation
Casting Time: 1 action
Range: 60 feet
Components: V, S
Duration: Instantaneous
You hurl a bolt of draconic energy at a target in range. Make a ranged spell attack. On a hit, the target takes damage equal to 1d6 + your spellcasting modifier of a type associated with a dragon you choose when you learn this spell: blue, bronze (lightning); black, copper (acid); green (poison); brass, gold, red (fire); silver, white (cold).
At Higher Levels. This spell's damage increases by 1d6 when you reach 5th level (2d6), 11th level (3d6), and 17th level (4d6).
Appendix C: Magic Items
Dragonblood Tattoo
Wondrous Item (tattoo), uncommon (requires attunement)
A dragonbood tattoo requires special ink crafted from dragon's blood and a needle carved form a dragon's tooth. The tattoo's effects are dependent on the type of dragon's blood used.
Only a creature that knows how to create this tattoo can apply it to another. Doing so requires a special ink crafted from dragon's blood and a needle carved from a dragon's tooth.
Tattoo Attunement. The creature receiving this tattoo must have an open attunement slot. If it does not, the tattoo fades upon completion, having no effect. Removing this tattoo and breaking its attument requires a remove curse spell or similar magic.
Hidden Ink. Once you are attuned to this tattoo, it becomes invisible to creatures without a dragonblood tattoo, unless that creature is a Dragon.
Draconic Tongue. While you have this tattoo, you know Draconic.
Draconic Spark. This tattoo grants benefits associated with a specific damage type related to the type of dragonblood used in the tattoo:
| Dragon | Damage Type | Dragon | Damage Type | |
|---|---|---|---|---|
| Black | Acid | Brass | Fire | |
| Blue | Lightning | Bronze | Lightning | |
| Green | Poison | Copper | Acid | |
| Red | Fire | Gold | Fire | |
| White | Cold | Silver | Cold |
If you are a dragonclaw or higher ranking member of the Cult of the Dragon, you are have resistance to this damage type.
Draconic Bolt. While the tattoo is on your skin, you know the draconic bolt cantrip and can cast it at will. If you are also a dragonclaw or higher ranking member of the Cult of the Dragon, its damage die increases to 1d8.
Sword of Peredus
Weapon (longsword), uncommon (requires attunement by a creature of good alignment)
You gain a +1 bonus to attack and damage rolls made with this magic weapon.
While you hold the drawn sword, it radiates bright light for 15 feet and dim light for an additional 15 feet.
Appendix D: Stat Blocks
Marauder
Marauder
Medium humanoid (any race), any alignment
- Armor Class 14 (leather armor, shield)
- Hit Points 22 (4d8 + 4)
- Speed 30 ft.
STR DEX CON INT WIS CHA 16 (+3) 12 (+1) 12 (+1) 10 (+0) 11 (+0) 10 (+0)
- Skills Athletics +5, Survival +2
- Senses passive Perception 10
- Languages Common
- Challenge 1/2 (100 XP)
Actions
Mace. Melee Weapon Attack: +5 to hit, reach 5 ft., one target. Hit: 6 (1d6 + 3) bludgeoning damage.
Shortbow. Ranged Weapon Attack: +3 to hit, range 80/320 ft., one target. Hit: 4 (1d6 + 1) piercing damage.
Dragon Cultist
Dragon Cultist
Medium humanoid (any race), any evil alignment
- Armor Class 13 (leather armor)
- Hit Points 16 (3d8 + 3)
- Speed 30 ft.
STR DEX CON INT WIS CHA 11 (+0) 14 (+2) 12 (+1) 10 (+0) 11 (+0) 14 (+2)
- Saving Throws Wis +2
- Skills Deception +4, Religion +2
- Senses passive Perception 10
- Languages Common, Draconic
- Challenge 1/4 (50 XP)
Dark Devotion. The cultist has advantage on saving throws against being charmed or frightened.
Actions
Dagger. Melee or Ranged Weapon Attack: +4 to hit, reach 5 ft. or range 20/60 ft., one target. Hit: 4 (1d4 + 2) piercing damage.
Draconic Bolt. Ranged Spell Attack: +4 to hit, range 60 ft., one target. Hit: 5 (1d6 + 2) of the damage type associated with the type of dragon it worships.
Dragonclaw
Dragonclaw
Medium humanoid (any race), any evil alignment
- Armor Class 14 (studded leather armor)
- Hit Points 33 (6d8 + 6)
- Speed 30 ft.
STR DEX CON INT WIS CHA 11 (+0) 14 (+2) 12 (+1) 10 (+0) 12 (+1) 16 (+3)
- Saving Throws Wis +3, Cha +5
- Skills Deception +5, Persuasion +5, Religion +2
- Damage Resistances same as Draconic Spark
- Senses passive Perception 11
- Languages Common, Draconic, DRSL
- Challenge 2 (450 XP)
Draconic Devotion. The cultist has advantage on saving throws against being charmed or frightened. While the dragonclaw can see a dragon or higher-ranking Cult of the Dragon cultist friendly to it, the dragonclaw ignores the effects of being charmed or frightened.
Draconic Spark. The dragonclaw is associated with one type of dragon its damage type: blue (lightning), black (acid), green (poison), red (fire), or white (cold).
Actions
Multiattack. The dragonclaw makes two attacks.
Dagger. Melee or Ranged Weapon Attack: +4 to hit, reach 5 ft. or range 20/60 ft., one target. Hit: 4 (1d4 + 2) piercing damage plus 2 (1d4) damage of the same damage type as the dragonclaw's Draconic Spark.
Draconic Bolt. Ranged Spell Attack: +5 to hit, range 60 ft., one target. Hit: 6 (1d8 + 3) damage. The damage type is the same as the dragonclaw's Draconic Spark.
Dragon's Breath (Recharge 6). The dragonclaw exhales destructive energy in a 15-foot cone. Each creature in that area must make a DC 13 Dexterity saving throw, taking 14 (4d6) damage on a failed save, or half as much damage on a successful one. The damage type is the same as the dragonclaw's Draconic Spark.
Draconic Sign Language
Among the many languages that exist, there are sign languages. One of these is called Draconic Sign Language (DRSL).
For more information on how sign languages work, see NyteShark's Character Creation document, page 4.
Frulam Mondath
Frulam Mondath
Medium humanoid (human), lawful evil (she/her)
- Armor Class 15 (draconic resilience)
- Hit Points 41 (5d8 + 15)
- Speed 30 ft.
STR DEX CON INT WIS CHA 10 (+0) 14 (+2) 14 (+2) 14 (+2) 13 (+1) 16 (+3)
- Saving Throws Con +5, Cha +6
- Skills Arcana +5, Deception +6, Perception +4, Persuasion +6, Religion +5, Stealth +5
- Damage Resistances acid
- Senses passive Perception 14
- Languages Common, Draconic, DRSL
- Challenge 5 (1,800 XP)
Draconic Devotion. Frulam has advantage on saving throws against being charmed or frightened. While she can see a dragon or higher-ranking Cult of the Dragon cultist friendly to it, she ignores the effects of being charmed or frightened.
Draconic Resilience. While not wearing armor, Frulam's AC is equal to 10 + her Dexterity modifier + her Charisma Modifier.
Spellcasting. Frulam is a 5th-level spellcaster. Her spellcasting ability is Charisma (spell save DC 14, +6 to hit with spell attacks) and she has 17 Sorcery Points (SP). She has the following sorcerer spells prepared:
Cantrips (at will): acid splash, dancing lights, message, shape water, thaumaturgy
1st level (costs 2 SP): absorb elements, caustic brew, command, featherfall, shield
2nd level (costs 3 SP): acid arrow, darkvision, dragon's breath, suggestion
3rd level (costs 5 SP): fear, fly, sendingActions
Multiattack. Frulam makes two attacks.
Dagger. Melee or Ranged Weapon Attack: +5 to hit, reach 5 ft. or range 20/60 ft., one target. Hit: 4 (1d4 + 2) piercing damage plus 5 (2d4) acid damage.
Draconic Bolt. Ranged Spell Attack: +6 to hit, range 60 ft., one target. Hit: 12 (2d8 + 3) acid damage.
Dragon's Breath (Recharge 6). Frulam exhales destructive energy in a 15-foot cone. Each creature in that area must make a DC 14 Dexterity saving throw, taking 21 (6d6) acid damage on a failed save, or half as much damage on a successful one.
LaserLlama's Alternate Sorcerer
Frulam Mondath is a Draconic Sorcery Sorcerer as shown in LaserLlama's Alternate Sorcerer.
Half-Black Dragon Veteran
Half-Black Dragon Veteran
Medium humanoid (any race), any alignment
- Armor Class 18 (plate armor)
- Hit Points 65 (10d8 + 20)
- Speed 30 ft.
STR DEX CON INT WIS CHA 16 (+3) 13 (+1) 14 (+2) 10 (+0) 11 (+0) 10 (+0)
- Saving Throws Str +6, Con +5
- Skills Athletics +6, Perception +3, Stealth +5
- Damage Resistances acid
- Senses Blindsight 10 ft., Darkvision 60 ft., passive Perception 13
- Languages Common, Draconic
- Challenge 5 (1,800 XP)
Actions
Multiattack. The veteran makes two longsword attacks.
Longsword. Melee Weapon Attack: +6 to hit, reach 5 ft., one target. Hit: 7 (1d8 + 3) slashing damage, or 8 (1d10 + 3) slashing damage if used with two hands.
Heavy Crossbow. Ranged Weapon Attack: +4 to hit, range 100/400 ft., one target. Hit: 6 (1d10 + 1) piercing damage.
Acid Breath (Recharge 5–6). The veteran exhales acid in a 15-foot line that is 5 feet wide. Each creature in that line must make a DC 13 Dexterity saving throw, taking 27 (6d8) acid damage on a failed save, or half as much damage on a successful one.
Bonus Actions
Shortsword. Melee Weapon Attack: +5 to hit, reach 5 ft., one target. Hit: 6 (1d6 + 3) piercing damage.
Second Wind (1/Short Rest). The veteran recovers 11 (1d10 + 5) hit points.
Reactions
Parry. The veteran adds 3 to its AC against one melee attack that would hit it. To do so, it must see the attacker and be wielding a melee weapon.