Forge of the Nightscales: Table of Contents
-
Introduction
- 3 Introduction
- 3 Opening Crawl
- 3 Setup
- 4 Adventure Synopsis
- 5 Running the Adventure
-
Blasyn Outpost
- 6 Key Locations
- 6 Rumors Heard in Blasyn Outpost
- 7 Approaching Choruk'Ed
-
The Mountain Door
- 11 1. End of the Trail
- 11 2. The Great Door
- 12 3. The Rift Hall
- 12-13 4 and 4a. Marksmens' Stations
- 13 5. Trandoshan Cave
- 13 6. Prisoner Cave
- 13 7. Fire in the Hole
- 14 8. Trandoshan Commons
- 14 9. Shaman's Lair
- 14-15 10. The Grand Stair
- 15 11. Trandoshan Quarters
- 15-16 12. Great Ulesk
- 16 13. Mandalorian Statue
- 16 14. Bunk Room
-
The Glitterhame
- 18-19 15. The Cold Stream / Sketto Colony
- 19 16. High Cavern
- 19 17. Troghoul Cavern
- 19-20 18. Troghoul Warren
- 20 19. Chieftain's Cave
- 20 20. Scaly Lair
- 20-21 21. Pirate Tunnel
- 21 22. Fungus Cavern
- 21-22 23. Mandalorian Sepulchers
- 22 24. The Glitterhame
- 22 25. Long Cavern
- 22 26. K'Lor'Slug Lair
- 22 27. Security Door
-
The Sinkhole
- 24 28. Waterfall Cavern
- 24 29. River Cavern
- 24 30. Old Storeroom
- 24 31. Empty Storeroom
- 24-25 32. Flooded Storeroom
- 25 33. Dianoga's Cavern
- 25 34. Prison
-
The Foundry
- 27 35. Chamber of Statues
- 27-28 36. The Great Hall
- 28 37. The Bladeworks
- 28 38. Chasm / Chain Ladder
- 28-29 39. Council Chambers
- 29 40. Durj Ne'tra's Quarters
- 29 41. Kitchens
- 29-30 42. Desecrated Monument
- 30 43. Entrance to the Dormitories
- 30 44. Looted Rooms
- 30 45. Droid Room
- 30 46. Common Area
- 30-31 47. Arun-Dyl's Chambers
- 31 48. Looted Armory
- 31-32 49. IDL-4's Den / Adjoining Rooms
-
The Black Lake
- 34 50. The Cascade
- 34 51. Plascrete Bridges
- 34 52. The Nightscale's Lair
- 34-35 53. The Nightscale's Hoard
- 35 54. The Beast's Passage
- 36-37 Aftermath
-
Appendices
- 38-39 Appendix A: Enhanced Items
- 40-60 Appendix B: Creatures
- 61-63 Appendix C: Miscellaneous
Forge of the Nightscales
Introduction
Forge of the Nightscales is a Star Wars 5th Edition conversion of the Dungeons and Dragons 5th Edition adventure The Forge of Fury, which is itself an adaptation of the Dungeons & Dragons 3rd Edition adventure of the same name.
The adapted version of this adventure was released in the 5e sourcebook Tales from the Yawning Portal, which included a collection of adventures from previous D&D editions adapted into 5e's format. Other conversions of adventures from this sourcebook into SW5e can be found in the Tales from the Yawning Maw document.
Much like the original module, this adventure takes players through a mountain fortress inhabited by a mixture of raiders, omnivorous beasts and sinister smiths - this time, with a distinctly-Star Wars flavour. Much of the content has been adjusted to match the official SW5e rules, but much of the adventure remains a flavourful conversion with minimal changes to the overall progression and difficulty.
This adventure is the second of the series outlined in Tales from the Yawning Maw. It is preceded by The Sunless Temple; a map leading to the Nightscale's fortress can be found in that adventure, leading the players directly from Dathomir to Blasyndel after they have received level 3.
It is followed by Hidden Shrine of the Massassi, to which the players can be led by the notes of a Sith alchemist after reaching level 5.
Opening Crawl
For Game Masters who wish to have an opening crawl before their adventure, consider using the read-aloud text below. You may edit it as necessary to fit the context of your party:
Forge of the Nightscales
The ancient warrior race of the MANDALORIANS is famed across the galaxy for both their crafting and combat prowess. Their most powerful weapons and armor are forged from precious BESKAR, a nigh-unbreakable metal alloy that can even withstand a Jedi's lightsaber.
On the forest moon of Blasyndel, an old Mandalorian redoubt is said to contain weaponry made from the valuable beskar by the famed Mandalorian armorer DURJ NE'TRA. However, the former fortress of Durj's NIGHTSCALES has long since been overrun by gangs of raiders and terrifying beasts.
A party of adventurers, having heard tales of the fortress and its contents, have arrived on Blasyndel at BLASYN OUTPOST, inviting the challenge of the redoubt's dangers...
Setup
Two centuries ago, the Mandalorian armorer Durj Ne'tra travelled with a small fleet of Mandalorian settlers to establish colonies in the Outer Rim; during their expedition, the fleet was ambushed and decimated by a large band of pirates, killing their fleet's leader and forcing the survivors to escape into hyperspace. Entering the Kwenn system and forced to crash-land their damaged ships on the moon of Blasyndel, Durj took charge and led the destitute remnants in search of a temporary stronghold where they could hide and repair what was left of their fleet.
Before long, the Mandalorians discovered a great cavern system and ancient ruins of a past civilisation beneath a rugged, forested hill crowned by a bare rocky crag. There, Durj and his followers founded the stronghold of Choruk'Ed ('Stone Tooth'), named for the cliff it was built beneath. It was at this point Durj declared his intentions to his followers: as vengeance for the destruction of their fleet and to make the galaxy safer for Mandalorian settlers of the future, he would lead a guerilla war against the pirates of the Outer Rim. Though he gave his followers the choice of moving on to form new settlements, all present swiftly rallied behind him in the name of Mandalore's honor.
Over the following decade, Durj and his warband - calling themselves the 'Nightscales' - conducted several raids against pirate gangs and warlords across the Outer Rim, striking from their hidden base and slowly threatening their influence. Ten years into the conflict, a Nightscale lieutenant was captured by a powerful warlord's forces, and the pirates learned the location of their enemy's hidden stronghold. Jumping at the chance to re-establish their power, the pirate warlords raised a contingent army of their forces and began an assault on Choruk'Ed. Though the stronghold's entrenched fortifications allowed the Mandalorians to hold out for some time, the pirates eventually managed to secretly excavate their way around the Mandalorian defenses and killed every last Mandalorian within the stronghold, though not without the loss of a great number of raiders.
In the years since the great battle, various marauder groups have occupied the stronghold and used the place as a base for their raids. At other times, the caverns have lain empty except for the mindless and bloodthirsty monsters that haunt such places. Today, legends of Ne'tra's Vengeance (or the Nightscale War) and the extraordinary weaponry that the Mandalorians forged in anger still surface from time to time in the regions near the Kwenn system.
Adventure Synopsis
Forge of the Nightscales is set in the ruined stronghold of Choruk'Ed. It is designed for four 3rd-level player characters. They can advance to 5th level with good play.
The characters come to Blasyndel in search of a reputed cache of Durj's superior weaponry, starting their journey at Blasyn Outpost, and find the stronghold inhabited by dangerous monsters. After Approaching Choruk'Ed and entering the stronghold, the complex consists of the following five sections:
The Mountain Door. The Mountain Door comprises the uppermost level of the cavern complex. It is currently inhabited by a gang of fierce trandoshans, led by a mutated trandoshan known as Great Ulesk.
The Glitterhame. The largest level of Choruk'Ed, the Glitterhame is an expanse of beautiful natural caverns now infested by Sith-spawn and other cave-dwelling monsters.
The Sinkhole. Streams in the Glitterhame descend to an underground river, which runs through a corner of the caverns forgotten by the denizens above. A water-dwelling dianoga resides here, waiting for unsuspecting prey.
The Foundry. Beyond the Glitterhame lies a complex of ancient chambers and passageways, created by an ancient race and appropriated by the Nightscales. A small band of ugnaughts called the Shadow Smiths currently hold Durj's hall, working to uncover the secrets of the smith's ancient forge. A great crevasse drops to the Black Lake.
The Black Lake. The most dangerous denizen of the caverns under the Stone Tooth lairs in the cold, still waters of the Black Lake. The Nightscale, an ancient amphibious beast from which the Mandalorians took their name, discovered a passage into the lake through an underwater siphon connecting to a mere on the far side of the hill. The beast has claimed the remaining Mandalorian equipment of Choruk'Ed as her hoard.
Placing the Adventure
Forge of the Nightscales is intended to be era-agnostic in relation to the wider Star Wars timeline. Here are some suggestions for existing eras in which to place this setting:
- The Old Republic: An era where Sith and Jedi fight for the equally matched powers of the Galactic Republic and Sith Empire, battling in a seemingly endless war between light and dark.
Key Events. Across this era, the Mandalorians are engaged in near-constant warfare in service to a variety of leaders. Some choose to lead crusades, while others seek to preserve the Mandalorian legacy. In all cases, most Mandalorians of this era unite under the one who wears the Mask of Mandalore.
- The High Republic: By this time in history, the once-great Sith threat is very nearly eradicated, and the Republic and Jedi Order are at the height of their power, prioritizing expansion and exploration.
- Fall of the Jedi: Since their peak, the Republic and Jedi Order have fallen into decline, allowing corruption of both political and moral nature to seep into their midst as the galaxy launches into a civil war between clone and droid armies.
Key Events. At this time, the Mandalorians have become a pacifist culture after their homeworld suffered mass surface destruction by Republic bombing. Even so, the splinter group Death Watch seeks to establish Mandalore's warrior culture, using the ancient Darksaber as a unifying symbol.
- The Empire: By the end of the Clone Wars, the Republic has been reorganized into an Empire and the Jedi outlawed by the machinations of the insidious Emperor Palpatine, opposed only by the steady unification of resistance cells into the Rebel Alliance.
Key Event. After Mandalore is seized by the Empire, Mandalore is split between those who serve the Empire and a contingent of clans seeking to govern themselves.
- The New Republic: After the defeat of the Empire at the hands of the Rebel Alliance, many efforts are taken to recover knowledge lost under the reign of the Empire and to combat the outlying Imperial remnants.
Key Event. After Mandalore is bombed a second time and rendered near-uninhabitable, the Mandalorians Din Djarin and Bo-Katan Kryze begin working to reunite the remaining tribes and restore Mandalore's glory.
- Rise of the First Order: The fledgling New Republic faces a resurgence of Emperor Palpatine's forces under the banner of the First Order, once again throwing the galaxy into turmoil and forcing the formation of a Resistance to oppose them.
Running the Adventure
To enhance the experience of the players and help you do your best job as Game Master, take the following pieces of advice and information into consideration.
Mapping
It can be difficult to keep track of all the corridors, turns, areas, and other features of a dungeon setting, and the player characters could soon get turned around without a map. Ask for a volunteer to be the party mapper. It's the mapper's job to listen carefully to your description of each area, noting its size and exits, and to record that information by sketching on a sheet of paper.
Alternatively, maps are provided throughout this adventure for both the players and the Game Master, distinguished by their indication of area numbers and other key markers. If you are playing online or using electronic devices at the table, consider providing players with the player version of each section's map and slowly reveal the areas as they progress.
Progression
The level progression of the characters in this adventure assumes you will be using XP progression. If you would prefer to use milestone progression to level the characters up after key events or major victories, consider the following areas as points to level up the characters (to a maximum of 5th level):
- Defeating the three trandoshan leaders (Great Ulesk, Old Yarassk and Burkuss) and their lackeys at areas 9, 12 and 14.
- Defeating Karrghaz in area 19 or his captured cave sleen in area 20.
- Defeating the adult dianoga in area 33.
- Defeating or negotiating successfully with the Shadow Smiths in areas 36, 37 and 39.
- Defeating the guard droids in area 42.
- Defeating the torture droid in area 49.
- Defeating the Nightscale beast in area 52.
Adventure Hooks
The settlement of Blasyn Outpost is briefly described in this adventure, if you need a location where the characters can make their final preparations. They can also learn more about the history of Choruk'Ed and
Your next task is to decide how the party learned about Choruk'Ed. Pick one of the following options that suits your campaign, or make up an explanation.
Follow The Map
The party has acquired a map showing the location of a secret Mandalorian stronghold named Choruk'Ed. Perhaps the characters discovered the map and other lore about the place during a previous adventure (such as in area 37 of The Sunless Temple), or it turned up in a forgotten corner of a library. Tales attributed to a previous, failed expedition make reference to a hoard of wondrous arms and armor.
Track the Broken Blade
Baron Ahl Thon, a local noble, hires the party to search for the legendary cache of weapons forged by Durj Ne'tra; if the party does not know of Durj's tale, he explains the tale as outlined in 'Setup' above. He shows the characters a broken blade bearing the smith's mark, and tells them that it was discovered by miners near a rocky hill called the Stone Tooth.
Thon provides directions and promises to reward the characters richly for each of Durj's blades they recover. He will pay the characters 200 credits each just for bringing back information about the Mandalorian complex, and an additional 1,000 credits if they provide detailed maps. The rewards for recovered weaponry can be found in the Aftermath section at the end of this adventure.
Vanquish the Trandoshan Raiders
In the mining settlement of Blasyn Outpost, the characters learn that trandoshan raiders have been attacking bands of miners as they leave Blasyn Outpost. The local militia captured a trandoshan left for dead by its comrades and brought it back for questioning. Under the influence of a truth serum, the trandoshan divulged the location of the raiders' lair: a lonely hill to the north called the Stone Tooth.
The mayor offers a bounty of 250 credits per trandoshan raider, dead or alive, and the gratitude of the outpost's citizens to any who can permanently end the threat. Party members are advised to mark each trandoshan that is captured or killed using a modified biometric scanner provided by the mayor, which marks the individual's unique biological characteristics to prevent multiple registrations of the same target or false positives.
Additionally, these same trandoshan raiders have managed to commander the speeder trucks used by the miners, limiting the outpost's available vehicles. If the party discover any stolen speeder trucks while traveling to Stone Tooth, the outpost's vehicle depot is willing to offer a reward for safely liberating it from the raiders and transmitting its coordinates for retrieval, at a rate of 2,500 credits per truck. Destroyed trucks do not count toward this reward.
Mandalorian Heritage
Many Mandalorians are fiercely proud of their warrior culture, and gladly take whatever action they can to learn more about it or retrieve relics of it from those they deem undeserving. Knowing that Choruk'Ed served as the site of the Nightscales' last stand would drive many Mandalorians to liberate the site and its contents from its occupants.
If any of your players want to play a Mandalorian, this can serve as an effective motivation for their character. Keep in mind what era of Star Wars history you have chosen to determine how most Mandalorians of the time would act, and whether the player character adheres to or goes against this culture.
Blasyn Outpost
On the forest moon of Blasyndel, a populous outpost has been set up to facilitate mining activity on the moon. This settlement, called 'Blasyn Outpost', lies 30 miles south of the Stone Tooth hilltop where Choruk'Ed is said to reside. Due to the lack of suitable landing sites within those 30 miles, it is advised that prospective explorers set out from Blasyn Outpost, either on-foot or using a rented landspeeder.
Blasyn Outpost contains a diverse mix of races from across the galaxy, numbering a total population of roughly 2,000; although humans are the largest population, many species available to player characters can be found here.
Blasyndel
Blasyndel is a forest moon distantly orbiting the planet Kwenn, located on the Ootmian Potal (Outlander's Route) hyperlane. Kwenn itself and its large orbital space station serve as the key draw for travellers, leaving Blasyndel relatively untouched by civilization save for some basic settlements.
Key Locations
Significant locations within Blasyn Outpost, and the people to be found within them, include the following:
Government Offices
The current political leader of Blasyn Outpost is Duke Miels Berric, a male human noble. He holds office in the outpost's centre, in a building where public meetings are held to discuss policy and conduct elections.
Enforcer Station
Though most businesses in Blasyn Outpost arrange their own protection from thugs or thieves, the enforcer station exists to provide general aid to the community and is often called on to provide additional protection during public events. The enforcers consist of Sergeant Kuln, a male gamorrean veteran; Officer Dara Whitestar, a female human veteran; and two full-time security guards.
In emergencies, a militia force of 100 commoners can be mustered from volunteers amongst the community. These commoners are assumed to be of suitable fighting condition and have access to combat armor and simple weaponry such as blaster pistols or vibrostaves.
Tolm's Superior Outfitting and Preserved Goods
Though a few general stores exist across the settlement, this store provides most basic adventuring gear, catering primarily to miners and explorers. Kel-Degan Tolm, a male weequay commoner, runs and operates this general store, being a retired explorer himself who can provide guidance on what would be most useful for delving into cavernous depths.
Stone Tooth Map. Tolm can also offer to provide the party with a satellite-image map of the area surrounding the Stone Tooth for 500 credits, having anticipated new explorers would come by someday.
The Rishii's Nest
A cantina and hostel run by Sarelban, a female twi'lek commoner. Sarelban's business caters primarily to offworld travellers, offering a wide range of drinks from across the galaxy and general-purpose rooms to accomodate most humanoid species.
Medical Centre
The town's medical centre is headed by Dr. Alonsa, a female chiss physician whose services include the supply of most standard medical supplies and surgery. She is assisted in her duties by two nurse droids. As a chiss, Alonsa's full name is Stylba'lon'sabosen, going only by her root name for ease of interaction.
Thon Manor
This manor serves as the home of one of the outpost's key financers, Baron Ahl Thon. A male nemoidian noble, Ahl Thon has developed an interest in the legend of the Nightscales, and will gladly inform any interested parties of its details (see 'Track the Broken Blade').
Mandalorian Datapad. If the party previously explored the Sunless Temple on Dathomir (as part of the preceding adventure The Sunless Temple), they would likely have found a plasteel case and ancient datapad referencing Choruk'Ed. Ahl Thon will gladly pay up to 1,000 credits total for these precious items.
Rumors Heard in Blasyn Outpost
In addition to the hooks provided in "Running the Adventure", player characters can discover the following additional information while spending time in the local cantinas, or through asking the right questions of the locals:
- The last known expedition to Stone Tooth consisted of five members, though their names, species and skillsets are long forgotten. The expedition left roughly a decade ago and never returned; no other expeditions have been made since to confirm their fate.
- One of the few legends of Blasyndel is that of the Nightscale beast, which Durj's Mandalorians named themselves after. It is unknown where the legend came from, but the few who have any knowledge of it report that it as an ancient, dark-scaled beast native to Blasyndel that can survive for centuries through hibernation.
- Another legend of Blasyndel suggests that the Mandalorians who settled in Stone Tooth did not forge all of its halls; some of the lower levels are said to be the handiwork of even older inhabitants, possibly left by an ancient empire or a long-dead species native to Blasyndel.
Approaching Choruk'Ed
When the party decides they are ready to head off for Stone Tooth, they must travel north for 30 miles in order to get there. It is assumed the party will make this journey on foot, but more savvy players may try to search for mount or speeder services in Blasyn Outpost to ease the trip - in this case, consider implementing 'Speeder Trucks' from appendix C.
Wilderness Encounters
When the characters set forth on their journey, they will have to travel at least several hours to reach the Stone Tooth. As such, there is a risk they may come across wildlife, roaming sith-spawn or even members of the trandoshan raiders situated in Choruk'Ed; due to the twists and turns required to navigate the forest, it would be difficult to avoid an effective ambush, but the party may see it coming or even counter the ambush depending on their chosen pace.
If you would like to implement wilderness encounters en route to Stone Tooth, adjust the chance of encounter as appropriate for your group - once per hour of travel is recommended. Consult the below table for options or roll for random selection:
Wilderness Encounters
d20 Encounter 1 2d6 cave sketto 2 2d4 troghouls 3 1d6 trandoshan raiders 4 1d4 garu-bears 5 1d2 k'lor'slugs 6 1 mogu 7-20 No encounter
Additional Considerations
It is recommended to limit the encounters with trandoshans in "Wilderness Encounters" to only one or two maximum, in order to match the number of active trandoshan raiding parties as described in "Wait and Watch" below. If so, decide which raiding party was defeated during an encounter and keep this in mind during later sections.
Additionally, if using the 'Speeder Trucks' rules in appendix C, consider giving at least one group of trandoshan raiders an M-37 speeder truck to allow the party the opportunity to capitalize on the additional bounty.
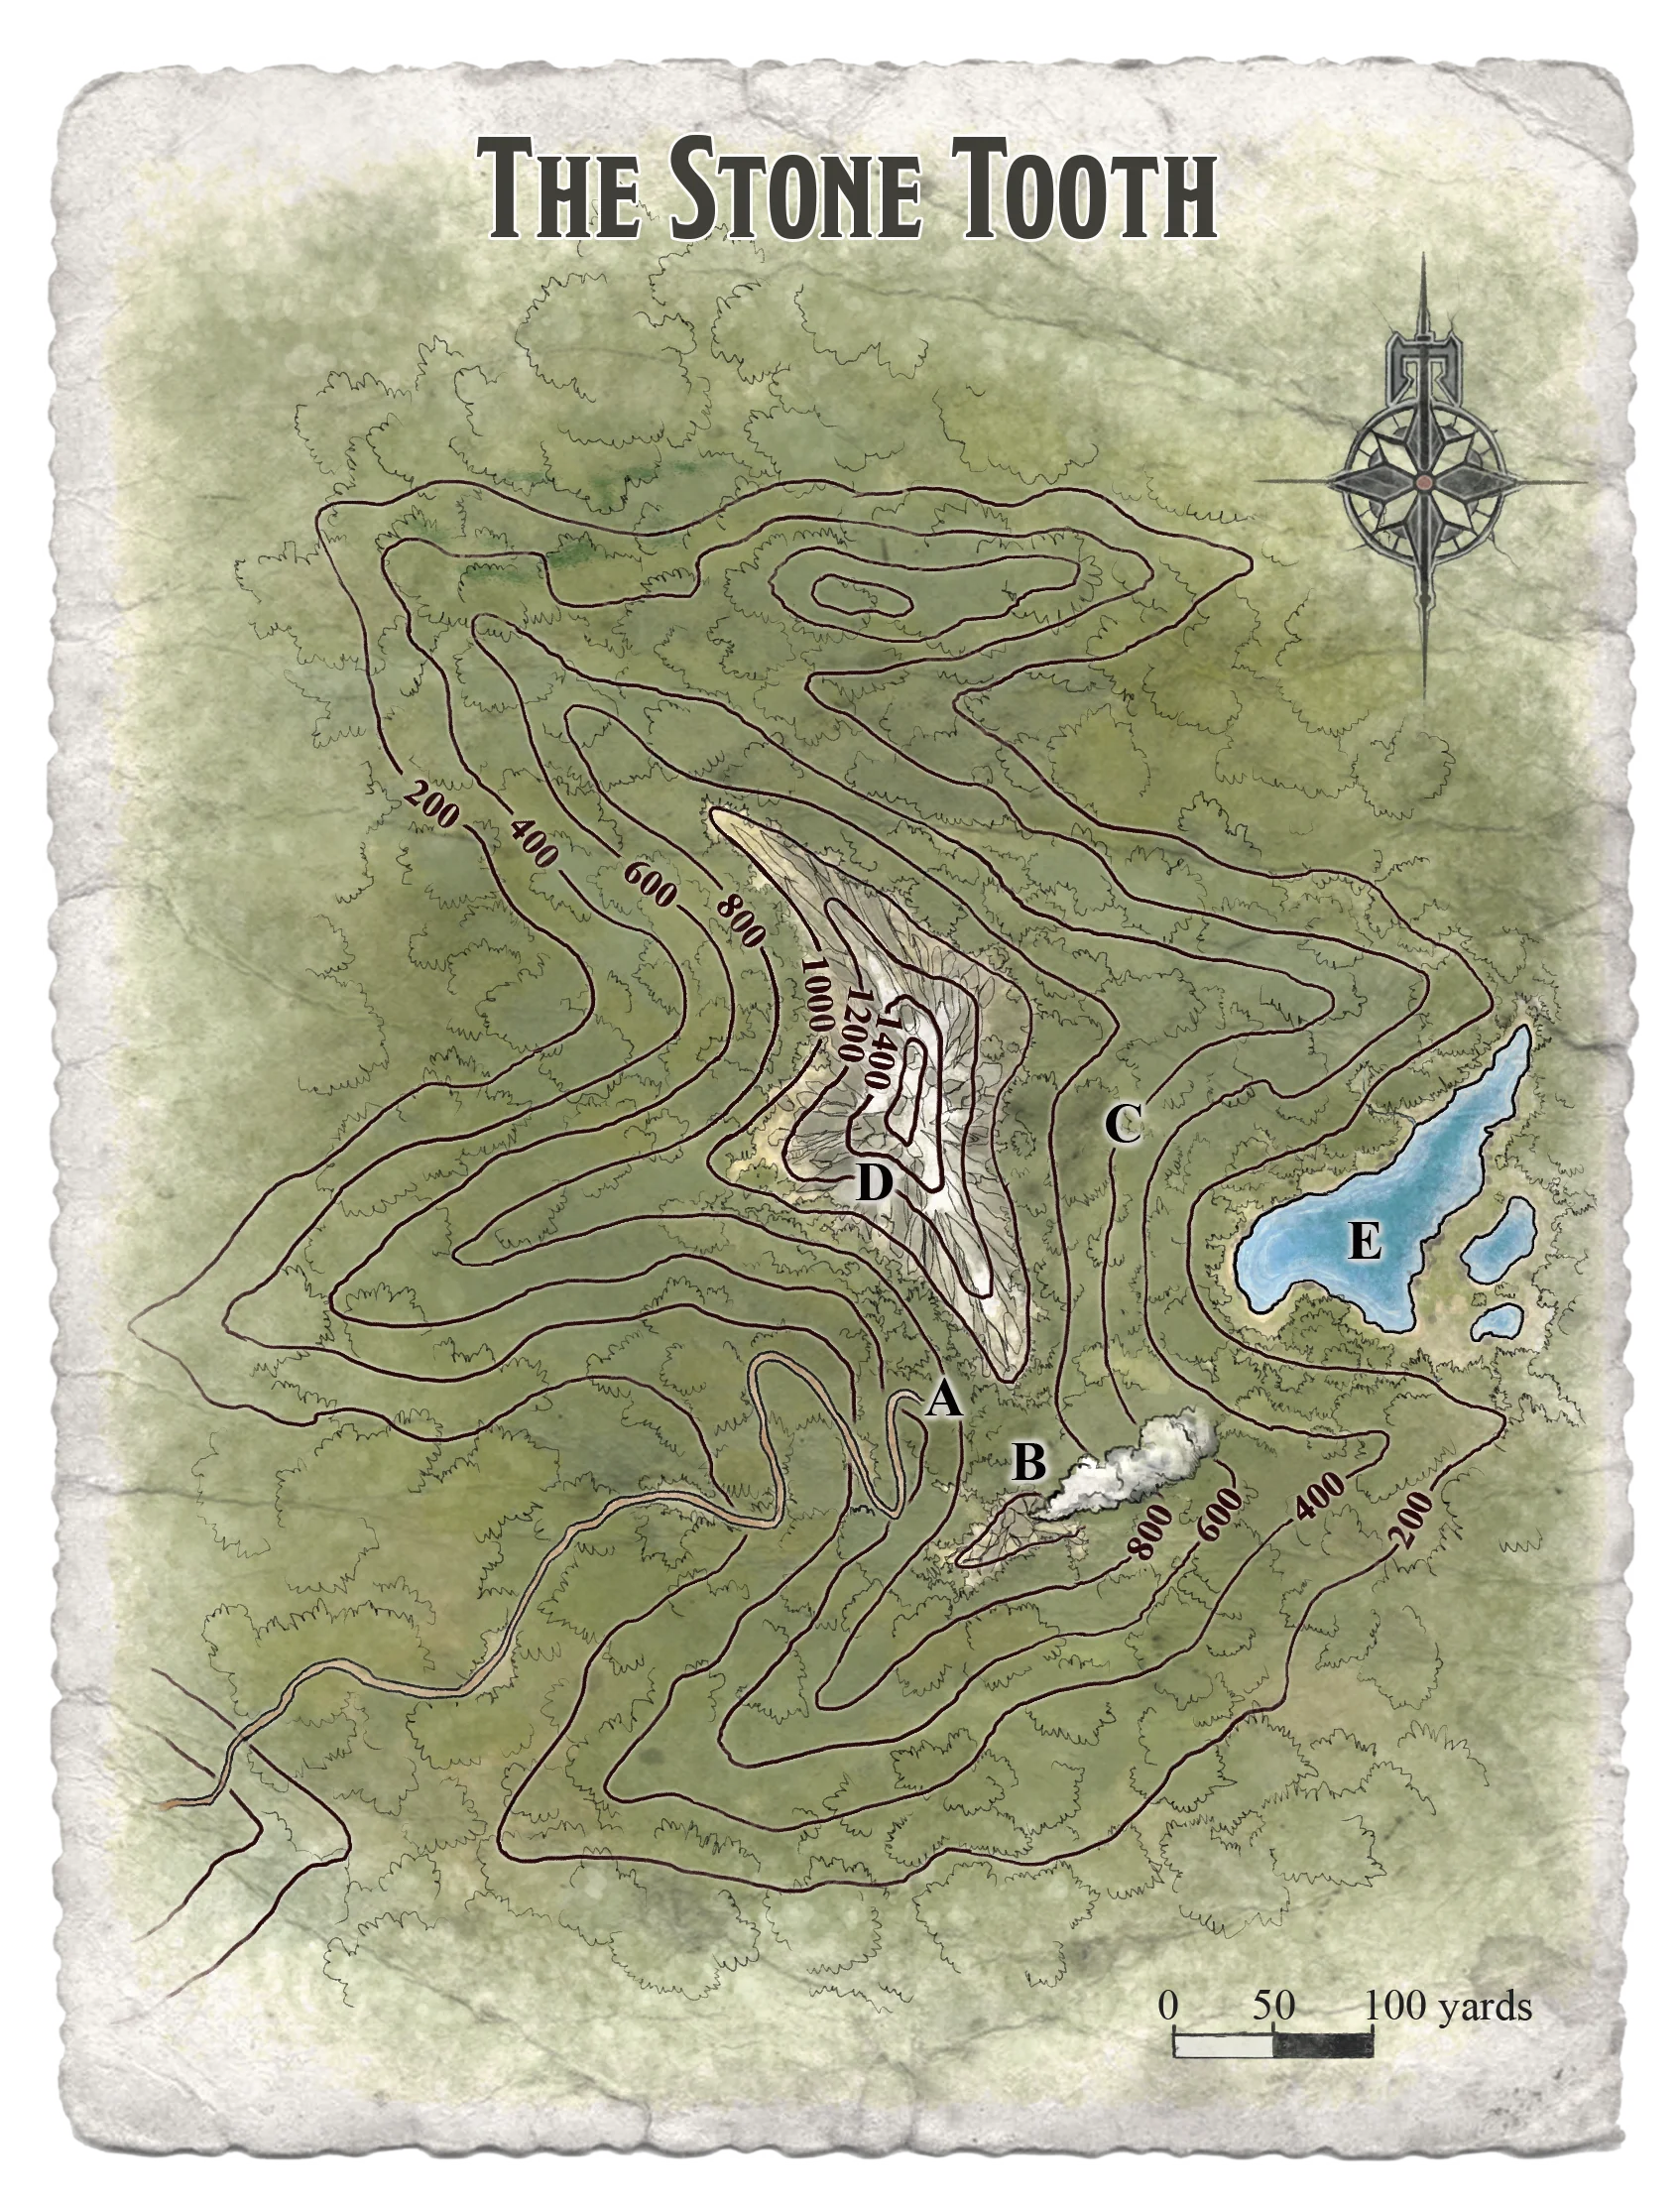
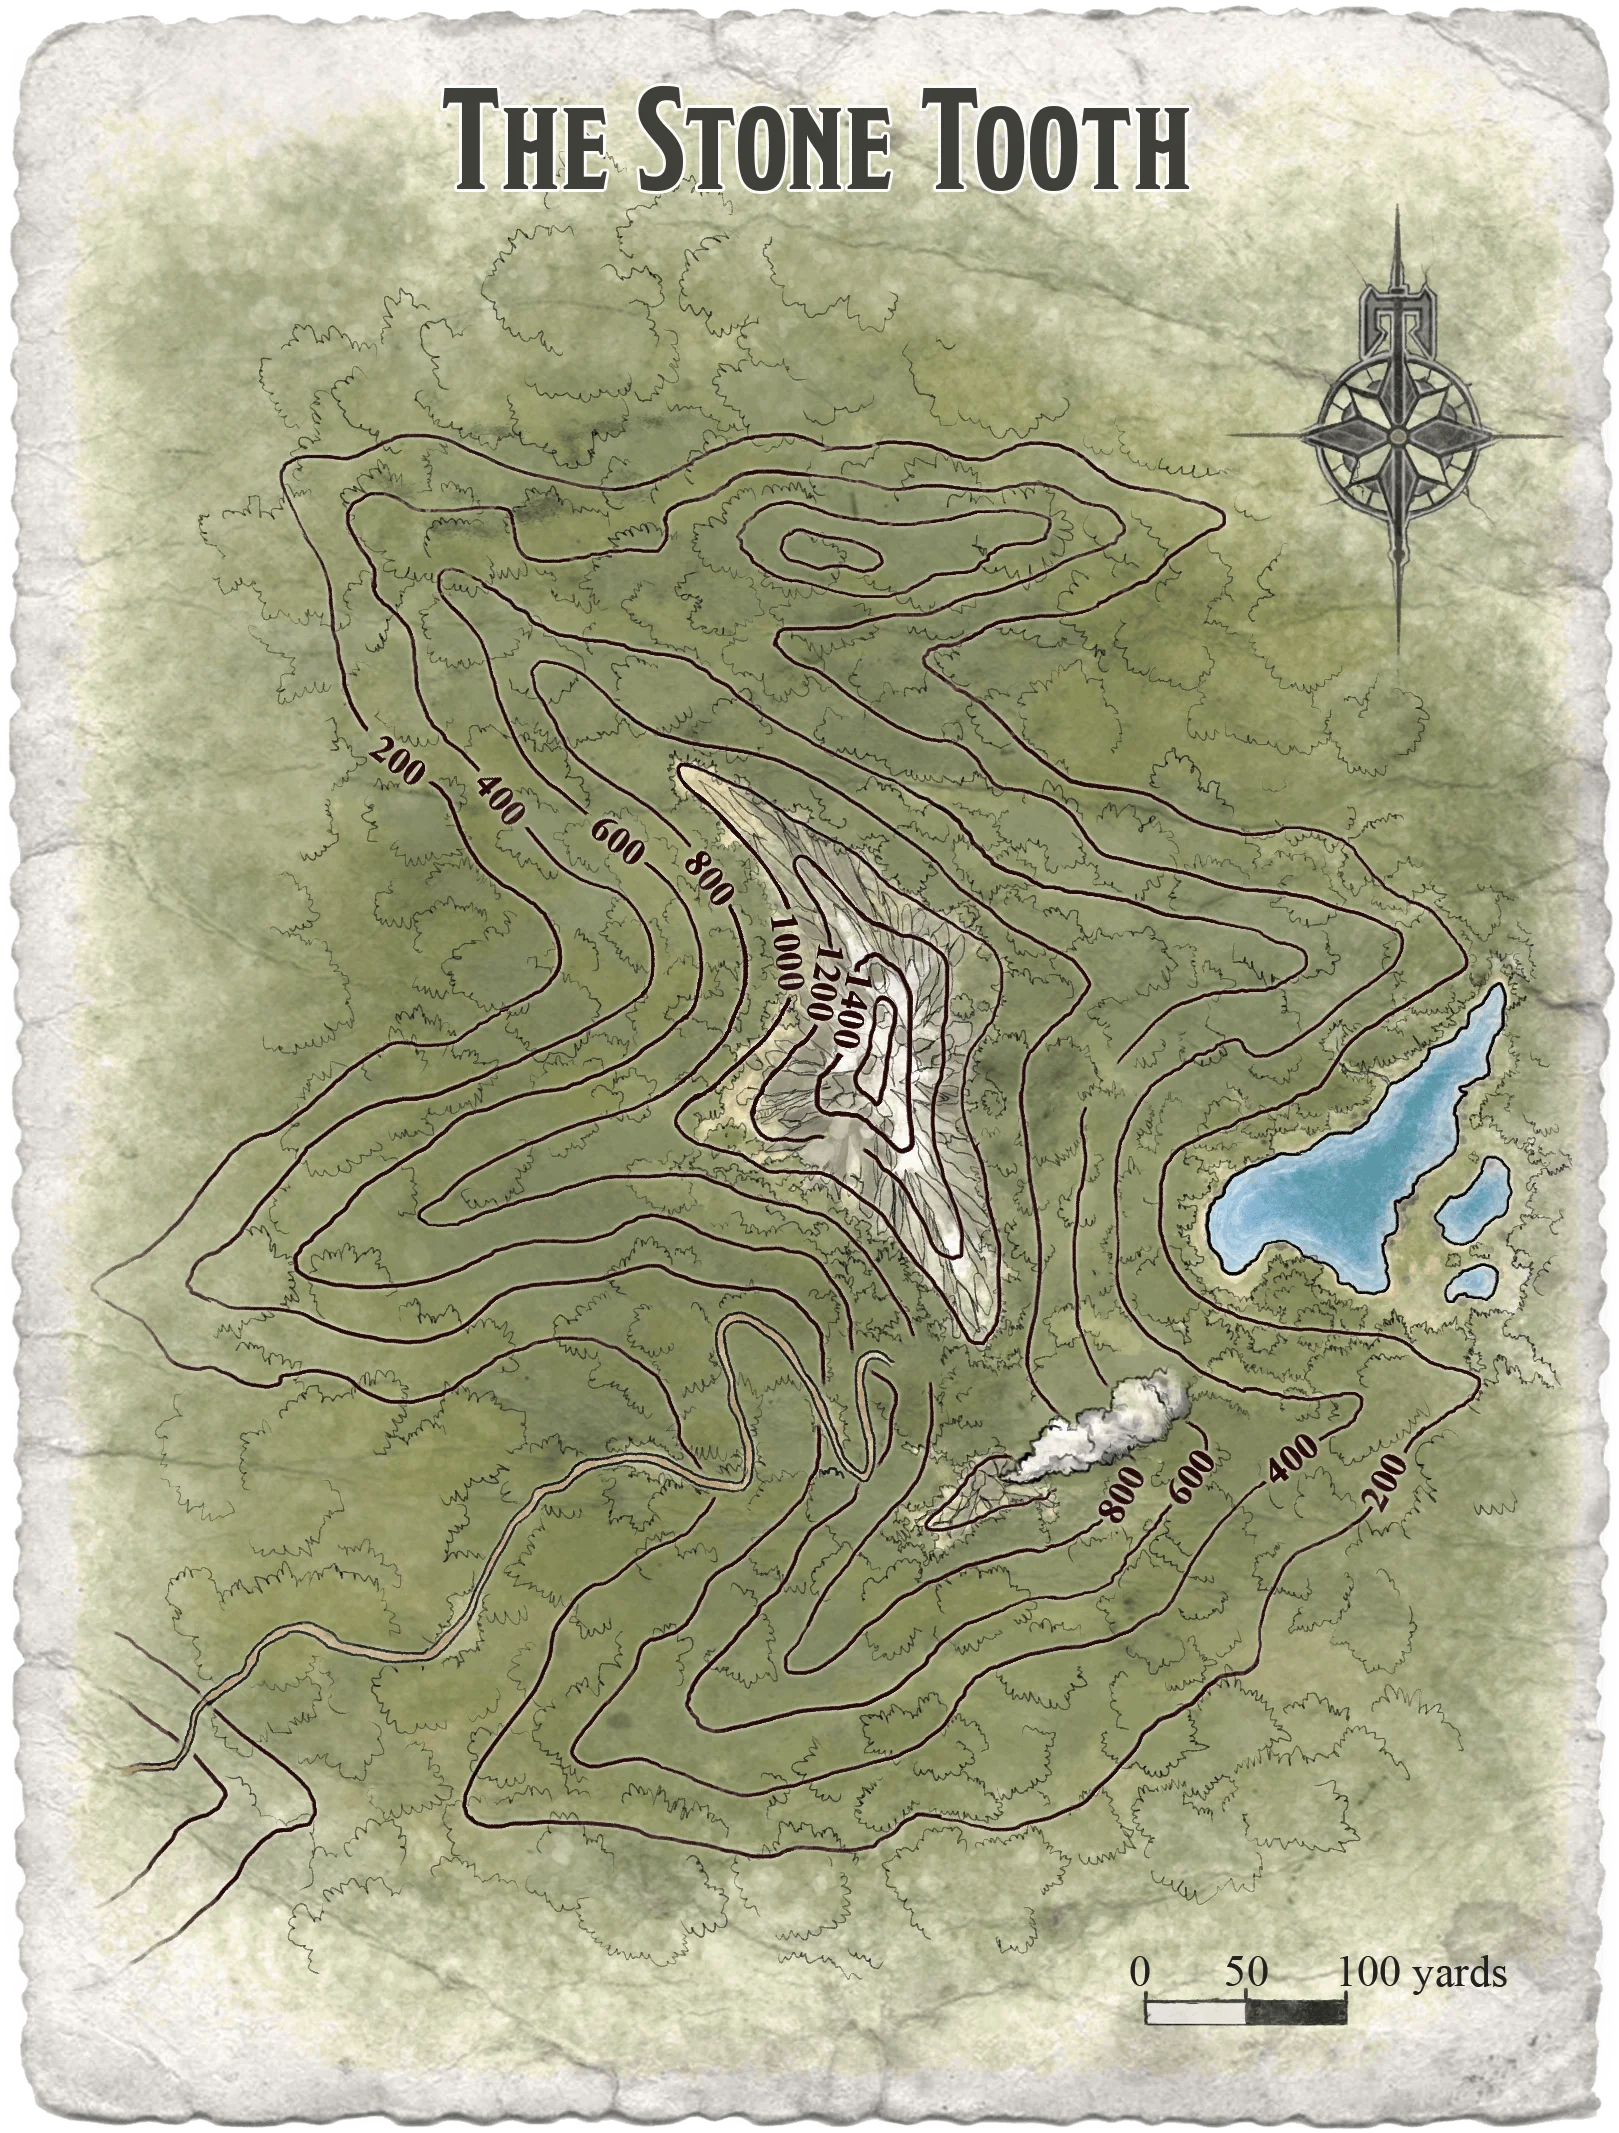
The Stone Tooth
Once the party arrives, read the following:
As you traveled north from the outpost, you have passed through brooding forests and deep valleys. From where you stand now, you catch sight of a tall, steep hill that rises to a prominent bare knob of rock — the Stone Tooth. A thin spire of smoke rises from some unseen point high on the hill's slopes, and you can make out a steep, narrow road or track that runs back and forth across the face of the mountainside.
Refer to the map shown below. The characters have several options: follow the path, scout the area, or wait and watch.
Follow the Path
At the foot of the Stone Tooth, a carefully constructed path winds up the hillside to some unseen height above. Durj's clan concealed its presence as much as possible, but years of wind and rain have eroded away its cover, leaving the path exposed and visible from the valley floor below.
The path climbs to the Mountain Door, at the location marked A on the map. This is the route used by the trandoshan hunting party to come and go from their lair.
If someone checks the path for tracks, a successful DC 10 Wisdom (Survival) check reveals that four reptilian humanoids came down it within the last day and headed into the forest. The trail joins older tracks in the woods and becomes indistinguishable after about half a mile. These tracks belong to trandoshan raiding parties; see "Wait and Watch" below for more information.
Scout the Area
Ambitious characters might choose to ignore the path and scale the Stone Tooth's slopes. The going is very hard, with steep slopes and heavy undergrowth, reducing the characters' travel pace to roughly 100 feet per minute (or 10-foot movement speed). Thoroughly exploring the hillside could easily take hours.
Heavy woods block the view upslope, making it difficult to ascertain the origin of the smoke (a natural chimney). Have the party's guide (ideally a scout or someone with high Wisdom) make a DC 10 Wisdom (Survival) check when the group first enters the hillside - this check is made with advantage if they previously purchased a map of the region (see 'Stone Tooth Map' in Blasyn Outpost).
On a successful check, the characters travel in the general direction of the chimney. Otherwise, they lose their way and become lost; the party must then spend 1d6 hours trying to get back on course before their guide or another party member can attempt the DC 10 Wisdom (Survival) check again.
(A) The Mountain Door. This is the front entrance to Choruk'Ed. The old path leads up to a bare shoulder of rock and then turns into a deep cleft in the hillside. If the characters enter this way, the expedition begins in area 1 of the Mountain Door.
(B) Chimney. When the characters reach the area marked B on the map, they can discover the source of the smoke. A natural rock chimney leads down into the caverns below, and a thin stream of smoke rises through it. The smoke spreads out and isn't easy to pinpoint in the rugged terrain.
A character who searches for the source of the smoke finds the rock chimney with a successful DC 10 Wisdom (Perception) check. If the characters pass nearby without searching, anyone who has a passive Perception score of 15 or higher notices the fissure.
If the characters descend the chimney, the expedition begins in area 7 of the Mountain Door.
(C) Pirate Tunnel. On the other side of the Stone Tooth, a few hundred yards from the Mountain Door, the pirate forces used excavation equipment on the hillside to circumvent the Mandalorian defenses. The tunnel is still passable, but its entrance is choked with brush and debris. If the characters enter this area, someone who has a passive Perception score of 15 or higher discovers the tunnel. The characters locate the tunnel automatically if anyone searches the area; it leads to area 21 of the Glitterhame.
The tunnel entrance is about 6 feet high and 4 feet wide. Anyone who succeeds on a DC 10 Wisdom (Survival) check can spot old tracks passing in and out of the tunnel — clawed footprints (from the troghouls inhabiting the Glitterhame) and the paw prints of a large garu-bear.
(D) Hilltop. An hour or two of hard hiking brings the party to the summit. The Stone Tooth is about 1,450 feet in height, towering over the neighboring hills by 500 feet or more. The last 100 feet or so are a sheer point of rock, requiring DC 15 Strength (Athletics) checks to climb successfully. The view is spectacular, but the hilltop is otherwise unremarkable. (No entrance to the fortress is to be found here.)
(E) The Dark Mere. The eastern slopes of the Stone Tooth descend into a damp valley where water is trapped by the terrain. A dark tarn pools under the hill's slopes, surrounded by numerous smaller lakes. A hidden drainage channel deep underwater connects to the subterranean Black Lake, providing access to the Nightscale's underground lair.
The opening is about 40 feet down, and it lies about 100 feet from the western lakeshore. Player characters exploring around the lake can't find this outlet unless they conduct extensive dives to plumb the mere's depths, requiring DC 10 Strength (Athletics) checks to swim underwater. If any characters are capable of staying this deep without suffocating and conduct a thorough search of the lake, they discover the passage with a successful DC 12 Wisdom (Perception) check.
If the characters enter through this watery passage, they emerge in area 54 of the Black Lake.
Wait and Watch
The characters might choose to observe the path for some time before braving the Stone Tooth. When they arrive, two raiding parties from the trandoshans are searching the nearby hills for miners. The first party of four trandoshan raiders returns two days after the characters arrive, and the second group of four three days after that. These trandoshans sleep by day and travel by night, so they arrive in the party's vicinity just before dawn.
If the party sets up camp at least 90 feet from the path and doesn't take any action that might draw attention, the returning trandoshan raiders pass by without spotting the campsite. Otherwise, the trandoshans notice the camp when they come within 90 feet (or within twice as far if there is a visible light source or the party isn't attempting to be quiet).
A lookout whose post overlooks the trail and who has a passive Perception score of 10 or higher detects the trandoshan raiders as they approach. The trandoshans aren't likely to notice a hidden lookout; compare their passive Perception scores to the character's Dexterity (Stealth) check.
Four reptilian humanoids in dirty mesh armor approach along the trail, hissing and muttering to each other in a serpentine tongue. Long, scaling fingers grip scatterguns and techaxes.
If the trandoshan raiders come across the camp and aren't spotted, they attempt to take out anyone on watch or creep into the camp to attack sleeping characters.
If a trandoshan party moves past the characters unchallenged or fights its way through, the survivors reinforce the defenses in the complex (see area 5 and area 14).
Captured trandoshan raiders can describe in some detail the general arrangement of the Mountain Door. They don't know anything about the rest of the complex, or that it's possible to enter through the chimney. The trandoshans defending the Mountain Door refuse to negotiate for their return.
Any player characters of the same or a similar species to trandoshans (such as barabels) might disguise themselves as members of the gang using captured gear; non-reptilian species have almost no chance of succeeding without other tools. Doing so can let them try to bluff their way past sentries in the dungeon, using Charisma (Deception) checks contested by the trandoshans' Wisdom (Insight) checks.
Treasure. Each trandoshan raider carries a pack of mundane supplies looted from the countryside, as well as credits totaling 2d6x10.
Development. No more dungeon denizens emerge from the dungeon during this time, and no more trandoshans leave for a week after the second patrol returns.
General Features
The following aspects of Choruk'Ed are true unless otherwise noted in a particular area description.
Doors. Most doors are made of wood or stone unless stated otherwise (such as in The Mountain Door). Characters can attempt various tasks before trying to open a door, including listening for sounds from the other side and checking for traps. If characters elect to listen at a door, check the description of the room beyond to determine if any creatures inhabit that area.
If no instructions are otherwise provided, a character who listens at a door and succeeds on a DC 10 Wisdom (Perception) check can hear sounds of activity through the door; increase the DC to 15 for quieter sounds.
Light. Within the confines of Choruk'Ed, all areas are dark unless a room's description says otherwise.
Ventilation. All keyed areas contain an adequate air supply. The air is renewed through vents that lead to the surface. These vents are individually too small for any but Tiny creatures to navigate.
Long Rests
The characters might be forced to retreat outside the stronghold to safely recuperate after difficult battles. The party can readily find defensible campsites in the forest near the Stone Tooth, or they can bunker down inside a speeder truck they have acquired.
Pneumatic Doors
If you would like to incorporate automatically opening-and-closing doors throughout this dungeon to simulate those seen in other Star Wars media, consult "Expanded Pneumatic Doors" in appendix C.
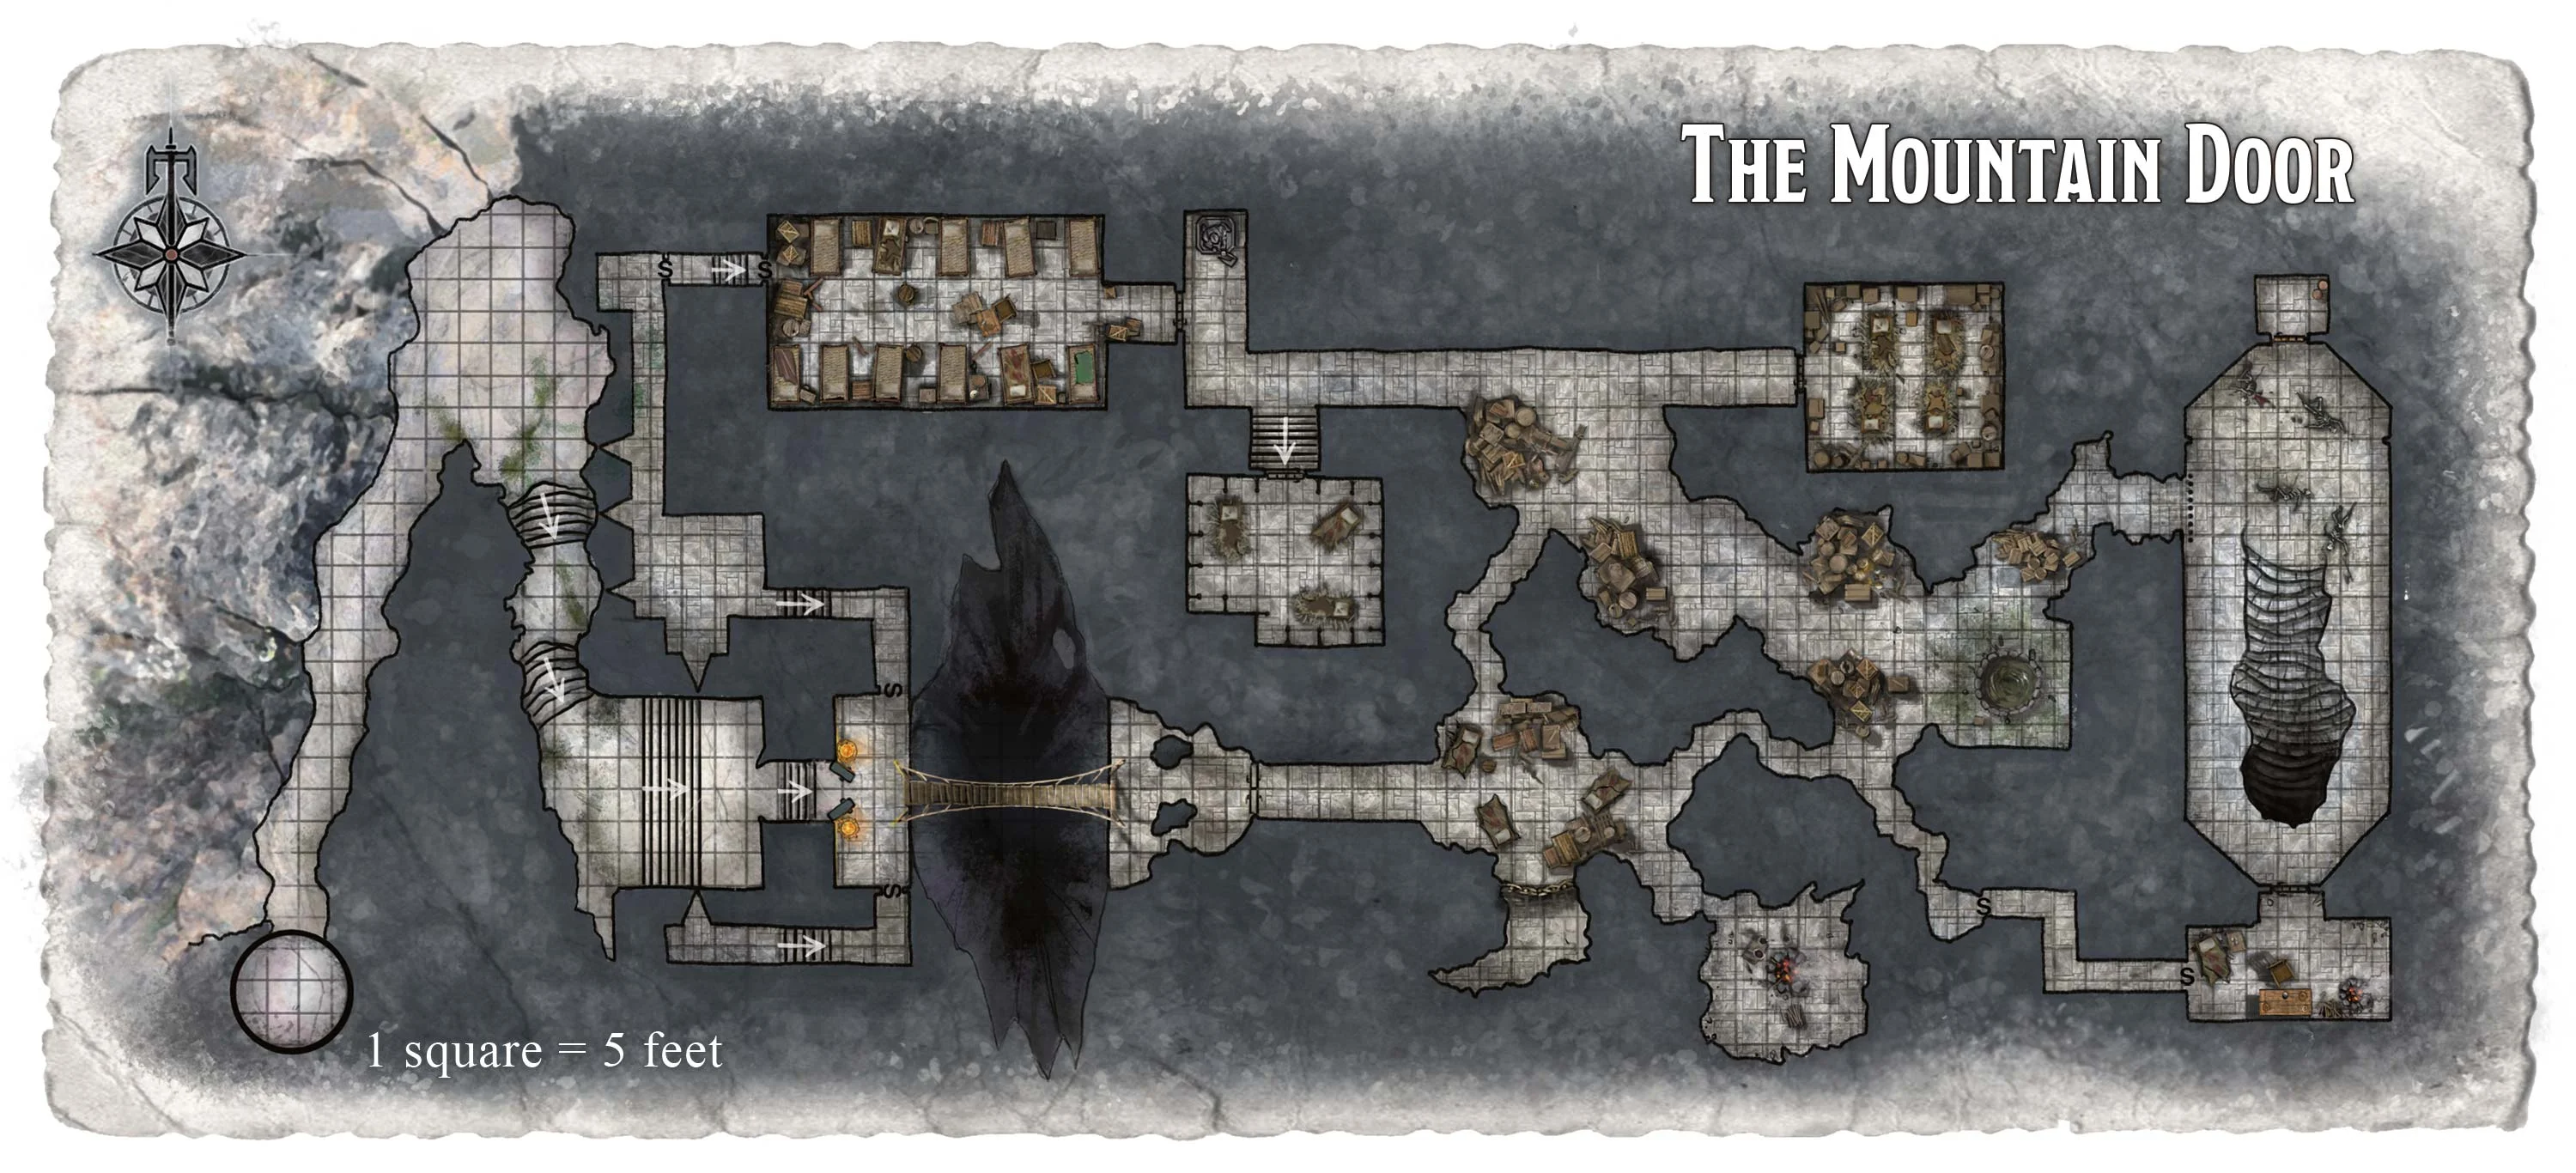
The Mountain Door
The uppermost level of Choruk'Ed, called 'The Mountain Door', is a natural cavern that was expanded and improved upon by Durj's followers, who created a series of primitive halls and guard chambers that protect the entrance to their stronghold. The place is still well fortified, even to this day.
This former Mandalorian strongpoint is now occupied by a band of trandoshan raiders, led by a trio of experienced trandoshan hunters. These raiders emerge from the Mountain Door to hunt and pillage in the surrounding area. To keep their lair secure, the trandoshans have blocked access to the lower levels of Choruk'Ed, and they rarely encounter the other denizens of the cave system.
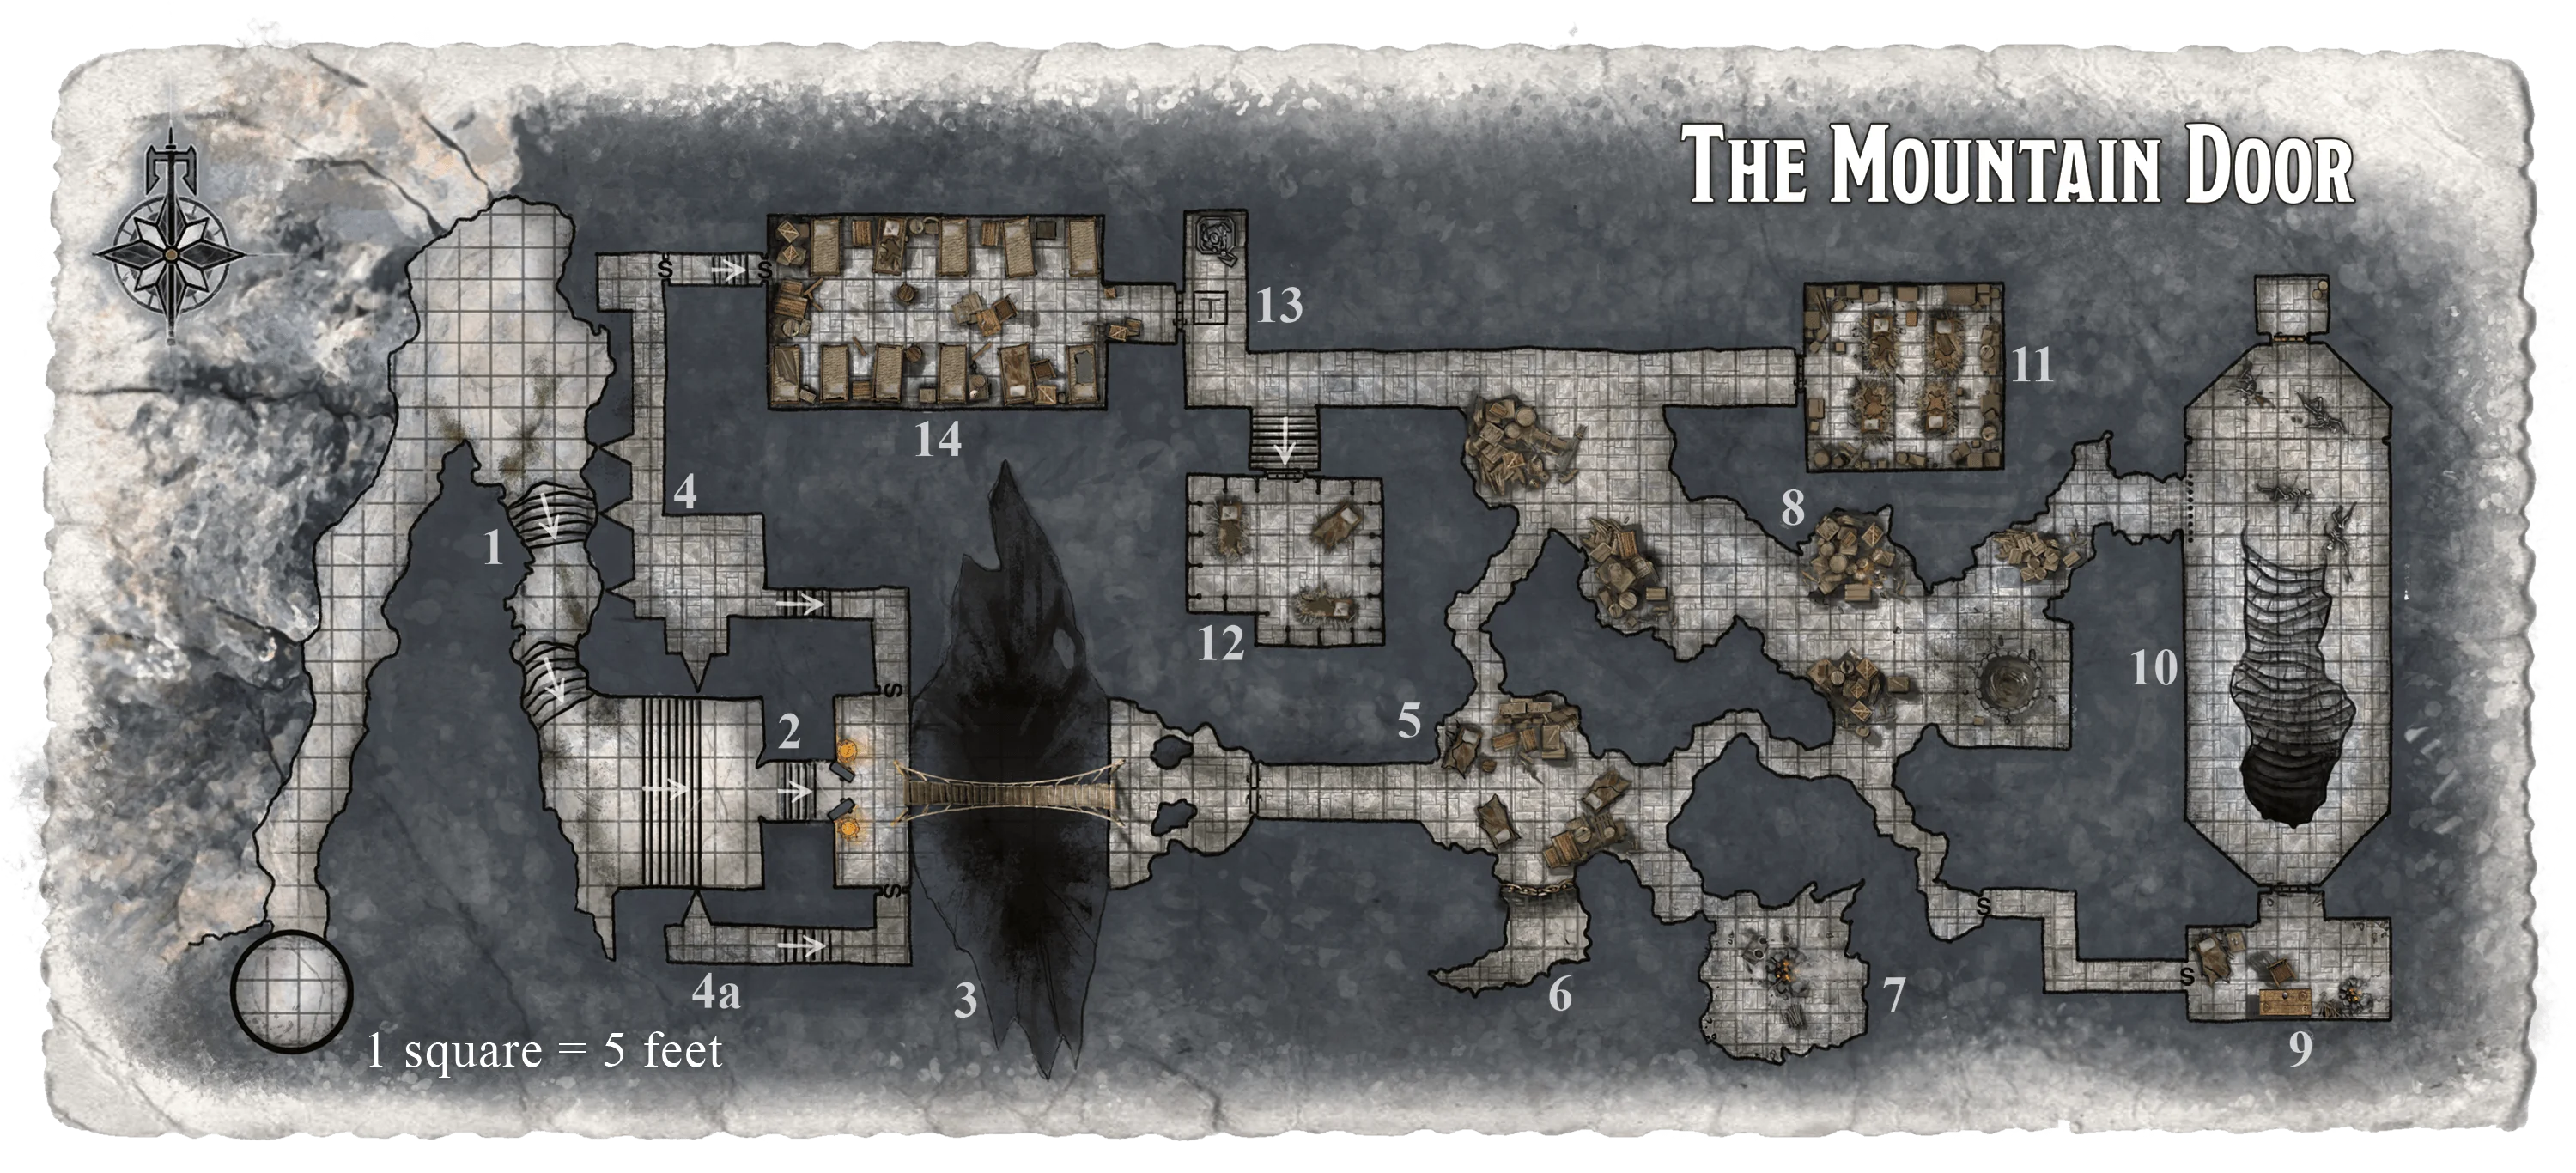
Civilized Age
Because the section known as The Mountain's Door was mostly hewn and furbished by Mandalorians, much of its architecture feels more modern than lower levels. Basic hinged doors are made from plasteel or plascrete instead of wood and stone (though they remain hinged), and portions of metal flooring can be found in front of doorways and man-made structures like the fibercord bridge. Secret doors and similar devices use pneumatics to operate.
Despite these modern fittings, minimal electricity runs through this area, as the Nightscales wanted to avoid relying on central power sources that could be targeted if they were discovered. Indeed, this approach proved effective in allowing the Nightscales to hold out for some time in their final stand.
1. End of the Trail
The old path ascends to a cleft in the hillside and ends at the front door of Choruk'Ed.
The path climbs up one last steep switchback toward a bare shoulder of rock. The hillside rises steeply on your right and drops away precipitously on your left. Debris and rubbish lie scattered over the last hundred yards or so — discarded canteens, bits of charred bone, and dented crates or chests. Up ahead, the path opens onto a wide ledge and then doubles back sharply into the mountainside.
Two reptilian humanoids in mesh armor stand watch on the ledge. They appear inattentive and bored.
Creatures
Two trandoshan raiders stand guard along the northern edge of the ledge, though they aren't paying as much attention to their duties as they should. The characters (or their advance scout) can spot them from as far as 60 feet away. The sentries, Warsk and Tharsk, are grumbling in Dosh (the trandoshan language) about someone named Ulesk. Apply a −2 penalty to the trandoshan raiders' passive Perception scores.
Blaster Slits
When the characters move around the corner into the eastern part of the ledge, they might discover a row of hidden blaster slits in the rocky wall to the east about 15 feet above the floor. By examining the wall and making a successful DC 15 Wisdom (Perception) check, a character notices the slits.
Developments
If they are attacked or confronted by more than one character, Warsk and Tharsk call out a warning that's heard by the trandoshan raiders in area 4 and then attempt to flee to area 3. See the "Mountain Door Defenses" sidebar.
If the marksmen are alerted to the party's presence, they open fire on intruders on the ledge and in area 2. See area 4 for more information.
Mountain Door Defenses
The trandoshans are well prepared for a frontal assault on the Mountain Door. They follow the sequence of activity described below to the best of their ability unless prevented or interrupted by the player characters.
Round 1. After sounding the alarm, the sentries in area 1 (Warsk and Tharsk) flee south to area 2.
Round 2. The trandoshan raiders in area 4 fire at any exposed characters in area 1 if they have been alerted by the sentries. Warsk and Tharsk flee through the door into area 3.
Round 3. Warsk and Tharsk cross the fibercord bridge in area 3. The trandoshan raiders in area 4 continue to fire at characters in areas 1 and 2. One trandoshan raiders from area 4 moves through the secret door leading to area 3, intending to close and bar the double doors leading to area 2.
Round 4. Warsk and Tharsk slip through to area 5 to spread the alarm, alerting the trandoshan raiders in areas 11 and 14.
Round 5. The trandoshan raiders that shut the double doors in area 3 moves to area 4 or 4a while the other marksmen continue to fire at exposed characters. The trandoshan raiders in the eastern half of area 3 cut the fibercord bridge and prepare to defend the doors that lead to area 5.
Round 8. The trandoshan raiders and Old Yarassk in area 14 arrive in area 5.
Round 12. Great Ulesk and the trandoshan raiders from area 11 move to area 5 to ready a counterattack.
2. The Great Door
Moving eastward from the ledge, the trail turns south and rises steeply through a cleft in the rock toward a grand entrance.
Shallow steps lead up through a steep fissure to the south and turn east into the mountainside. Here, a broad entranceway has been carved out of the stone. Black marble steps cracked with age and veined with green moss lead up to a strong double door of carved stone, eight feet wide and almost ten feet tall. Blaster slits high on the north and south walls command this area.
If the characters quietly dealt with the trandoshan raiders in area 1 using stealth or disguise, the door is open. Otherwise, the trandoshans have been alerted to intruders, and the door is shut and barred from the inside. Forcing open the barred door is very difficult, requiring a successful DC 20 Strength check.
Creatures
If the trandoshans have been alerted, the trandoshan raiders in areas 4 and 4a fire their blasters until the characters either retreat or succeed in bypassing the door.
Development
If the characters are repelled, they must deal with additional reinforcements if they try this approach again. Two trandoshan raiders from area 11 stand watch at the doors on the west side of area 3, while Burkuss from area 9 backs up the trandoshan raiders in area 4 or 4a.
3. The Rift Hall
The great door opens into a large hall. A narrow ledge overlooks a deep, dark crevasse that cuts the room in two. A dangerous-looking fibrecord bridge, frayed and thin, spans the gap. Water gurgles and rushes somewhere far below. Two bronzium braziers burn brightly on either side of the door, illuminating the western half of the room. Another ledge is barely visible on the other side of the chasm.
The hall beyond the doors, and the great crevasse that runs through it, once served as the last line of defense for Choruk'Ed's Mandalorians.
Creatures
Two trandoshan raiders guard the eastern side of the room. They do everything in their power to prevent the characters from getting across the bridge. If any of the party members have darkvision or a means of illuminating the far side, read:
Two reptilian humanoids stand watch on the other side of the crevasse. They hiss a challenge, revealing sharp teeth, and prepare to fire scatterguns at you!
Fibrecord Bridge
The bridge is safe structurally, despite its appearance. Crossing under fire is difficult enough to require DC 10 Dexterity (Acrobatics) checks. On a successful check, a character can move at half speed. On a failed check, a character makes no progress. If the check fails by 5 or more, the character must make a DC 10 Strength or Dexterity saving throw. On a failed save, the character plummets almost 200 feet to the underground river below and is swept away. The characters can prevent falls by securing themselves with fibercord cable to a stable attachment point before crossing.
Secret Doors
Two secret doors on the north and south walls lead to areas 4 and 4a. The doors are well made, each requiring a successful DC 15 Wisdom (Perception) check to discover. A door can be opened by simultaneously pushing in two concealed stone plates in the wall about 1 foot above it. The plates can be found with a successful DC 15 Wisdom (Perception) check.
Developments
The trandoshan raiders use the rock outcroppings on their side for shelter from attacks, gaining half cover. They fire their scatterguns at characters trying to cross the bridge, or at those who hang back to cast powers or make ranged attacks. A character on the bridge who is hit by an attack must make a saving throw to avoid a fall, just as if the character's Dexterity (Acrobatics) check to move along the bridge had failed by 5 or more.
If an intruder gets at least two-thirds of the way across the bridge, one trandoshan raiders breaks cover to move through the double doors into area 5 and get help. The other tries to hinder the characters by chopping at the bridge's support cords with its techaxe. Each fibercord has 8 hit points and AC 11.
If one support cord is cut, the DC of the Dexterity (Acrobatics) check to cross the bridge increases to 12, and characters on the bridge must immediately make a saving throw to avoid falling as described above. If both cords are cut, the east end of the bridge drops into the crevasse and slams into the cliff wall on the west side.
Any characters on the bridge take 7 (2d6) kinetic damage from the impact with the wall and must make successful DC 12 Strength or Dexterity saving throws to avoid losing their grip and falling if they aren't otherwise secured.
Long-Term Development
If the trandoshan raiders destroy the bridge but repel the invaders in doing so, the trandoshans rebuild it within three days. Any trandoshan raiders killed here are replaced by trandoshan raiders from area 11.
4 and 4a. Marksmens' Stations
The Mandalorians excavated chambers on either side of the entryway so they could rain blasterfire down on attackers that approached the front door of their stronghold. The blaster slits are 15 feet or more above the floor of areas 1 and 2 and are impassible for creatures larger than Tiny. They grant three-quarters cover to the trandoshan raiders stationed behind them.
The secret doors in area 3 provide access to these locations.
The door slides aside to reveal a narrow passage that descends a flight of stairs into a small chamber. Light from outside slants into the room through a series of narrow embrasures.
The area is littered with well-gnawed bones, cobwebs, and rodet droppings. Poor-quality hide blankets are carelessly scattered over the floor.
Secret Door
In the north end of area 4, a secret door connects to area 14. A character can find the door by succeeding on a DC 18 Wisdom (Perception) check. The trandoshans are unaware of this passage and don't use it.
Creatures
Four trandoshan raiders, three in area 4 and one in area 4a, overlook the stairs leading up to area 2. These trandoshan raiders aren't particularly vigilant, but they do start shooting if the sentries in area 1 call for help. The trandoshan raiders are armed with blaster rifles instead of scatterguns.
When the characters turn the corner into area 2, the marksman in area 4a joins the attack while one of the marksmen from area 4 circles around through the secret door in an attempt to shut the double doors to area 3 (see "Mountain Door Defenses" above).
If the heroes attack by coming through the secret doors that lead to these areas, the marksmen fire at characters descending the stairs, then switch to techaxes and light shields as they move up to block the stairways.
Development
If the characters dispose of the sentries in area 1 quietly, the trandoshan raiders in area 4 might not notice them. Characters can attempt to sneak past the row of blaster slits by comparing their Dexterity (Stealth) checks to the trandoshan raiders' passive Perception scores. If the characters successfully sneak past the sentries, they reach area 2 without alerting the marksmen.
If the characters defeat these trandoshan raiders but withdraw from the dungeon before overcoming the rest of them, the marksmen are replaced by trandoshan raiders from area 14 and reinforced by Burkuss from area 9.
5. Trandoshan Cave
The walls and floor of this natural cave have been carefully smoothed. You can discern at least four routes leading off into darkness. Red coals glow from within the southeastern passageway, and a crude plasteel cage door closes off the southern exit. The floor is covered with sleeping covers, crates, sacks, and rubbish.
The second trandoshan raiding party normally lairs in the open area east of the doors. These trandoshans are currently out of the dungeon unless the party spent several days observing the hillside (see "Wait and Watch" above) before entering.
Cage Door
The cage door to the south leads to area 6, where two prisoners languish under the trandoshans' indifferent care. The prisoners leap to their feet and rush to the cage door to cry for help when the characters enter area 5.
Treasure
The crates and packs in this room contain mundane supplies looted from various settlements across Blasyndel — rations, polystarch, building materials, and so on. The total value is about 200 credits for about 500 pounds of material. Additionally, if characters are held captive in area 6, their equipment is stored here.
Development
When the second trandoshan raiding party returns (five days after the characters arrive at the Stone Tooth), they take up residence here. Add four trandoshan raiders to this room after their return.
6. Prisoner Cave
The trandoshans occasionally capture miners and settlers traveling through the forests north of Blasyn Outpost. They keep their captives in a small pen until they put them to death or ransom them.
A row of plasteel bars forms a crude but serviceable barrier across the mouth of this small cave. A door locked with a durasteel lock secures the room. Inside, you see two filthy prisoners dressed in tattered rags, crowding close to the door. "Thank the Force!" one cries out. "We're rescued!"
Creatures
The prisoners are a pair of human commoners named Gerra-Dil and Corana. They hail from a small settlement a few miles from Blasyn Outpost, and the trandoshans have held them captive for almost a month now. Neither one's family could raise the ransom demanded by their captors, so both await a terrible death at the trandoshans' hands.
Opening the cage door requires a successful DC 12 Dexterity check using a security kit, the key from Old Yarassk's pocket (see area 14), or a sharp blade and a little time. (The lock has AC 19 and 5 hit points.) Gerra-Dil and Corana are extremely grateful for their rescue, but they will not join the characters in their quest — neither is skilled at fighting, and they just want to go home.
Treasure
The characters can free the prisoners and escort them back to their homes (about a day's travel away). The grateful families reward them with two medpacs (fine). Taking the time to see Gerra-Dil and Corana to safety, however, gives the trandoshans a chance to prepare for the next assault.
Development
Any characters captured by the trandoshans eventually wind up in the cage, unless they demonstrate that they're too much trouble to be left alive. Their gear is stored among the other supplies in area 5. New characters joining the party might also be introduced as prisoners here.
7. Fire in the Hole
The irregular chamber southeast of the main cave holds the main cooking fire of the gang. A crevice in its ceiling winds up through the rock to the natural chimney on the hilltop above (see "The Stone Tooth" above).
A large, smoky fire crackles in the center of this room. Battered cooking equipment is stacked all over; clearly, this space serves as a crude kitchen. You feel a distinct draft drawing the smoke up through a rough hole in the ceiling.
The characters might attempt to descend into the area through the chimney. The shaft is about 80 feet long; its walls are irregular and rough but slippery, requiring successful DC 15 Strength (Athletics) checks to climb. Anchoring a fibercord at the top of the shaft reduces the check DC to 5. A careful climber can easily avoid the fire on the way down.
If a character's check fails by 5 or more, the character must succeed on a DC 10 Strength saving throw or fall the rest of the way down the chimney. In addition to falling damage, the character takes an extra 3 (1d6) fire damage from the hot coals and makes enough noise to alert any trandoshans in area 5.
8. Trandoshan Commons
Haphazard stacks of crates, plasteel drums, packs, and bundles crowd this long cavern. To the north, two finished stone passageways open to the east and west; a narrower opening leads south. In the southeast corner is an old well full of murky water.
The cavern is full of plunder from the trandoshans' raids through the surrounding area: rations, alcohol, blankets, tools, plasteel, resicrete, bolts, bantha wool, and similar goods.
Fleximetal Gate
The passage leading east is blocked about 10 feet in by tightly packed crates and sacks of polystarch. Removing this material allows travel for another 20 feet to the east, where the tunnel ends at a fleximetal gate stuffed with blankets and bedding. The trandoshans created these barricades to prevent the cave sketto in area 10 from getting out.
The fleximetal gate's lock is rusted shut; it can be picked with a successful DC 12 Dexterity check by a character using a security kit or forced open with a successful DC 15 Strength check.
Secret Doors
The passage to the south branches in a Y shape. The southwest branch connects to area 5, and the southeast one leads to a secret door cleverly constructed to blend into the natural rock of the cave. A character who makes a successful DC 15 Wisdom (Perception) check discovers the door.
On the other side, a worked passage continues up to what appears to be a blank wall, marked with graffiti written in Dosh. The markings conceal another secret door, which requires a successful DC 12 Wisdom (Perception) check to find.
Treasure
The mundane supplies have a total value of about 200 credits for about 500 pounds of material. With a successful DC 10 Wisdom (Perception) check, a character finds a loose stone. Behind it is hidden a small locked strongbox containing 1,800 credits and a plasma grenade. This is the personal treasure of Old Yarassk (see area 11).
9. Shaman's Lair
The secret door pivots open to reveal a chamber of finished stonework. The room is cluttered with crude furnishings, and the air is hazy with the smoke of a small cooking fire. Dozens of yellowed skulls, reptilian and humanoid alike, are suspended from the ceiling by fraying fibercords strung through holes punched in the bone. A trandoshan in a ragged black robe looks up from her work, her face twisted in an expression of rage.
Creatures
Burkuss the shaman has commandeered a chamber as her private domain. She lives here with her two followers (both female trandoshan raiders) separate from the rest of the gang.
The door to area 10 is locked, but the key is inserted in the keyhole on this side. Burkuss keeps the door closed because she wants to confine the cave sketto on the other side. (She calls the sketto her "little stingies" and occasionally captures one to use in her rituals.)
Burkuss orders her two followers to engage intruders while she attempts to neutralize a dangerous-looking combatant with the malacia force power. Then she casts valor on herself and the others, and finally casts animate weapon on a nearby vibrospear before joining battle.
If the fight goes poorly, Burkuss throws an incendiary grenade (she has three) and opens the door to area 10, releasing the cave sketto. She takes advantage of the confusion, using more grenades if necessary, to escape and seek help.
Treasure
A character who makes a successful DC 10 Wisdom (Perception) check finds two bantha-hide sacks among the clutter, each containing 160 credits. If Burkuss is defeated, the characters can recover any of her three incendiary grenades that weren't used.
Secret Exit
A successful DC 12 Wisdom (Perception) check is required to find the secret door on the west wall. It connects to the passage leading toward area 8; the secret door farther along the passage to the west isn't concealed from this side.
10. The Grand Stair
The ceiling soars thirty feet high in the center of this impressive chamber, and the walls are carved with images of Mandalorians in resplendent armor. Two large stone doors exit to the north and south. Several old skeletons lie scattered near the northern door. A gate of wrought fleximetal stands in the western wall.
In the center of the floor, a natural rift descends sharply. Dozens of stone steps lead down into darkness. You can hear the distant sound of running water and a curious buzzing coming from far below.
The easternmost chamber in the Mountain Door complex formerly served as the main entrance to the Glitterhame, which occupies the great natural caverns deeper in the hillside.
Creatures
If the characters aren't trying to be quiet, four hungry cave sketto attack.
The buzzing grows louder, and then four things resembling insectoid reptiles emerge from the stairwell and fly toward you!
Large quantities of smoke discourage the cave sketto, and they don't move closer than 5 feet from a source of fire (including characters set alight by the trap described below). Sated cave sketto flap off to digest their meal down in area 15a of the Glitterhame.
The fleximetal gate blocks entry from area 8 (see it for more information). The stairs in the rift lead down to the northwest end of area 15 in the Glitterhame.
The door to the south connects to area 9 and is locked from the other side. The lock can be picked from this side by someone who makes a successful DC 10 Dexterity check using a security kit, but doing so pushes the key out on the other side and warns Burkuss the shaman that someone's coming.
Fire Trap
The plascrete door to the north is carved in the image of a Mandalorian helmet, complete with a T-shaped visor. Hinges are visible. On either side of the door, eight small spouts are carefully worked into the stonework about 10 feet above the floor.
The skeletons near the door are those of pirates killed by the trap long ago; their remains show signs of severe scorching. Rusted blades and blasters lie near the bodies.
If the door is pulled open before the trap is disabled, a counterweight drops and pumps lit flammable gases from the spouts. Each creature within 15 feet of the door takes 10 (4d4) fire damage, or half damage with a successful DC 10 Dexterity saving throw. At the start of each of its turns thereafter, an affected creature takes 5 (2d4) fire damage.
A creature can fight the flames around itself by making a successful DC 10 Dexterity check as an action; a successful check reduces the fire damage it takes at the start of each of its turns to 2 (1d4). Making another successful Dexterity check as an action quenches the flames around the creature entirely.
After the door is opened, the counterweight pulls it shut again in 2 rounds, resetting the trap. The characters can prevent this from happening by jamming the door open. If the trap resets, it can be activated only once more before its gas is depleted.
The spouts on the wall can be detected by someone who succeeds on a DC 15 Wisdom (Perception) check. With a successful DC 10 Intelligence (Investigation) check afterward, a character deduces that they form part of a trap mechanism. A character who makes a successful DC 12 Dexterity check using a security kit, or someone who tightly plugs the holes with durable material, renders the trap inactive.
Someone who succeeds on a DC 10 Intelligence (Investigation) check while examining the door identifies the counterweight mechanism that activates the trap; it can be deactivated afterward by someone who makes a successful DC 10 Dexterity check using a security kit.
Development
Inspecting the small room behind the door reveals the full extent of the trap's counterweight mechanism, as well as a system of pipes that connect the spouts to two 20-gallon bronzium drums (containing flammable gas for the fire trap).
A character who is proficient in the use of a demolitions kit might be able to craft incendiary grenades from the dregs of gas in the tanks. Doing so requires a successful DC 15 Intelligence check after the character finishes a long rest. On a successful check, the character salvages 1d4 incendiary grenades. On a failed check, the gas is lost and no further attempt to use it can be made. If the check fails by 5 or more, the character is affected as though hit by an incendiary grenade.
11. Trandoshan Quarters
Drums, crates, and sacks line the walls of this chamber. Among the loot, four metal frames and other simple furnishings show that it now serves as a bunk room. Four reptilian humanoids with slitted eyes are cleaning their weapons and mending their gear; they spring to their feet and hiss in challenge.
Creatures
Four trandoshan raiders live in an old guardroom. These trandoshans fight dirty. They team up into pairs, each focusing on one character. One trandoshan raiders in the pair attempts to trip the character, then the other attacks, hoping for a prone target.
Treasure
The supplies stockpiled here are the same as those in areas 5 and 8: trade goods and staples raided from travelers and nearby settlements.
The trandoshans have 2,100 credits stashed in an old fleximetal cauldron under vermin-infested bedding. A small pouch in another trandoshan's bedding contains a topaz worth 2,000 credits and two onyx stones worth 500 credits each. This loot isn't well hidden; anyone searching the room can uncover it.
Development
If the characters leave the complex before they have defeated the trandoshan leaders, two of these trandoshan raiders move to reinforce area 2 (reducing the number in this room to two) before the characters return.
12. Great Ulesk
A short flight of stairs leads up to a large, fleximetal-bound door. A bloodstained human skull is fixed to the center of the door by a durasteel spike.
The door isn't locked, but it is heavy and hard to move; a successful DC 17 Strength check is needed to force it open.
Beyond the door lies a small chamber covered in poor-quality bantha hide and illuminated by glowrods in bronzium sconces. The smell is indescribable. A monstrous creature about ten feet in height steps forward, a massive vibroaxe in one hand. Two large, mutated kath hounds strain at chains held closely in its other hand. "You think to challenge the Great Ulesk?" the creature screeches. "Vask! Thrass! At them!"
It drops the chains and, as the kath hounds spring forward, it charges at you with a hiss of rage.
Creatures
Great Ulesk is a fierce and heavy-set trandoshan mutant who acts as one of the huntmasters for the trandoshans of the Mountain Door. The chamber he claims as his own once belonged to the Mandalorian watch-captain.
If the characters fail to open the door on the first attempt, Great Ulesk is alerted to their presence. He releases his two mutated kath hounds, Vask and Thrass, and takes the Ready action to attack the first enemy who enters the room.
Great Ulesk neither asks nor gives quarter, but if the trandoshan mutant falls, the mutated kath hounds attempt to flee.
Development
If at least half the trandoshans in the tribe are slain in addition to Ulesk, Old Yarassk and Burkuss, any survivors abandon the dungeon after the party leaves. They become roving bands of raiders that the adventurers might have to deal with later.
Treasure
Great Ulesk keeps his hoard in two large plasteel chests against the south wall: 6,000 credits, a mutagen of climbing, and a lightfoil (fine) taken off a prior quarry. The trandoshan would never stoop to wielding the delicate blade like some Jedi paragon of righteousness.
13. Mandalorian Statue
At the end of the passage stands a statue of a fierce-looking Mandalorian in traditional armor. The stone warrior holds a sword in one hand and a smith's hammer in the other. The statue is about seven feet tall and stands on a large stone pedestal.
The statue is part of another trap designed to thwart invaders of the citadel. All the denizens of the Mountain Door know about the trap and avoid triggering it.
If any character approaches within 5 feet of the statue without disarming the trap, read:
Suddenly, you feel a small click from the floor beneath your feet. The statue's face-mask splits in half vertically and slides open as greenish gas billows forth.
Poison Gas Trap
A pressure plate is set into the floor about 5 feet in front of the statue. When at least 20 pounds of weight is placed on the pressure plate, it depresses into the floor, opening the statue's face-mask to reveal a nozzle from which poison gas sprays out in a 15-foot cone. Each affected creature must succeed on a DC 12 Constitution saving throw or become poisoned until the creature finishes a short rest.
Someone who examines the proper location and succeeds on a DC 15 Wisdom (Perception) check notices the pressure plate. A successful DC 12 Dexterity check by a character using a security kit disarms the trap; the pressure plate can also be deactivated by physically jamming it so that it can't move.
If the trap isn't deactivated, it resets automatically after 1 minute.
14. Bunk Room
A large chamber, once the principal bunk room for Mandalorian guards posted in this part of the dungeon, has been appropriated by the trandoshan raiders. Up to eleven of the creatures live here, but at the moment a group of them are out raiding the countryside nearby, and three others are on duty in area 4.
This chamber is filled with metal bunks, tables, and chairs, and the floor is strewn with filthy pelts. At first glance it appears that a dozen or so humanoids might use this area as a sleeping quarters.
Creatures
Only Old Yarassk and four trandoshan raiders are at home when the characters enter the chamber. They enter combat as soon as they're aware of intruders.
If the battle goes poorly for the trandoshans, Old Yarassk orders a trandoshan raiders to break off and summon help from area 9. If things get desperate, he sends for help from the trandoshans in area 11. If the trandoshans here fall, Yarassk attempts to join Great Ulesk in area 12. Old Yarassk carries a medpac and applies it if his current hit points drop to one-fourth his hit point maximum or lower.
Secret Door
The trandoshans don't know about the secret door in the western wall, but a character who searches the spot can discover it with a successful DC 15 Wisdom (Perception) check.
Development
Two days after the characters arrive, the first raiding party returns and reinforces this room with four more trandoshan raiders. Thus, the party might encounter as many as nine creatures in this room. Any trandoshan raiders slain in area 4 are replaced by trandoshan raiders from this room, if any survive.
Treasure
A successful DC 10 Wisdom check reveals a loose stone on the south wall, concealing a sack that holds 650 credits. Aside from his medpac and a techaxe imprinted with Durj's smith-mark, Old Yarassk keeps his personal treasure in area 8. Old Yarassk carries the key to the cage door in area 6.
The Glitterhame
Below the Mountain Door lies the Glitterhame, a large series of natural caverns in the heart of the Stone Tooth. The caverns are beautiful: the walls sparkle and glisten with flecks of semiprecious stone, and millennia of sculpting and erosion by water have created sheets of fluted flowstone, delicate stalactites, and majestic stalagmites. Water streams down through the caverns toward an underground river far below.
The Glitterhame is now home to a band of troghouls, creations of an ancient Sith alchemist that populate the subterranean caverns of Blasyndel. The troghouls and the trandoshans maintain an uneasy peace, although skirmishes occur.
The troghouls usually use the old pirate tunnel (see area 21) to hunt on the surface and leave the trandoshans alone. In return, the trandoshans rarely invade the troghouls' domain.
Vision in the Glitterhame
Range of vision is important in the characters' exploration of this level. Most light sources don't illuminate beyond 60 feet, and many of the chambers and passages in the Glitterhame are much larger than that. The darkness hides many perils.
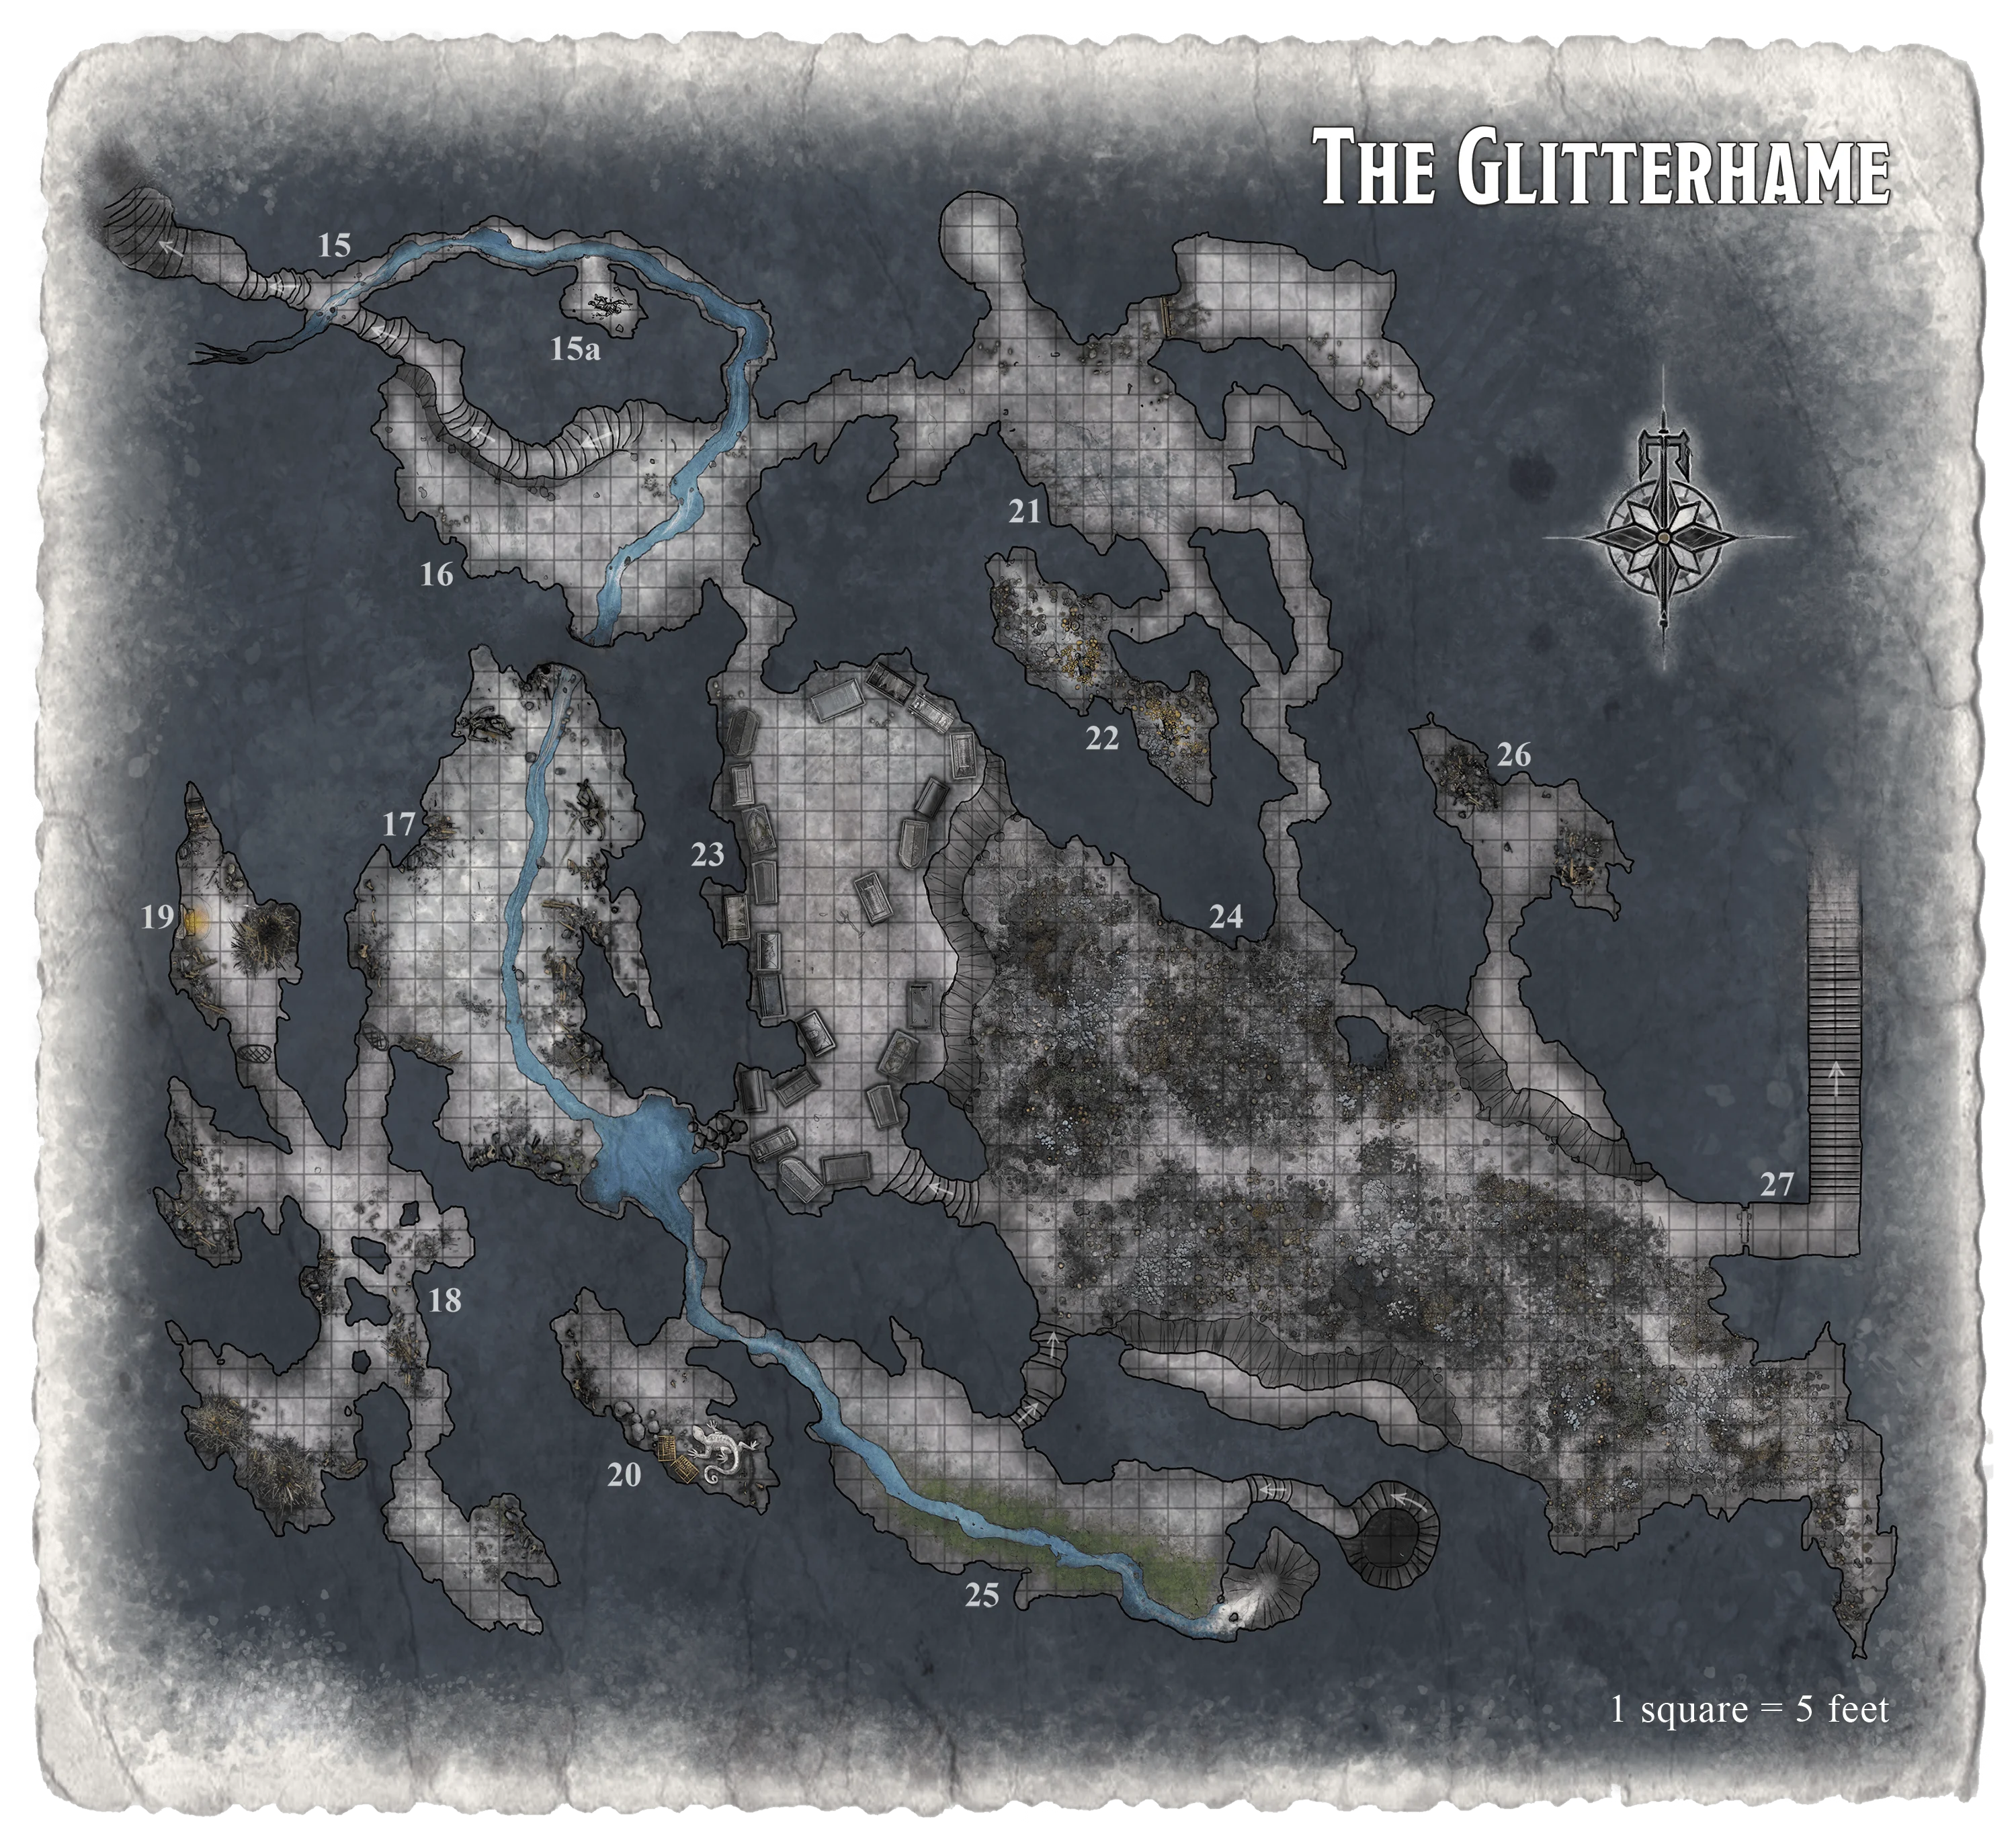
15. The Cold Stream
If the characters take the steps down from area 10, they emerge into a narrow tunnel with a subterranean stream flowing across it.
The stairway twists and turns a long way downward. The floor has been cut into hundreds of shallow steps, but the walls and ceiling are still natural rock. About sixty feet down, a rushing stream spills from a narrow crack to the south and crosses the stairway, disappearing into a narrow, winding tunnel to the north. The rill is only two or three feet wide.
If the characters explore the route taken by the stream, they have to go single file as they wade through the water. The bed of the fast-moving stream slants sharply; each character must make a successful DC 8 Strength (Athletics) or Dexterity (Acrobatics) check to descend safely. If the check fails by 5 or more, the character falls, tumbling 20 feet downhill and taking 3 (1d6) kinetic damage.
15a. Sketto Colony
Creatures
Sketto have made their nest in a small cave overlooking the stream, about halfway down the passage. Fissures at the back of the cave run 150 feet to the surface, but nothing larger than a cave sketto can fit through. Six cave sketto are sleeping in the nest, but any noise or light from a party descending the streambed wakes them. Each round after the characters enter the cave, 1d4 cave sketto wake and attack, until all are active.
Treasure
On the floor at the back of the cave sketto cave lies the desiccated corpse of a bothan explorer who died here many years ago — part of the failed expedition. A synth-hide pouch on its belt contains 350 credits.
16. High Cavern
The first chamber of the Glitterhame proper is bisected by the stream and has a number of routes leading away from it.
The descending fissure opens up abruptly into a very high cavern, its ceiling easily forty feet or more overhead. The stairway continues to wind down along a ledge that follows the north wall of the chamber. A fast-moving stream about five feet wide runs across the floor of the chamber from the north and disappears under a low stone overhang to the south, and larger passageways exit to the southeast and the northeast.
Creatures
Four cave sketto are clinging to the chamber walls high overhead. They can see any light source that is brought into this chamber, but they are very hard to spot in turn, owing to the height of the ceiling. The cave sketto have advantage on Dexterity (Stealth) checks made to hide unless a character specifically looks for danger overhead, so they might surprise the party.
The stream exits the south wall of the cavern through a passage only 3 feet high, half filled by water, which serves as an entrance to the troghouls' lair (area 17). Anyone who searches the stream's banks finds the footprints of Medium clawed creatures with a successful DC 10 Wisdom (Survival) check.
To reach area 17 from this cave, a Medium or larger character must crouch down and then wade or crawl through the stream. Fire-based light sources are difficult to keep lit, since the lowest point of the ceiling in this passage is only about 6 inches above the water's surface.
17. Troghoul Cavern
The troghouls that infest the Glitterhame have claimed one of the largest caverns as a common room and food storage area. They defend it against all intruders. Characters coming from area 16 might not be able to see everything at first.
Floundering through the cold, swift stream, you emerge in a huge cavern. The ceiling must be thirty feet overhead, and the far end of the cave is lost in darkness. A foul stench assaults your nostrils immediately. The remnants of butchered game animals hang from crude wooden stakes along the cavern walls, and you spot a pair of trandoshan corpses treated in the same fashion.
The grisly trophies that decorate the room represent about two or three weeks' worth of meals for the troghoul tribe. The troghouls like to let their meat age a bit before eating it, so most of the carcasses here are appallingly decayed.
Creatures
Two troghouls are hiding in the northern end of this area, one on each side of the stream. Their Chameleon Skin trait gives them advantage on Dexterity (Stealth) checks made to hide. They attack as soon as two characters have entered the area, likely achieving surprise.
Mud-and-Wattle Door
The troghouls have blocked the southwest passage leading to the main warren (area 18) with a crude plug made of mud and wattle. A successful DC 10 Strength check is required to pull it open. If alerted by the sounds of battle, the troghouls on the far side secure the door, increasing the DC of the check to 15.
Pool
The stream flows through the center of the cavern, growing somewhat wider and deeper until it reaches the southeast corner. The pool in that location is about 20 feet across and about 10 feet deep in the middle.
Along the eastern edge of the pool, a short passage leading to area 23 has been blocked up with loose rubble and mud, creating a rough stone wall 10 feet across. Characters can break through this barrier with some effort; it has AC 16 and 50 hit points per 5-foot segment.
18. Troghoul Warren
Most of the troghouls dwell in a group of dismal caverns, occupying three caves that branch off the warren's central area to the northwest, southwest, and southeast.
The passage opens into a long, low cavern that has three narrow, twisting passages leading off into darkness. Numerous rock columns rise to meet the stone overhead. The air is thick with troghoul stench, and the floor is littered with refuse from the monsters' meals and gnawed bones of dubious origin.
Something scrapes and hisses in the dark, and you hear the soft padding of clawed feet on rock.
Characters who are being stealthy might catch the troghouls unawares. If the characters are carrying any light sources or making a lot of noise when they enter, the troghouls in the west and southeast chambers are alerted. As soon as any fighting begins, one troghoul attempts to escape to the north, toward area 19, and summon Kaarghaz, the chieftain.
Northwest Chamber
Two troghouls are sleeping in the small cave to the northwest when the characters enter area 18.
Southwest Chamber
The females tend the colony's newborns and raise their young in the southwest cave. Six troghouls defend the hatchery and fight to the death to defend their young.
The chamber also contains two dozen noncombatant children, which scurry away from intruders. Characters receive no XP for slaughtering them.
Southeast Chamber
Three troghouls recently returned from the hunt are relaxing in the southeast cave. Unless they are alerted to the characters' presence, they are concentrating on devouring what's left of a small eopie.
Tactics
If the characters attack the troghouls in the northwest or southeast chamber, those in the other chamber hear the sounds of battle and rush to assist. The troghouls in the southwest chamber remain there to protect the children; if the characters attack the southwest chamber first, all the troghouls from the other chambers come to join the fight.
19. Chieftain's Cave
The door leading north from area 18 is a mud-and-wattle barrier wedged in place; a successful DC 10 Strength check is required to pull it aside.
Glowing coals in a crude hearth illuminate this large cave. The ceiling here rises about fifteen feet above the floor, and rubbish and skins cover the floor. A lizard the size of a small horse rises and slowly slithers toward you.
Creatures
The chief of the troghouls, Kaarghaz, occupies the chamber along with his pet juvenile cave sleen. Kaarghaz is a troghoul with changes as indicated in appendix B.
If the characters make a lot of noise or tip off their presence in some other way, Kaarghaz begins this encounter invisible (see below). Otherwise, read:
Behind the lizard, a hulking, mutated creature easily a foot taller than any of the others you've seen glares at you and snarls.
If Kaarghaz is alerted to the party's approach, he uses force camouflage on himself before they enter. If he loses at least half his hit points, he tries to escape (using force camouflage if possible). If his escape succeeds, he soon afterward rounds up a war party of surviving troghouls from other areas to track down and ambush the party.
Negotiation
Kaarghaz starts out hostile and won't become friendly to the characters. Nevertheless, a character who speaks Sith might be able to stave off combat by parleying with the chieftain. For example, the characters might have captured some of the young in the southwest chamber, intending to ransom them back to the troghouls in exchange for treasure. Even if Kaarghaz can be convinced to give up some of his wealth, he doesn't let the matter rest — he forms a war party (as described above) and goes after the characters.
Treasure
The chief's chamber is strewn with trophies, including the skulls, bones, hides, and weapons of defeated foes. Amid the mess, a small square of black silk hides a ruby worth 3,000 credits. It can be found with a successful DC 10 Wisdom (Perception) check. A battered plasteel chest with leather clasps holds 1,500 credits.
20. Scaly Lair
The swift stream passes over a steep slab of bedrock in front of a short passage. The cave beyond is long and low, with an uneven ceiling about ten feet high. In the southern end of the room, an enormous white-scaled lizard lunges and snaps, but you can see that a sturdy chain around its neck tethers it in place. The agitated creature twists in frustration, its tail lashing.
Behind the lizard lie a couple of durasteel chests.
Creature
The cavern holds the troghouls' secret weapon — a freshly captured cave sleen. Although the lizard is chained, it can attack anyone who comes within its reach. It strikes with its tail first, hoping to knock a target prone, then snaps at it with its powerful jaws to gulp it down.
If the party decides to attack the beast, the cave sleen grows desperate enough to break free of its chain on its next turn after losing at least 20 hit points. It will initially attempt to take revenge on its tormentors, but after a round or two rushes out and towards the waterfall in area 25 to escape.
Treasure
The two chests contain a total of 2,200 credits. One holds a mutagen of climbing, and the other a mutagen of water breathing.
21. Pirate Tunnel
Several passages branch away from this large, high-ceilinged cavern. To the north, an excavated, square-mouthed tunnel shows that someone has been at work in these caves. A gate of rough-hewn timber blocks a small passage to the northeast. Three other passageways wind off toward the south. A heavy animal smell lingers in the air.
A hundred years ago, the pirates besieging Choruk'Ed used mining equipment to tunnel into the Mandalorian stronghold. The cavern they emerged in now serves as a guard post and a mustering point for troghoul raiders.
The tunnel in the northern end of the area runs about 500 feet and opens on the hillside (see the "Pirate Tunnel" subsection of "Scout the Area"). The troghouls use the opening to hunt on the surface, though they have avoided settlements for the time being.
Creatures
In the northern part of the cavern, near the passages that run east and west, two troghouls are hiding. From their Chameleon Skin trait, they have advantage on Dexterity (Stealth) checks to hide. The troghoul on the west side waits for an opportune moment to attack intruders with surprise. The other moves east to the gate and opens it to release a garu-bear, which attacks any non-troghoul in the next round (roll initiative for the garu-bear when it is released).
Bear Pen
A sturdy timber gate, latched on the outside, seals a smaller cave to the east. The garu-bear attacks any non-troghoul that opens the cage door, then tries to escape through the tunnel.
The animal isn't trained but has come to expect food from the troghouls. It is hostile toward strangers, but someone proficient in Animal Handling might be able to calm it down with a DC 15 Wisdom check. If the check succeeds and no troghouls remain nearby, the characters can release it safely and let it depart.
22. Fungus Cavern
A trickle of water seeping down from the hillside above reaches this irregular cavern, nourishing a profusion of fungus—weird puffballs, tall caps, and patches of fuzzy mold in a variety of colors. A golden-brown carpet of mold covers an old corpse in rusted Mandalorian armor in the southern part of the room, and a narrow passageway leads to another small room beyond this one. A surprisingly bright vibroblade gleams in the corpse's cold grasp.
Hazard
The corpse that the characters first see is that of a Mandalorian warrior - beneath the armor, the body has rotted to a skeleton, though the coverings prevent this from being visible. From its location, it's possible for someone to see a second skeleton (human) in the south end of the chamber. Both skeletons are covered with a particularly virulent form of mold. A character can identify the threat with a successful DC 10 Intelligence (Nature) or Wisdom (Survival) check.
If either skeleton or the items they hold are touched, the mold ejects a cloud of spores that fill a 10-foot cube originating from the skeleton. Any creature in the area must succeed on a DC 15 Constitution saving throw or take 10 (3d6) poison damage and become poisoned for 1 minute. At the end of this time, unless the poisoned condition is removed, the creature must repeat the saving throw, taking 17 (5d6) poison damage on a failed save, or half as much damage on a successful one. Exposing a patch of the mold to sunlight or dealing any fire damage to it destroys it.
Treasure
The Mandalorian corpse clutches a beskar-alloy vibroblade that bears Durj's smith-mark. The human skeleton wears a durasteel helmet chased with silver, worth 1,100 credits.
23. Mandalorian Sepulchers
You gaze into an extremely large cave faintly lit by natural phosphorescence. Its ceiling rises fifty feet high in places. Crystals glimmer softly in the eerie light. Weird, beautiful flows and structures of delicate stone grace the chamber. The western portion of the great cave is separated from the rest by a steep bluff; the ceiling here is half the height of the rest of the chamber.
A couple dozen large stone sepulchers line the cavern walls, each carved with intricate reliefs and designs and marked with Mando'a script.
The upper portion of the great cavern was intended to be the final resting place of Durj's Mandalorians.
Durj and his followers believed that their war against the pirates would ultimately claim them all, so they built their own tombs during the first phase of carving out the stronghold. Ironically, only a handful of the Mandalorians were ever interred here; the rest lie where they fell when the pirate forces stormed Choruk'Ed.
The troghouls have a superstitious fear of the tombs and refuse to set foot in this part of the Glitterhame. They don't pursue characters who enter this area.
If the characters investigate the tombs at greater length, read:
Twenty-three sepulchers stand here. The lids are carved in the likenesses of Mandalorians in traditional armor. Mando'a script on the front of each tomb appear to represent the names of the occupants or the intended occupants. Three of the stone coffins have additional script carved into them.
If someone in the party can read Mando'a, the following details become apparent:
The additional script records the occupant's date of death and the great deeds the Mandalorian performed in life. Also carved into these three coffins is a warning that doom awaits any who dare to defile the honorable dead.
The names on these three sepulchers are those of Borgol Rook, Gharin Awaud, and Numik Vizsla.
Treasure
Each tomb is a black marble vault 6 feet long, 4 feet high, and 3 feet wide, with a heavy stone lid. Despite the warnings carved on the tombs, there is no danger here. Even if the characters disturb Borgol, Gharin, or Numik, all they find are old bones and no traps.
The three Mandalorians were buried with little funerary wealth; Durj's Nightscales believed in honoring their dead with their deeds, not riches. Borgol's remains include a ring of gold in the shape of a mythosaur holding its tail in its mouth, worth 1,200 credits. Gharin was buried with a finely crafted heavy blaster rifle bearing Durj's smith mark; a chain strung around the stock bears a garnet worth 1,100 credits.
24. The Glitterhame
This great cavern glimmers with a faint phosphorescence. The ceiling is almost fifty feet overhead, and bright flecks and gleaming stone formations are visible in the distance. Patches of strange fungi dot the floor, including capped stalks standing as tall as a human and glowing puffballs almost a yard wide.
High ledges rise fifteen to twenty feet above the floor on the north, south, and west walls. Narrow passageways lead off to the north and the south, and a flight of carved stone stairs descends from the western ledge to a path that meanders through the center of the chamber toward a small durasteel door in the eastern wall. Audible throughout the entire chamber is the sigh of a soft, cool breeze that rises toward the surface far above.
The fungal growths are harmless. In fact, the stalks and the puffballs are edible, if not especially tasty. The danger lies in the k'lor'slug nest that overlooks the path.
Creatures
Two k'lor'slugs lurk in the 20-foot-high rockfall that spills down from area 26, at the place where the path leading east comes closest to the slope. They are wedged into spaces between boulders, 6 to 8 feet above the cavern floor. Their Stone Camouflage trait gives them advantage on Dexterity (Stealth) checks made to hide, so they might surprise the party.
The k'lor'slugs attack anyone who travels on the path next to the rockfall or climbs anywhere along the slope that leads to area 26. Any character trying to scale the rockfall while under attack must succeed on a DC 8 Strength (Athletics) check to make progress. If the characters reach area 26 by some other means, the k'lor'slugs move to attack them there.
25. Long Cavern
The thunderous roar of falling water fills this long, low chamber, and spray makes everything slick and wet. A fast stream rushes through the center of the cavern, emerging from beneath a crude dam of rock and mud in the western wall. The stream disappears into a dark shaft at the cavern's eastern end. A rough, winding path follows the stream toward the east.
The chamber runs from the troghoul warrens to a natural shaft on the east end that leads down into the Sinkhole (see area 28). The stream spills over the edge of the shaft in a subterranean waterfall, and near the waterfall a narrow, winding stairwell leads down.
Slippery Slope
The smooth cavern floor slopes down toward the stream, and much of the area immediately north of the stream is covered with a thin layer of slime. The slime makes the floor very slippery. Its presence can be discerned with a successful DC 15 Wisdom (Perception) or Wisdom (Survival) check.
Any creature that enters the slippery slope or starts its move there must make a DC 12 Dexterity (Acrobatics) check. A creature that fails the check falls prone and slides southward toward the stream at half its walking speed. The stream is flowing fast enough that anyone who falls in must succeed on a DC 10 Strength saving throw to avoid being swept over the waterfall.
A creature that goes over the waterfall lands in a pool 60 feet below (see area 28), taking 10 (3d6) kinetic damage and suffering one level of exhaustion.
26. K'Lor'Slug Lair
A rocky ledge sits at the top of a steep, irregular rockfall about twenty feet high. The mouth of a side cavern leads into darkness beyond.
Creatures
The two k'lor'slugs hidden in the rockfall (see area 24) make their lair at the end of a passage that winds north from the ledge. They are encountered here if they retreated to attack characters who got past them.
Treasure
The k'lor'slugs discarded the inedible portions of their victims in the back of the cave. Rooting through the grisly remains uncovers a suit of weave armor and scattered credit chips totaling 800 credits.
27. Security Door
The entrance to Durj's halls and forges lies behind a sturdy security door.
Cut into the cavern wall is a strong-looking security door, about seven feet tall and four feet wide. Durasteel panelwork makes up its surface, and a tarnished silver imprint — Durj's smith-mark — gleams on the door's rusted face. A control panel with an electronic lock is built into the adjoining wall.
The pneumatic security door is made from durasteel and will only open if the electronic lock is deactivated. It can be opened with the code cylinder on the Mandalorian skeleton in the prison (see area 34). A character can pick the lock with a security kit and a successful DC 18 Dexterity check. Forcing themselves through the door is very difficult, requiring a successful DC 25 Strength check to break it down or force it open.
On the other side of the door is a steep staircase that leads up to area 35 in the Foundry.
The Sinkhole
The stream that flows through the Glitterhame descends through the chasm in area 25 to an even lower level of caverns — the Sinkhole. Here, it joins a subterranean river that traverses dark caverns and forgotten storerooms before connecting with the Black Lake.
None of the monsters that inhabit the complex regularly visit this place. The Nightscale beast sometimes swims through its submerged areas, using the river as a back door to its lair.
A narrow staircase winds down along the chasm walls until reaching bottom, where it offers access to area 28.
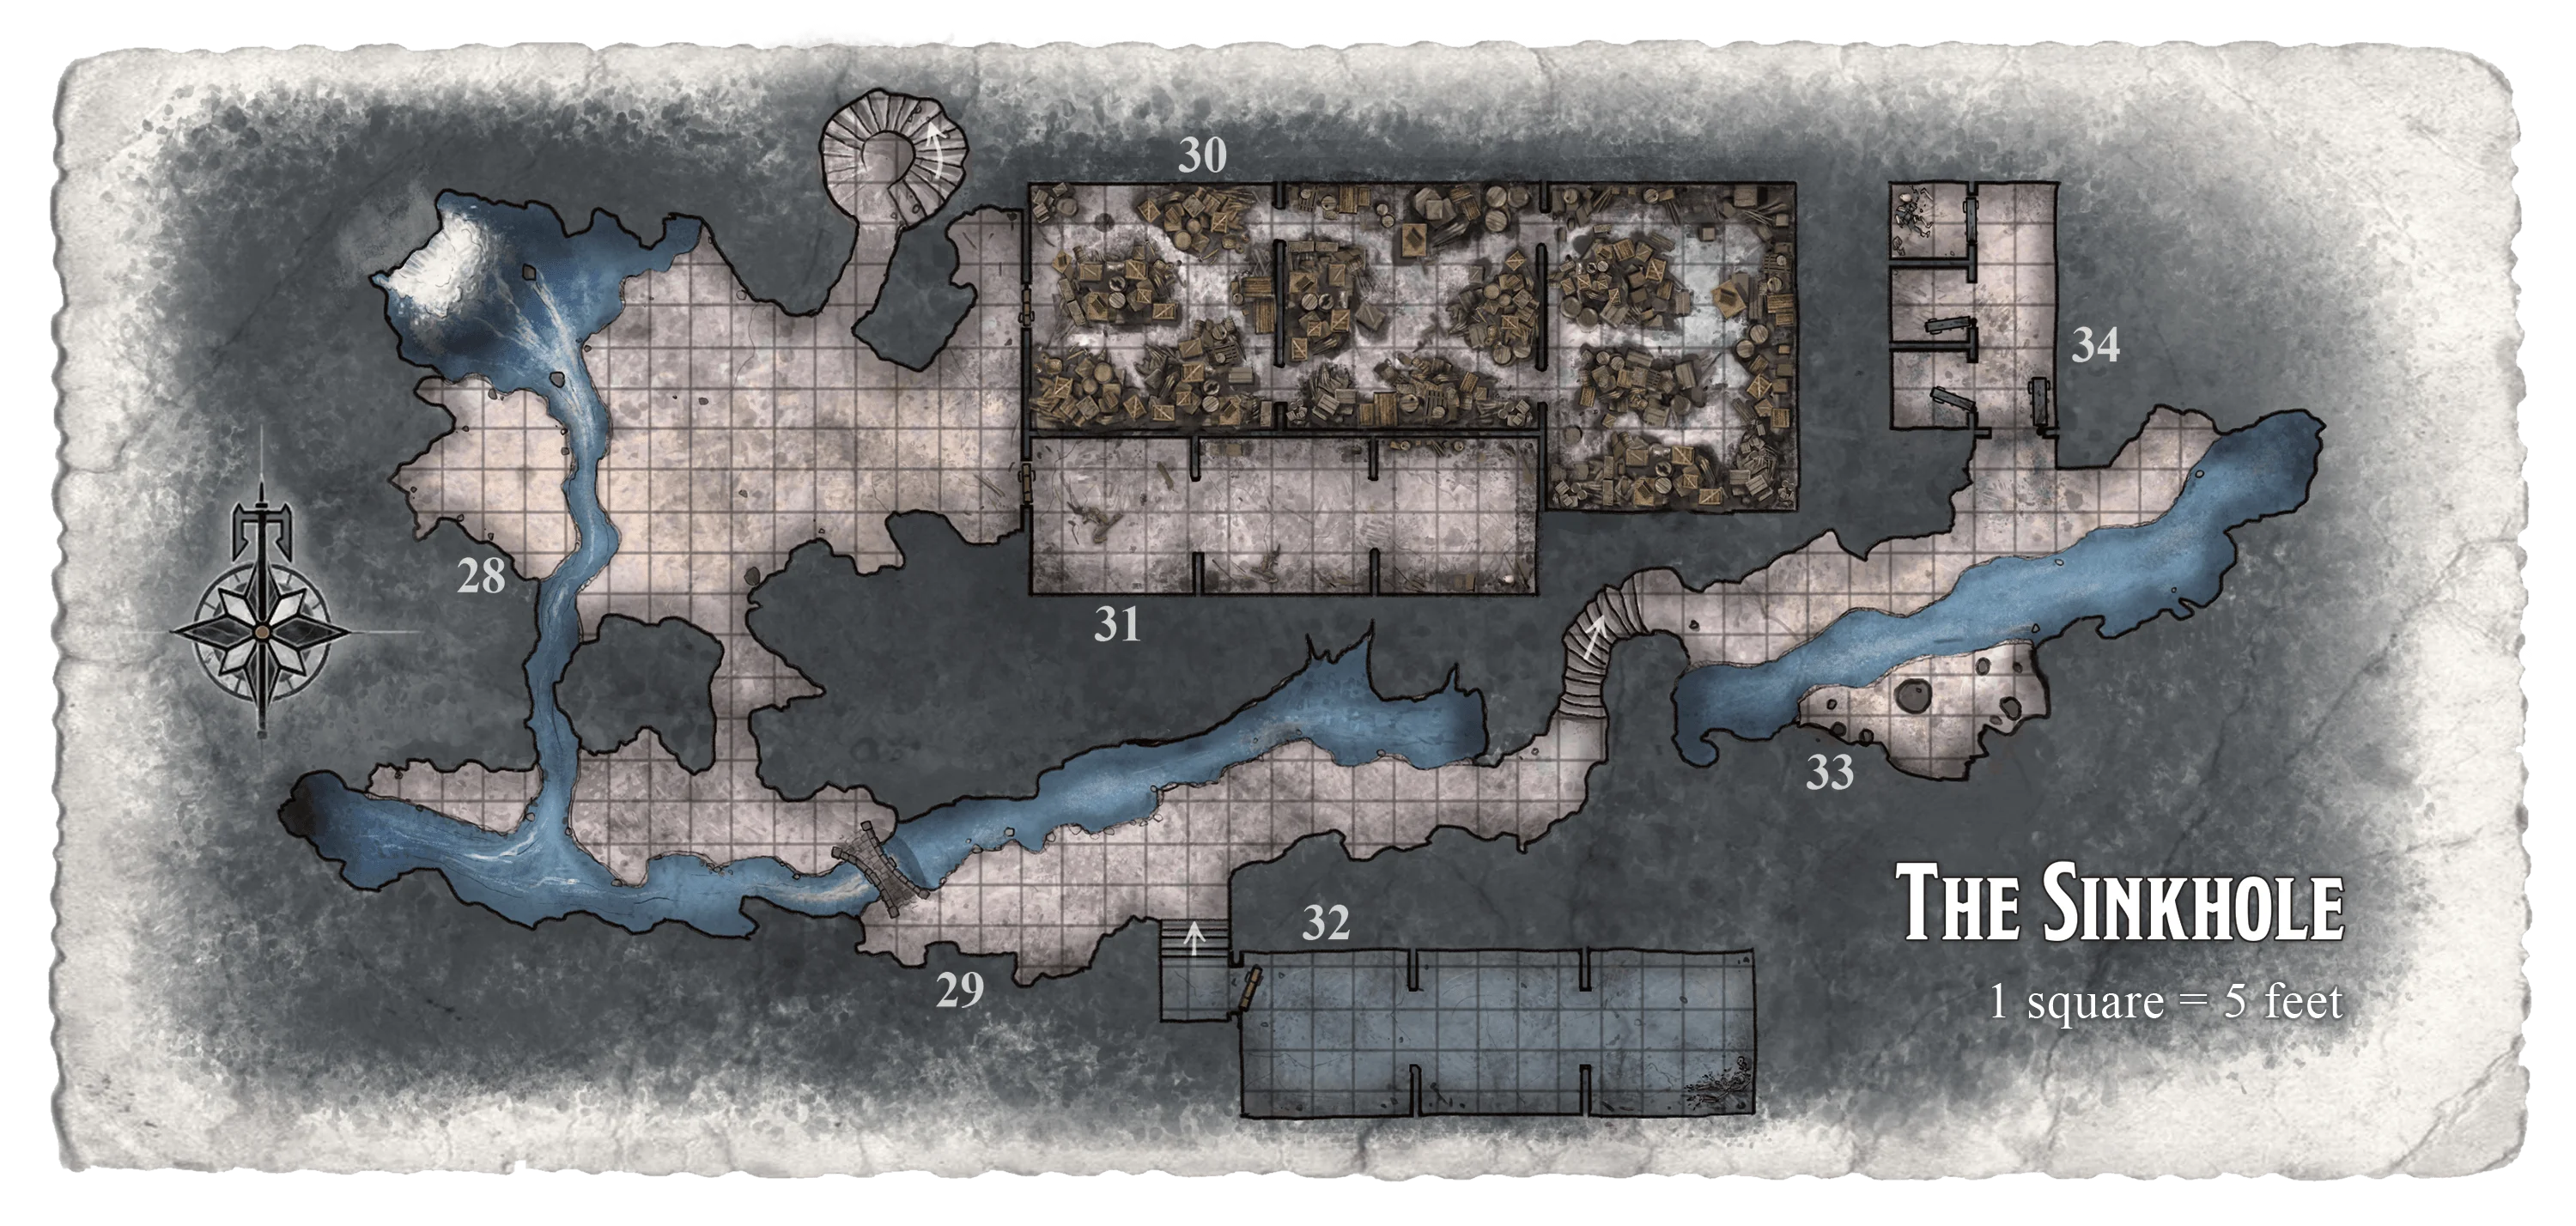
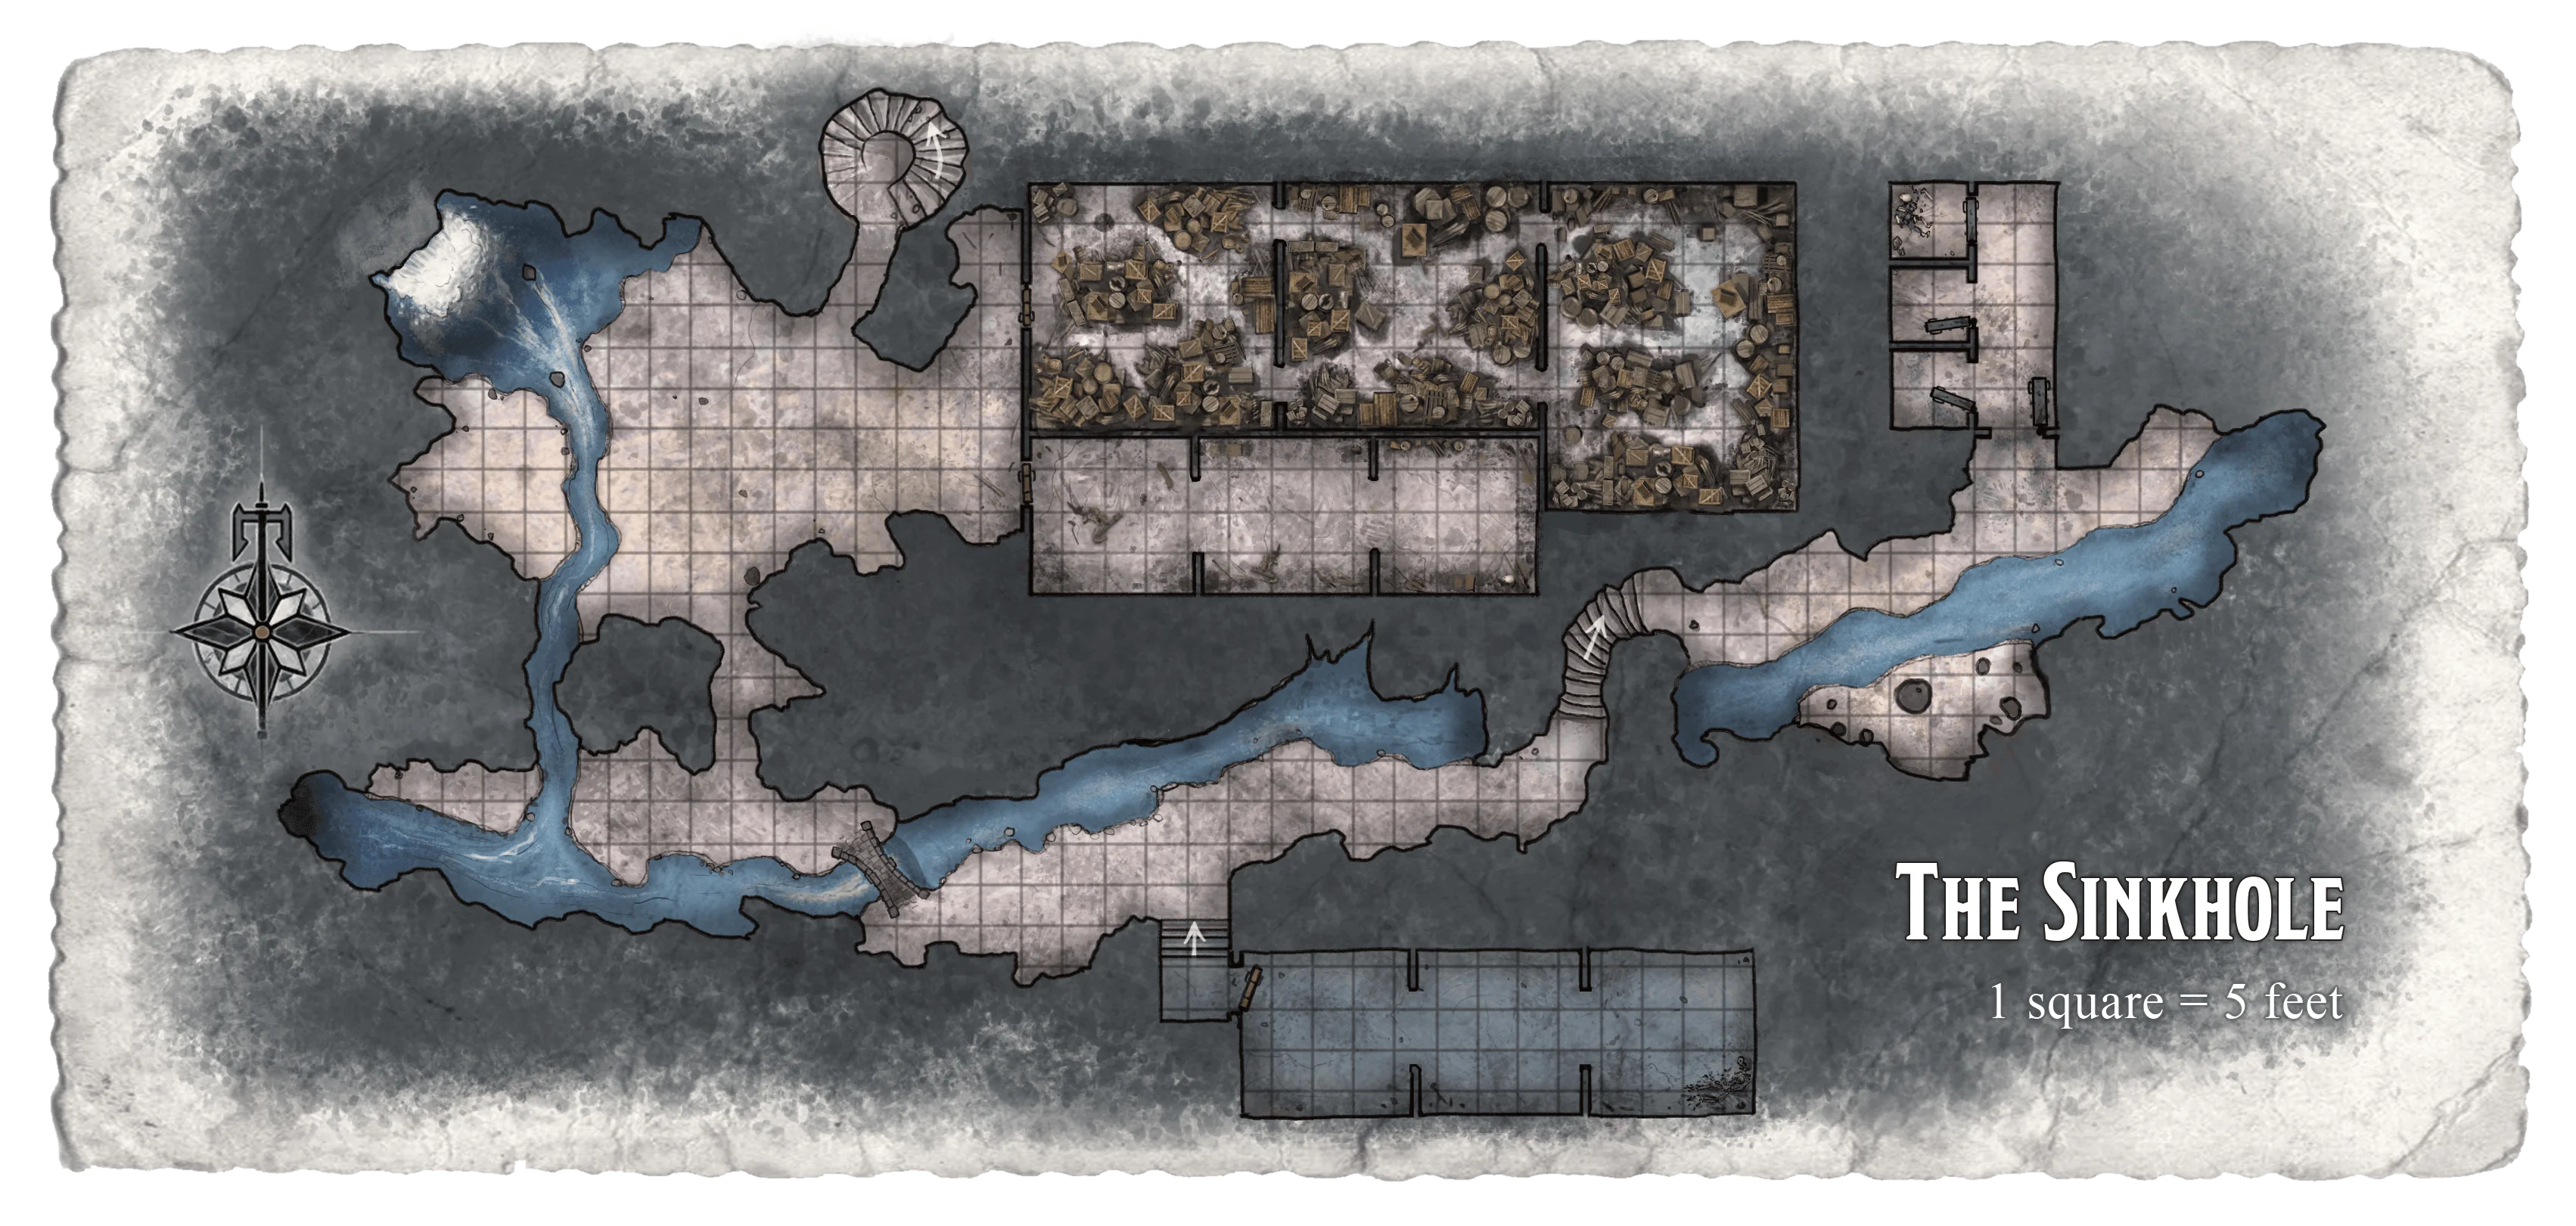
28. Waterfall Cavern
A loud waterfall spills down the northwest wall of this cavern into a deep pool. The rocky walls glisten with spray, and a weird array of colorful minerals and strange lichens lend an unearthly beauty to this spot. A fast-moving stream runs south from the pool at the base of the falls, and a nearby natural passage heads in the same direction.
A set of narrow stairs cut into the rock wind up to the north, and two old wooden doors stand in a wall of dressed stone to the east.
The stream flowing from area 25 in the Glitterhame pours down into the chamber.
The pool is populated by harmless blind fish and white crustaceans but contains nothing dangerous. The outflowing stream drains into the river in area 29. Any characters who fell into the pool are carried by the current toward the outflow at about 20 feet per round. A character who ends up in the river might be swept away; see "Fast-Flowing Water" below.
29. River Cavern
This long, narrow cavern is half-filled with an underground river, flowing along at a rapid pace. A narrow ledge on the north side overlooks the river. A bridge of stone spans the river, leading to a larger ledge on the south side that follows the course of the river to the east.
The underground river flows swiftly from east to west. The bridge is sturdy and sound; there's no danger in crossing it.
Watery Peril
At the west end of the cavern, the ceiling lowers to meet the surface of the river. Any creature swept past this point by the current is trapped in a long, airless underground channel and is likely to drown (see "Suffocating" in chapter 8 of the Player's Handbook). In addition, the creature must make a successful DC 12 Strength saving throw each round or take 1d6 kinetic damage as it is battered by rocks. Even creatures that can breathe water aren't likely to survive for long.
The stream runs underground for about 5 miles before emerging on a hillside to the west of the Stone Tooth.
30. Old Storeroom
The northern door in area 28 has been jammed shut. A successful DC 10 Strength check is required to force it open. Durj's warband formerly used the large chamber beyond as a storeroom.
The door gives way grudgingly, revealing a low chamber of dressed stone. This chamber is filled with what appears to be rotten food — drums of salted meat gone bad, sacks of polystarch or grain covered in russet-colored mold, tuns of Mandalorian cider turned to vinegar.
Two open archways in the east wall lead to a similar room, and two more openings are dimly visible beyond. The floor just past the first archway gleams wetly.
Creature
None of the supplies are salvageable. While searching, the characters might blunder into a sithspawn ooze that occupies the middle chamber of the three.
While motionless, the ooze is indistinguishable from a patch of wet stone. It is alerted when characters force open the door, and it strikes at the first character who enters the middle chamber, attacking with surprise.
What appeared to be a wet patch on the floor suddenly twists like a snake and lunges toward you!
31. Empty Storeroom
The southern door in area 28 is jammed shut and requires a successful DC 10 Strength check to open. The chamber on the other side of the door resembles area 30, but it is empty. The pirates broke in and carried off most of its contents during the fall of Choruk'Ed.
32. Flooded Storeroom
A year or so ago, a season of heavy rains on the surface raised the level of the subterranean river to create a minor flood. Water still stands at the bottom of the stairs.
A short flight of stone steps leads down to a wooden door that stands half-open. Dark, stagnant water pools in the small landing at the base of the steps and in the doorway, presumably filling the room beyond as well. The area smells of rot.
Diseased Pool
The water is about 5 feet deep and is tainted by disease. Anyone who drinks the water or wades into it is exposed and must succeed on a DC 10 Constitution saving throw to avoid infection. Symptoms manifest one day after exposure and include high fever, muscle spasms, and eventual paralysis.
An infected creature suffers one level of exhaustion when it finishes the first long rest it takes after being exposed. Whenever it finishes a long rest thereafter, it must make a DC 10 Constitution saving throw. On a failed save, the creature suffers another level of exhaustion.
On a successful save, its exhaustion level is reduced by one. If its exhaustion level reaches 5, the infected creature becomes paralyzed until the disease is cured or the effect is removed with a restoration force power or similar effects. If a successful saving throw reduces the infected creature's exhaustion level to 0, the creature recovers from the disease.
Treasure
Submerged in the corner of the eastern vault is the skeleton of a pirate killed almost two centuries ago. The skeleton rests atop a rotted synth-hide pouch that contains a mutagen of water breathing and a mutagen of invisibility.
33. Dianoga's Cavern
The rock stairs climb steeply, turn north, and then descend toward the east into a cavern very much like the one you just left, but smaller. A ledge along the river continues east to a door on the north wall, and the rushing river separates you from a ledge on the southern side.
A small cave rodent can be seen on the southern bank, sniffing inquisitively.
Creature
The bottom of the stream is the home of a ravenous adult dianoga that has been feeding on passing fish and any cave beasts that enter its range. Unsatisfied with this diet, the dianoga is eager for larger prey.
Even characters who look closely at the stream cannot detect the dianoga's presence; in turn, the dianoga is difficult to sneak up on. If a character manages to approach without alerting it, continue:
A slimy strand suddenly extends from the stream on the southern side, wrapping around the small rodent. It swiftly pulls the squealing creature toward the stream's edge and underneath the raging water.
The dianoga attacks when any character gets at least 10 feet within the stream, gaining surprise if its presence hasn't been revealed. As it has three tentacles dedicated to resisting the current's pull, it can only target up to four characters with its tendrils, possibly pulling those it has grappled into the rushing river. Characters in the water have advantage on checks to escape the grapple due to the force of the current. The river poses a severe hazard in itself, though; see "Fast-Flowing Water" below.
Development
The dianoga is satisfied, ending the attack, after it devours one Small or larger creature. It can also speak the Dianoga language and retains bestial intelligence, so it may be persuaded to accept a substitute meal. As long as the food is alive, the dianoga isn't picky.
As noted above, three of the creature's tentacles are wrapped around stone outcroppings in the river bank to prevent it from being swept away by the current. Destroying these tentacles forces the creature to use all its movement speed to resist the current 60-foot speed (though it does not need to take the Dash action as indicated in "Fast-Flowing Water" due to its natural swim speed), giving distant fighters a better chance to attack it from afar.
Treasure
Cutting open the dianoga's slimy gizzard reveals a ring of tech storing MK III and six gemstones: a ruby worth 10,000 credits, two emeralds worth 4,000 credits each, and three serpentines worth 600 credits apiece.
34. Prison
If the characters get past the dianoga in area 33, they can explore an area that was used as a prison in Durj's day.
A sturdy door of durasteel plate stands open in the north wall of the cavern. Inside you see a short passageway with three small fleximetal doors set into the west wall. The first two are open, but the door at the end of the hall is closed.
The door to the northern cell is locked. With a search of the grimy floor and a successful DC 10 Wisdom (Perception) check, a character discovers an old jailer's key that fits the lock. Otherwise, the lock can be picked by someone who succeeds on a DC 15 Dexterity check using a security kit.
The first two cells are empty. The locked cell holds the skeletal remains of a Mandalorian in a battle-damaged heavy exoskeleton. This individual was one of Durj's chief lieutenants; the pirates captured her during the final battle and threw her in this cell for interrogation later. Afterward, the unfortunate warrior was forgotten and left to starve.
Treasure
The heavy exoskeleton, dyed a midnight black, is too heavily damaged to be of any use in the short term (though it can be repaired with some expense), but a search of the corpse produces a small synth-silk purse containing 8,000 credits and a key that opens the durasteel door in area 27.
Fast-Flowing Water
The underground river that cuts through this level of the dungeon presents a serious hazard. Those who fall in risk being swept away by the current.
A creature that falls in the river and is within 5 feet of the water's edge must succeed on a DC 10 Strength saving throw to catch itself on the rocky bank. On a failed save, or if the creature is too far away from the bank, it is drawn into the main current.
A creature in the main current that takes no other action is swept 60 feet downstream (to the south or to the west, depending on location) each round. If it spends its action to make a DC 10 Strength (Athletics) check and the check is a success, it can reduce the distance traveled by the amount of its walking speed and move toward a bank.
On a failed check, the creature must succeed on a DC 10 Constitution saving throw or suffer one level of exhaustion. Creatures that have a swim speed can take the Dash action and use their full swim speed without making a Strength check. A creature within 5 feet of a bank can pull itself out of the current as part of its move.
Relevant Areas: Area 28, Area 29, Area 33
The Foundry
Durj's followers lived and worked in a series of carved halls and chambers beyond the Glitterhame. Most of this part of the complex was thoroughly ransacked when the Mandalorian citadel fell. Unlike the Mountain Door or the Glitterhame, which offer exits to the surface world, the Foundry isn't readily accessible. The area isn't abandoned, though.
Constructed horrors wait in its darkest recesses, and Mandalorian-crafted traps still work perfectly well despite their age. In addition, a collective of ugnaught engineers known as the "Shadow Smiths" have come here to breathe life into Durj's old forges and decipher the secrets of the master smith's work.
If the characters come to this part of the complex from the Black Lake (see the "Dark Mere" subsection of "Scout the Area"), they begin in area 38.
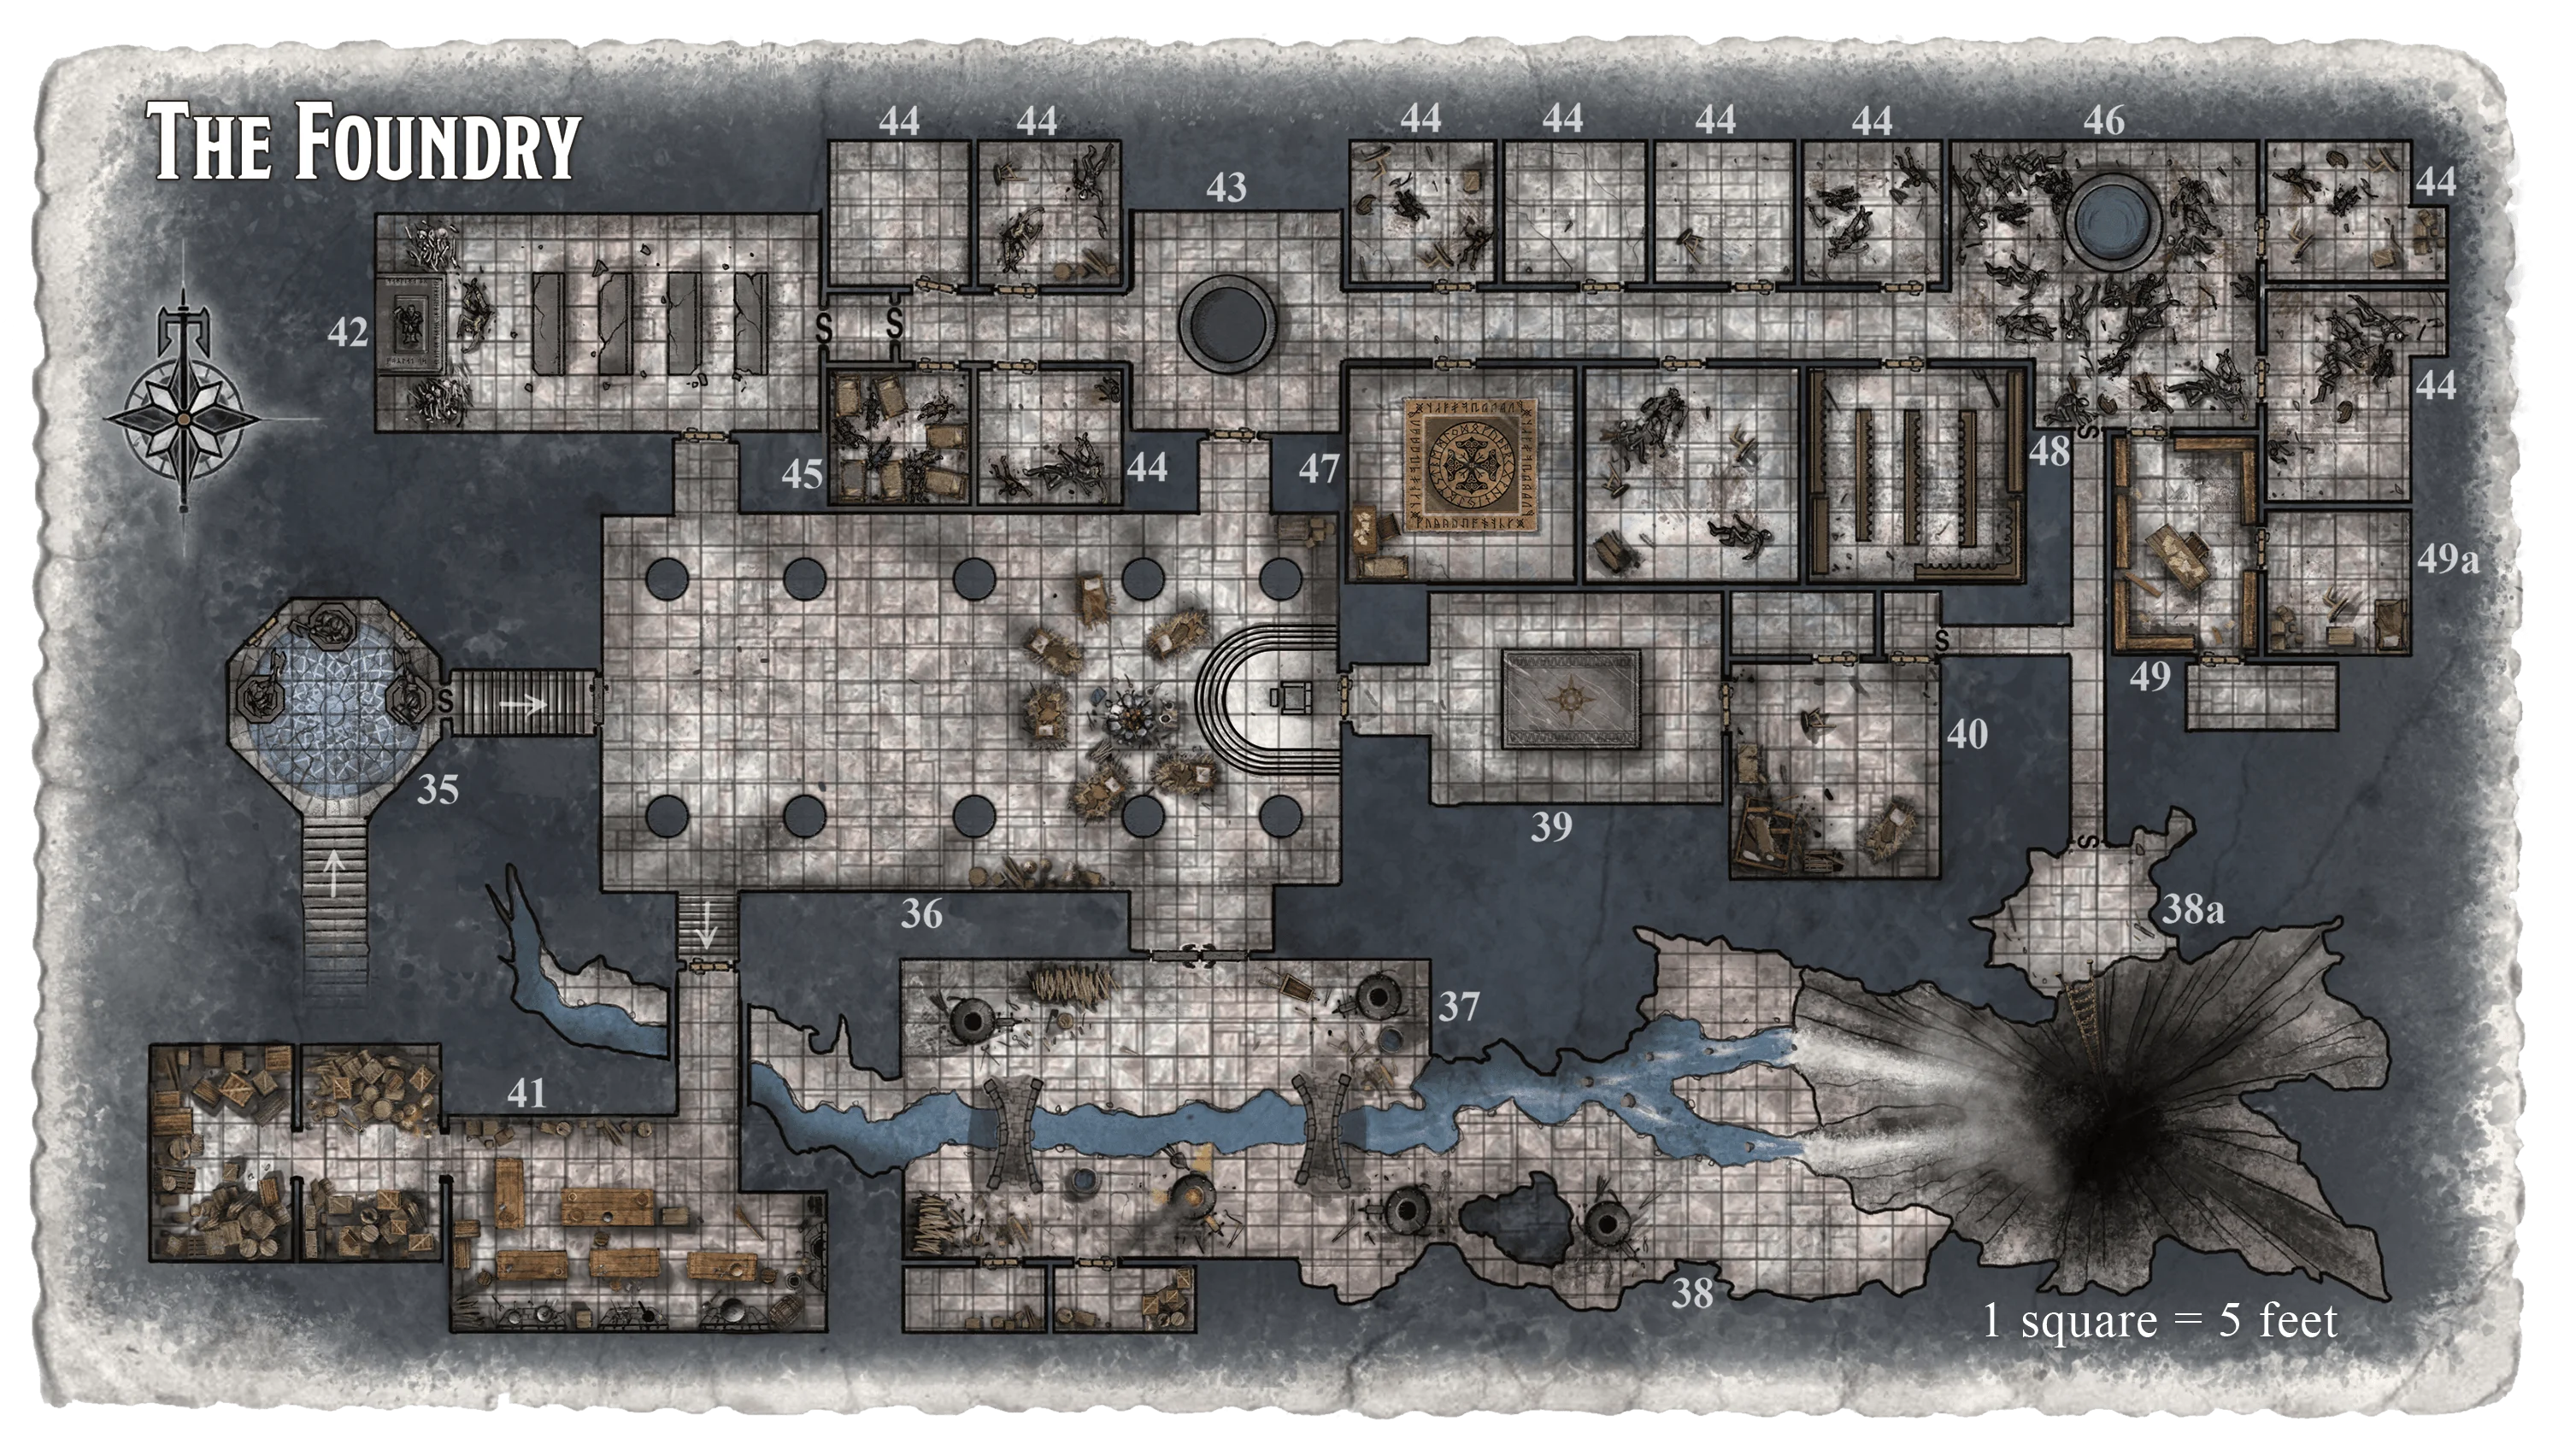
35. Chamber of Statues
In the corridor behind the durasteel door in area 27, a flight of steep stone stairs climbs 30 feet northward.
The stairs end at the entrance to an octagonal chamber. The floor is inlaid with cracked, dusty blue tiles, and the walls are dressed with polished marble. Large doors of durasteel-bound oak exit to the northwest and northeast.
Three cast bronzium statues, almost ten feet tall, stand by the west, north, and east walls. Each depicts an armed Mandalorian. The eastern and western ones carry vibroblades and shield generators. The center statue is armed with two vibroblades. The ceiling rises in a dome almost thirty feet above the floor.
From somewhere in the distance, you can hear the faint ringing of hammer on anvil.
The sound of the hammering comes from beyond the east wall, as can be determined with a successful DC 13 Wisdom (Perception) check. Anyone who examines the floor notices that the dust is somewhat disturbed. A successful DC 13 Wisdom (Survival) check reveals an infrequently used trail that leads from the entrance stairs to the stone wall behind the east statue.
Statue Trap
The obvious exits to the northeast and northwest are false doors that open onto blank stone. Pulling on either door releases a catch that causes the blade-wielding hands of the two closest statues to drop. Any creature within 5 feet of a door when it is opened is subjected to two melee attacks: +5 to hit; 9 (2d8) kinetic damage on a hit.
With a successful DC 15 Wisdom (Perception) check, a character can discern small scorings on the floor in front of a door, left by earlier blade strokes. A successful DC 15 Intelligence (Investigation) check enables a character to deduce that the doors aren't what they seem, through small clues showing that they are unused. The same check focused on a statue can reveal a small segmentation line on the arm that holds a vibroblade, indicating the arm's ability to move.
A character who makes a successful DC 10 Dexterity check using a security kit can jam a statue's arm so that the vibroblade can't swing. Destroying a statue (AC 18, 60 hit points, immunity to necrotic, poison, and psychic damage) also disables its attack.
Once a statue has attacked, the trap must be reset manually. If any ugnaughts survive and remain here, they reset the trap within a day after it has been triggered.
Secret Stairwell
The secret door behind the east statue is well hidden, requiring a successful DC 18 Wisdom (Perception) check to spot. If the characters detected the faint trail that leads there, a successful DC 10 Wisdom (Perception) check locates the door. Beyond is a flight of stone stairs that leads upward.
The stairs have been warded with an electronic alarm. When a creature ascends past the halfway point of the staircase, an implant message power calls out in Ugnaught, "Alert! Alert! Intruders approach!"
To anyone who can't understand Ugnaught, this sounds like a random series of porcine grunts and squeals. This sound warns the Shadow Smiths in area 36.
36. The Great Hall
At the top of the stairs from area 35 is a stone door carved with a Mandalorian helmet's faceplate. It opens easily.
This enormous hall is lined with ten great pillars, carved into the forms of giant humanoids, that support the vaulted ceiling high above. Flickering orange glowrods set in sconces along the walls illuminate the room, and a mighty throne sits on a dais at the opposite end. The walls were once covered with tile mosaics, but they have been smashed and defiled by graffiti. Tiny fragments of tile litter the floor. You can see five other exits. A small portable heater rest on the floor before the dais, where six sleeping cots lie empty, surrounded by packs and supplies. The sound of hammers ringing on steel comes from beyond the doors to the south.
Suddenly a harsh voice calls from the shadows of the pillars, "Go back the way you came! This is the only warning you'll get!"
The cavern was formerly Durj's throne room, dining hall, and center of authority. Its ceiling is 30 feet high, and the sconces are 10 feet above the floor. The throne is unremarkable: a short bench of stone that might have been decorated at some point in the past. The graffiti consists of crude epithets in Basic and Huttese insulting Mandalorians and their ancestry.
Creatures
Three ugnaughts, numbering two Shadow Smiths and Gharr, a Shadow Smith operative, stand watch here. Unless the party climbed the stairs from area 35 without triggering the implant message, the ugnaughts are invisible.
Negotiation
The ugnaughts start hostile but wait to see if the characters attack. Gharr shouts the initial warning and speaks for the group; she's suspicious, greedy, and arrogant, but not stupid. She is willing to give information to the party if a character succeeds on a DC 20 Charisma (Persuasion) check. The characters can change her attitude to indifferent, reducing the check DC to 10, with a suitable bribe (at least 1,000 credits).
Ghared can share any of the following information if the party succeeds in getting her to converse:
- The doors to the north lead to halls infested with mechanical traps and droid soldiers created by the Mandalorians.
- The door to the southwest leads into the old kitchens, guarded by more traps.
- A great, black-scaled beast lives in a large lake cavern deep below.
- The subterranean river flows from the lake through other parts of the complex below the Glitterhame. It's fed from a lake on the surface.
If negotiations are successful, the ugnaughts are willing to let the party enter the rooms to the north. With a sufficiently high Charisma (Persuasion) check and an indifferent attitude from Gharr, the characters can get the ugnaughts to escort them to the entrance to the beast's territory (the chasm in area 38). The ugnaughts will not allow the party into the bladeworks (area 37) without an escort, and they prohibit entry into area 39.
If the characters don't negotiate, or if talks go badly, combat ensues.
Tactics
If combat occurs, the Shadow Smiths first attack with their blaster rifles. They use their Enlarge ability in the next round, taking cover behind two of the pillars before wading into melee.
Meanwhile, Gharr remains invisible and maneuvers to make a sneak attack, then enlarges herself after she becomes visible. She has a medpac, which she uses if her current hit points drop to half her hit point maximum or lower.
If two ugnaughts fall in battle, the survivor tries to retreat to area 37 or 39.
37. The Bladeworks
In what was Durj's forge and workplace, the ugnaughts are currently engaged in a secret project, hoping to capture a spark of the master smith's vengeful talent.
Double stone doors lead into a barrel-vaulted area containing several furnaces. The eastern end of the chamber continues into a large, dark cave, from which a cold wind moans. A stream of water rushes from west to east through the center of the room, crossed by two stone bridges. On the other side of the stream, three bald ugnaughts wearing bulky exoskeletons work at a roaring cryo-furnace, beating a white-hot blade into shape on an old anvil.
Creatures
Two Shadow Smiths are forging a blade at the forge in the center of the south wall. The work is overseen by Snurre, a Shadow Smith with techcasting capabilities.
Snurre has interfaced with a tracker droid - a mouse droid dubbed MSE-1-3 or "Wunthree" - that hides in the shadows near the unlit forge to the east. The ugnaughts are preoccupied with their task and don't notice the party's entrance unless the characters make themselves known. They object violently to intruders who aren't escorted by other Shadow Smiths.
If a threat becomes apparent, the two Shadow Smiths ready their weapons, use Enlarge, and move to guard the two bridges. If the fight goes against them, they turn invisible and try to slip out to area 36, then join the other ugnaughts in area 39.
In combat, Snurre might cast electroshock through his hidden tracker droid, and he might use hologram to confound enemies with realistic-seeming threats.
Treasure
In the cold forge in the northwest corner of the room, Snurre has stashed 4,300 credits, an aurodium necklace set with ruby stones worth 9,000 credits, and a mutagen of mogu strength.
38. The Chasm
The stream running through the old Mandalorian bladeworks meanders through a natural cavern before tumbling into a great chasm. You can see nothing but darkness below, although the splashing of waters deep below is barely audible over the roar of the waterfall.
To the north of the chasm, a small ledge is partially hidden by a spur of rock.
The chasm is 120 feet deep. Anyone who falls in takes 42 (12d6) kinetic damage and ends up in area 50 of the Black Lake level. Climbing down the slippery stone next to the waterfall requires several successful DC 15 Strength (Athletics) checks, or DC 5 checks for a character who uses a fibercord.
38a. Chain Ladder
The rock spur on the northern ledge partially conceals an old fleximetal chain ladder that leads down to area 51 of the Black Lake. The ladder isn't immediately obvious from the southern ledge, but a character who makes a successful DC 10 Wisdom (Perception) check can spot it.
39. Council Chamber
The ugnaughts have set up a guard post in what was once the council room of Choruk'Ed.
The door behind the throne leads into a small audience chamber. A large durasteel table cut into a circular shape dominates the room's center, and old banners of various Mandalorian clans cling to the walls. A stone door in the far wall is carved with the Mandalorian visage that you've seen elsewhere.
One ugnaught in a heavy-duty exoskeleton stands watch by the far door. He shouts and raises his blaster rifle.
Creatures
Unless the party is under Gharr's protection (see area 36), the lone Shadow Smith on duty fights to the death to protect his leader, who is in area 40.
If the characters engage the Shadow Smith, the sounds of battle alert the leader, Nimir. She is a Shadow Smith with significant battle experience, enhancing her fighting capability.
Nimira uses Enlarge and comes out to join the fight in the next round. If her guard falls or she faces at least three enemies, and negotiation isn't an option, she turns invisible and tries to escape into area 36 or through the secret door that leads east out of area 40.
Negotiation
Nimir is an excellent fighter, but she is pragmatic and willing to negotiate in the right circumstances. She knows the same information as the ugnaughts in area 36 and might be convinced to guide the party to the chasm that leads to the black-scaled beast's lair (area 38).
Arun-Dyl's Automatons
Roughly two centuries ago, the Mandalorian engineer Arun-Dyl installed hidden traps in a number of rooms to defend the Foundry against intruders other than Mandalorians, automated by rudimentary droid intelligences called automatons. Many of these creations remain in place today (in areas 41, 47, and 48).
These automatons never attack people in Mandalorian armor. In addition, a creature wearing Mandalorian can order an automaton to cease its attack, so long as the order is spoken in Mando'a. If so commanded, the automaton becomes inactive for 10 minutes, or until the one commanding it leaves the area.
The ugnaught Shadow Smiths learned of these automatons soon after entering the Foundry, and developed an override signal built into their exoskeletons. These allow the wearers of the exoskeletons to simulate the non-aggression and attack cessation protocols reserved for Mandalorians.
40. Durj Ne'tra's Quarters
Durj Ne'tra led a spartan lifestyle, eschewing rich decorations and treasures in his personal quarters. Nimir has appropriated the room for her own use.
This room appears to be a bedchamber. In one corner to the south stands a large wooden sleeping platform, badly gouged by vibroweapon blows and partially scorched by blaster fire. A table, a bench, and a writing desk have been similarly treated. In the middle of the southern wall, a space has been cleared for a simple mattress and a pair of large backpacks. Two doors exit the room to the north.
If the party enters the room through the secret door in the closet (see below), or if the characters avoided or quietly dealt with the ugnaught in area 39, Nimir is here, resting on the frame. Otherwise, the room is empty. The satchels contain mundane supplies: extra clothes, rations, portable generators, and similar stuff.
The door in the northwest corner leads to a bathing area, fitted with a heating system and water tank. The northeast door opens into a closet containing the mildewed remnants of Mandalorian attire.
Secret Door
The east wall of the closet conceals a secret door. The door isn't well hidden, requiring a successful DC 10 Wisdom (Perception) check to find. Nimir knows about the secret passage and escapes through it if pressed.
41. Kitchens
The stairs leading south from the pillared hall end at a wooden door. Beyond is a corridor that opens up into a large room lined with ovens and stoves. This room must once have served as the kitchen: pots, pans, pressure cookers and kettles lie scattered on the floor and strewn across several tables. An archway to the west leads into a pantry filled with rotted foodstuffs.
Suddenly, you hear a scraping sound, and a big metal table shudders and begins to roll across the floor, heading right for you!
Creature
An automaton table activates when someone enters the main part of the room. It fights until destroyed but won't attack someone wearing Mandalorian-styled armor (see "Arun-Dyl's Automatons").
The room is full of old, rusty fleximetal pots, pans, cutlery, and cooking utensils, none of which are worth much.
42. Desecrated Monument
Durj Ne'tra made his last stand in Choruk'Ed's monument, laying enemies low until the pirate forces finally overwhelmed him. Hired members of the Bounty Hunters' Guild confirmed his death on-site and transmitted the confirmation to the Holonet to prevent any pretenders from showing up. Finally, a group of former Mandalorians-turned-mercenaries, who had developed respect for Durj as a both a warrior and forgemaster, installed a trio of droids to deter any who tried to disturb his resting place.
The door leading from area 36 bears an inscription in Basic: "Beyond this door, the Maker of Death is chained. May his warrior's fury stay quenched until the stars die and all things end."
This room was once a monument to the Mand'alors of legend. The walls are carved with the visages of the ancient Mandalorian leaders, and a low stone altar stands at the western end of the room. Stone benches have been smashed and thrown askew, and the icons of the Mand'alors have been defaced.
Atop the altar, arms folded over his chest, lies the ancient corpse of a Mandalorian armorer. A pair of large, deactivated loader droids flank the altar's base, and at its foot crouches the immobile form of an assassin droid.
Creatures
The assassin droid is an old IG-series unit from a previous era. It is supported by two bulky loadlifter droids.
The assassin droid and loadlifter droids are on standby until someone enters. They can't pursue characters outside of the room.
As you enter, the loader droids rise and get into fighting positons. The assassin droid looks up at you and draws a sniper rifle, red light emitting from its photoreceptors as it stands.
Treasure
The pirates looted the monument after the fall of Choruk'Ed, but two members of the previous expedition fell to the droid defenders with valuables in their possession. Under a scattering of bones near the altar can be found a sack that holds 2,800 credits and a plasteel case containing two tech ciphers: a single-shot meshnet launcher (electromesh) and a pair of electro-magnified attachable boot soles. (magnetic hold).
If you would like to include more significant valuables for Durj Ne'tra final resting place, refer to 'Durj's Equipment' in appendix C.
43. Entrance to the Dormitories
The Mandalorians of Choruk'Ed once resided in private rooms to the north of the great hall. When the pirates came through, they cut down all the Mandalorians they found and stripped the treasure out of the place.
The door opens into a large chamber with a dark pool in the center. Bits of smashed furniture and other debris are scattered about the floor. Hallways lead off to the east and the west.
A weird moaning fills the area, slowly becoming recognizable as Mando'a curses. The sound rises to angry shouting and grows closer. Then the translucent form of an armored Mandalorian appears through a wall and attacks!
Creature
Area 43, area 46, and all the rooms marked 44 are now the demesne of the force-sensitive Mandalorian engineer Arun-Dyl, who lingers as an insane dark side spirit bound by the dark side.
The spirit relentlessly attacks anyone who enters its territory (most likely in either area 43 or area 46) but can't pursue characters who retreat beyond its domain. If the ghost is forced to run, it flees to one of the empty rooms labeled as area 44.
Development
Arun-Dyl's spirit is tormented by grief and shame over abandoning his kin to die (see area 47). The spirit might be laid to rest if the characters can convince it that they have cleansed Choruk'Ed.
44. Looted Rooms
Several chambers in the Foundry were once living quarters, drawing rooms, barracks, armories, storerooms, and so on. Now they contain only smashed furniture and debris from the final battle, graffiti in Huttese, and skeletal remains of both Mandalorians and pirates.
Treasure
Here and there, a remnant of something valuable can be salvaged from the trash. Roll a d10 the first time a character searches a given room; on a result of 10, the character uncovers a semiprecious stone (worth 100 credits).
45. Droid Room
One of the smaller chambers once served as a small barracks. Half a dozen Mandalorians perished here and were later replaced with makeshift droid counterparts by Arun-Dyl (see area 47). He ordered them to defend their post against all intruders.
This chamber might once have been a barracks. The remains of six steel bunks lean against the walls, blasted and hacked by pillagers, and half a dozen skeletal Mandalorians lie here and there across the room.
Six makeshift battle droids, painted a midnight black, stand at attention throughout the room. Shouting war cries in synthesized Mando'a, the battle droids raise their blasters and advance on you.
Creatures
The six automaton comradess attack any creature not wearing Mandalorian armor that enters (see "Arun-Dyl's Automatons"). They don't pursue anyone beyond this chamber.
Treasure
The operative from the failed expedition lies in this room, her laser-riddled corpse half-buried under wrecked furniture. A pouch on her belt contains 670 credits.
46. Common Area
The open courtyard in the east end of the residential area was the site of a pitched battle between Mandalorians and pirates.
The hallway leads to a large open chamber. Three doors open into it, and a dark pool fills a low stone basin in its center. The chamber is littered with the remains of old warriors. Seven Mandalorian corpses lie where they fell a hundred years ago, surrounded by the remains of at least a dozen pirates. The dead have been stripped of their arms and armor; only a handful of broken weapons and rotted clothing remain.
Creature
If the characters approach this area from the secret door to the south before entering area 43, Arun-Dyl the dark side spirit confronts them here; refer to the encounter in area 43. Otherwise, there is nothing dangerous or valuable in the area.
47. Arun-Dyl's Chambers
Arun-Dyl, a force-sensitive Mandalorian engineer and Durj's trusted advisor, lived in a spacious room close to the great hall. During the final assault of the pirates, Arun-Dyl used both his technology and basic Force powers to escape the slaughter, hiding in the nearby woods. He returned to find all his kinfolk dead. Driven insane with grief, he tried to repair some of the complex's defenses, constructing droid sentries and setting up traps to kill any intruders that returned. In his madness, he activated an ancient torture droid, and he perished at its hands not long after.
This chamber must once have been the personal quarters of an important Mandalorian. It is decorated with banners and furnished comfortably, although age has taken its toll on the contents. Apparently, the room has not been looted. A beautiful rug covers the center of the floor, and a simple bed and writing desk stand in the southwest corner below a scanner.
Electromesh Trap
Suspended at the top of the 15-foot-high chamber is an electromesh net trap, covering the 25-by-25-foot area just in front of the entrance and centered on the room's large rug. The net is under the effect of a cloaking field tech power, rendering it invisible to the naked eye. An autonomous sensor (AC 14, HP 12) is situated high on the southwestern corner of the room; while it can be seen clearly by any who enter the room, only with a DC 15 Intelligence (Technology) check can someone tell that it is still active.
The scanner checks for any intruders into the room and determines whether they are trustworthy (see "Arun-Dyl's Automatons".) If none of the intruders are seen wearing Mandalorian armor or heard speaking Mando'a, the sensor triggers the electromesh net trap as soon as any intruder comes within 10 feet of the writing desk or bed in the southwest corner. Destroying the sensor early prevents this trap from triggering and reveals the cloaked net.
When triggered, the electromesh net falls from the ceiling onto the unfortunate souls below, weighed down with dense spheres at each side and corner of the net. Any creature fully within the area it covers must make a DC 15 Dexterity saving throw (with disadvantage if within the central 15-foot-square area) or be restrained by the net and take 7 (2d6) lightning damage. Any creature who steps on the net before it is fully destroyed (AC 12, 125HP) must make another DC 15 Dexterity saving throw or suffer a further 7 (2d6) lightning damage.
A creature caught by the net can make a DC 10 Strength check (using an action if in combat) to try to free itself or another creature in the net within reach; on a failure, the creature making the check instead receives a further 7 (2d6) lightning damage. Dealing 5 kinetic or energy damage to the net with a melee weapon attack also frees a creature within reach without harming the creature.
Treasure
Beneath the bed is a small plasteel chest containing 1,500 credits and a square of silk in which are wrapped a star sapphire worth 5,000 credits and a pair of matched blue topazes worth 900 credits each.
48. Looted Armory
Choruk'Ed's armory was looted long ago. Its door is made of flexisteel plates, but the lock was broken during the pillaging — it can be forced open with a successful DC 15 Strength check.
Rows of empty weapon racks and a dozen or more armor stands indicate that this room was once an armory. Some debris litters the floor, but nothing of value is readily apparent - save for a single black Mandalorian heavy exoskeleton.
Creature
The heavy exoskeleton actually contains a reprogrammed security droid, which activates when anyone not wearing Mandalorian armor enters the room. It fights as an automaton armor until destroyed (see "Arun-Dyl's Automatons" above).
49. IDL-4's Den
The mad Mandalorian Arun-Dyl used every tool at his disposal to protect the complex. He not only trapped the rooms and resurrected his fallen brothers, but threw caution into the wind in his futile attempt to make the place safe. In the former chambers of a Mandalorian archivist, tucked away in the eastern end of Choruk'Ed, he uncovered an ancient droid in a hidden chamber that he tried to use for his own purposes.
This room was once a library or a study. Bookshelves stand against the walls. Piles of tomes and datapads rest on a reading table in the middle of the room. The air reeks of moldy paper. Doors exit to the north, east, and south.
An elegant silver protocol droid of unknown make sits in a chair at the table, scanning over a datapad. Its worn and corroded plating does little to detract from its air of sophistication.
Creature
Arun-Dyl activated a protocol droid found hidden in an ancient chamber to the south and commanded it to assist with setting traps in the area that is now the domain of Arun-Dyl's ghost (see area 43). But the droid, secretly a torture droid with a sadistic streak, easily overpowered Arun-Dyl, then toyed with him cruelly until it finally killed him. The intense emotions brought forth by the droid's torture, amplified by his force-sensitivity, caused Arun-Dyl to linger within the halls as a bound dark side spirit.
The feminine-programmed droid, which has the designation IDL-4 and goes by "Idela", claimed the scholar's library for its own and spends much time here reading through the collected lore. It learned of Choruk'Ed's history from the Mandalorian records and realized that the legends of wondrous treasure would lure greedy souls. It killed an engineer from the previous expedition, who took refuge in this library after his companions were killed. Since that time, the droid has occasionally left Choruk'Ed via area 21 and infiltrated settlements to spread rumors, with the goal of drawing more adventurers to its lair.
Idela appears to be nothing more than a simple protocol droid of unknown make. When the characters enter, the droid jumps up and begs to be released from imprisonment. Idela tells the characters that she is the unwilling servant of a Sith lord who resides below this level. The droid plays the role to the hilt, quaking and going on tangents as it spins a tale of woe - it even has a restraining bolt attached, though a successful DC 17 Intelligence (Technology) check reveals that it is not linked to any control unit.
The droid tries to split up the group, persuading one character to remain as a protector (using its Hypnosis attack if necessary) while the others deal with the Sith. If they leave anyone alone with Idela, the droid tries to get close to its target before using its Mind Probe on them. The droid is an adept liar and mixes in just enough of the truth to be convincing; see the "Idela's Story" sidebar.
Idela's Story
Idela takes delight in misleading the characters. The droid can impart the following bits of information:
- The Sith alchemist, Lord Troja, lives below this area. He wants to use Idela for a study on converting mechanical beings into organics. (False.)
- The Sith lord told Idela a bit of the history of Choruk'Ed and the fate of Durj, which she can pass on. (The information is true, but the droid learned history from reading the datapads here, not from a Sith lord.)
- A clawdite assassin, servant to the Sith lord and expert impersonator, lurks in the Glitterhame. (False.)
- A dead Mandalorian haunts the halls, reduced to a mad, gibbering ghost. (True; this is the dark side spirit of Arun-Dyl.)
- An ancient, black-scaled beast lairs below the Foundry. (Partly true; though the Nightscale beast lives in the Black Lake, the current beast is the offspring of its ancient parent, and considerably smaller.)
If the characters see past her lies or try to use tech powers such as read memory that would reveal her treachery, Idela attempts to hypnotize the most dangerous-looking character and turn him or her against the party while the droid activates her Stealth Generator and escapes deeper into the complex.
49a. Adjoining Rooms
The adjoining room to the east was the sleeping quarters of the Mandalorian archivist. It is moldy and very stuffy. Anyone who looks around the room finds a secret compartment in one of the walls with a successful DC 15 Wisdom (Perception) check.
The adjoining room to the south features an obsidian door of ancient design - the door is sealed and requires a successful DC 25 Strength check to break down. The door leads to a small chamber filled with words written in the Sith script; anyone who understands Sith can tell that the words form sentences relate to torture methods. An ancient droid charging station sits at the far end of the chamber, unoccupied.
Treasure
The ancient scholar amassed a small amount of treasure, which he kept in the secret compartment: 1,100 credits and a cat's-eye gem worth 700 credits. In the library, in addition to an extensive collection of Mandalorian and Sith lore, the characters can find four tech ciphers: an activity sensor (alarm), a holo-disguise matrix (holographic disguise), an overclocking module (motivator boost), and a quick-shielding device (energy shield).
Reading some of the collected lore here reveals additional information about the Mandalorians who formed Choruk'Ed, as well as those who came before them - the party will need to be able to read Sith or Mando'a (as indicated for each paragraph) to understand it. If the party takes time to read this lore (such as during a short rest), reveal the following information:
- Mando'a: The Foundry used by the Mandalorians is not originally of Mandalorian make. When they first arrived at Choruk'Ed, Durj and his followers discovered the ruins of an ancient civilization, and retrofitted many of its abandoned halls to suit their needs. The main architecture of the Foundry, such as the carved pillars in area 36, was created by this ancient civilization.
- Mando'a: The stronghold was only sparsely outfitted with technology by the Mandalorians, who preferred to use their ships as technological centres. This also served the benefit of keeping the stronghold's location safe from discovery, as any electrical signals would be too weak to be registered by most space probes.
- Sith: The ancient civilization who inhabited the Stone Tooth millenia ago were known as the Du-Wav, a species of cave-dwelling humanoids who revered the ancient Nightscale beast as a god. They were discovered during the days of the ancient Sith Empire by a Sith alchemist named Lord Troja, who ingratiated himself amongst them as a powerful sorcerer and set about using them for experimentation purposes.
- Sith: Part of the experimentation conducted by Lord Troja included altering and refining the process used to create sith-spawn known as rakghouls, originally created by the Sith Lord Karness Murr. Rather than forcing random individuals to mutate via talismans or plague, Troja instead targeted the Du-Wav people directly and began slowly turning them into a personalized variant of the rakghoul that he dubbed the 'troghoul'. As a result of this mutation, the Du-Wav eventually lost their sapience and scattered into the subterrenean caverns of Blasyndel, becoming the ancestors of the modern troghoul tribe now found in the Glitterhame.
- Sith: IDL-4/Idela was the assistant protocol droid to Lord Troja that doubled as a torture droid for punishing insubordinate Du-Wav. Encouraged to go beyond her programming by Troja, Idela developed a sadistic streak that Troja noted as 'making it grow more organic every day'. The last-dated entry that can be found written by Troja states that he would seal IDL-4 in a hidden chamber to prevent any troghouls from attacking it, as he planned to venture into the depths and attempt to bend the Nightscale beast to his will (it can be easily discerned that he died in the attempt).
Additionally, characters who succeed on a DC 17 Intelligence (Investigation) check find a tome and datapad tucked far back in the archives. The old tome, penned in Sith script by Lord Troja, describes his distant study of the Nightscale beast - he notes the beast's ability to spit acid like a krayt dragon and conceal itself underwater, as well as its latent Force capabilities and "a hint of sentience". The accompanying datapad is typed in Mando'a, and mixes in both analysis of the tome's script with musings on the name "Nightscale" and its symbolism.
The shelves might also include more ciphers, useful information tying in to future adventures, items of value to a collector, or other interesting lore, as you see fit.
The Black Lake
The darkest and most remote corner of the Glitterhame's cavern system, the Black Lake is a large, winding cavern filled with water that drains from the Dark Mere through a submerged siphon. From the lake, the subterranean river flows west through the Sinkhole, across the bottom of the chasm in area 3 of the Mountain Door, and onward for about 5 miles until it emerges at the surface.
Neither the original civilization of the Foundry nor the Mandalorians settled these caverns, although Durj had his followers begin work on an escape route through the depths.
The Black Lake is now the domain of a juvenile Nightscale beast, the offspring of an ancient creature who dwelled on Blasyndel for centuries. Here, she has built her hoard, having slowly collected much of the Mandalorian armor from Choruk'Ed. From the lake, the Nightscale beast can swim to the Sinkhole and up to the Glitterhame, or climb up to the Foundry through the chasm there. The troghouls fear and worship the Nightscale. The ugnaughts have negotiated an uneasy truce with Nightscale, paying her with forged black armor to leave them alone.
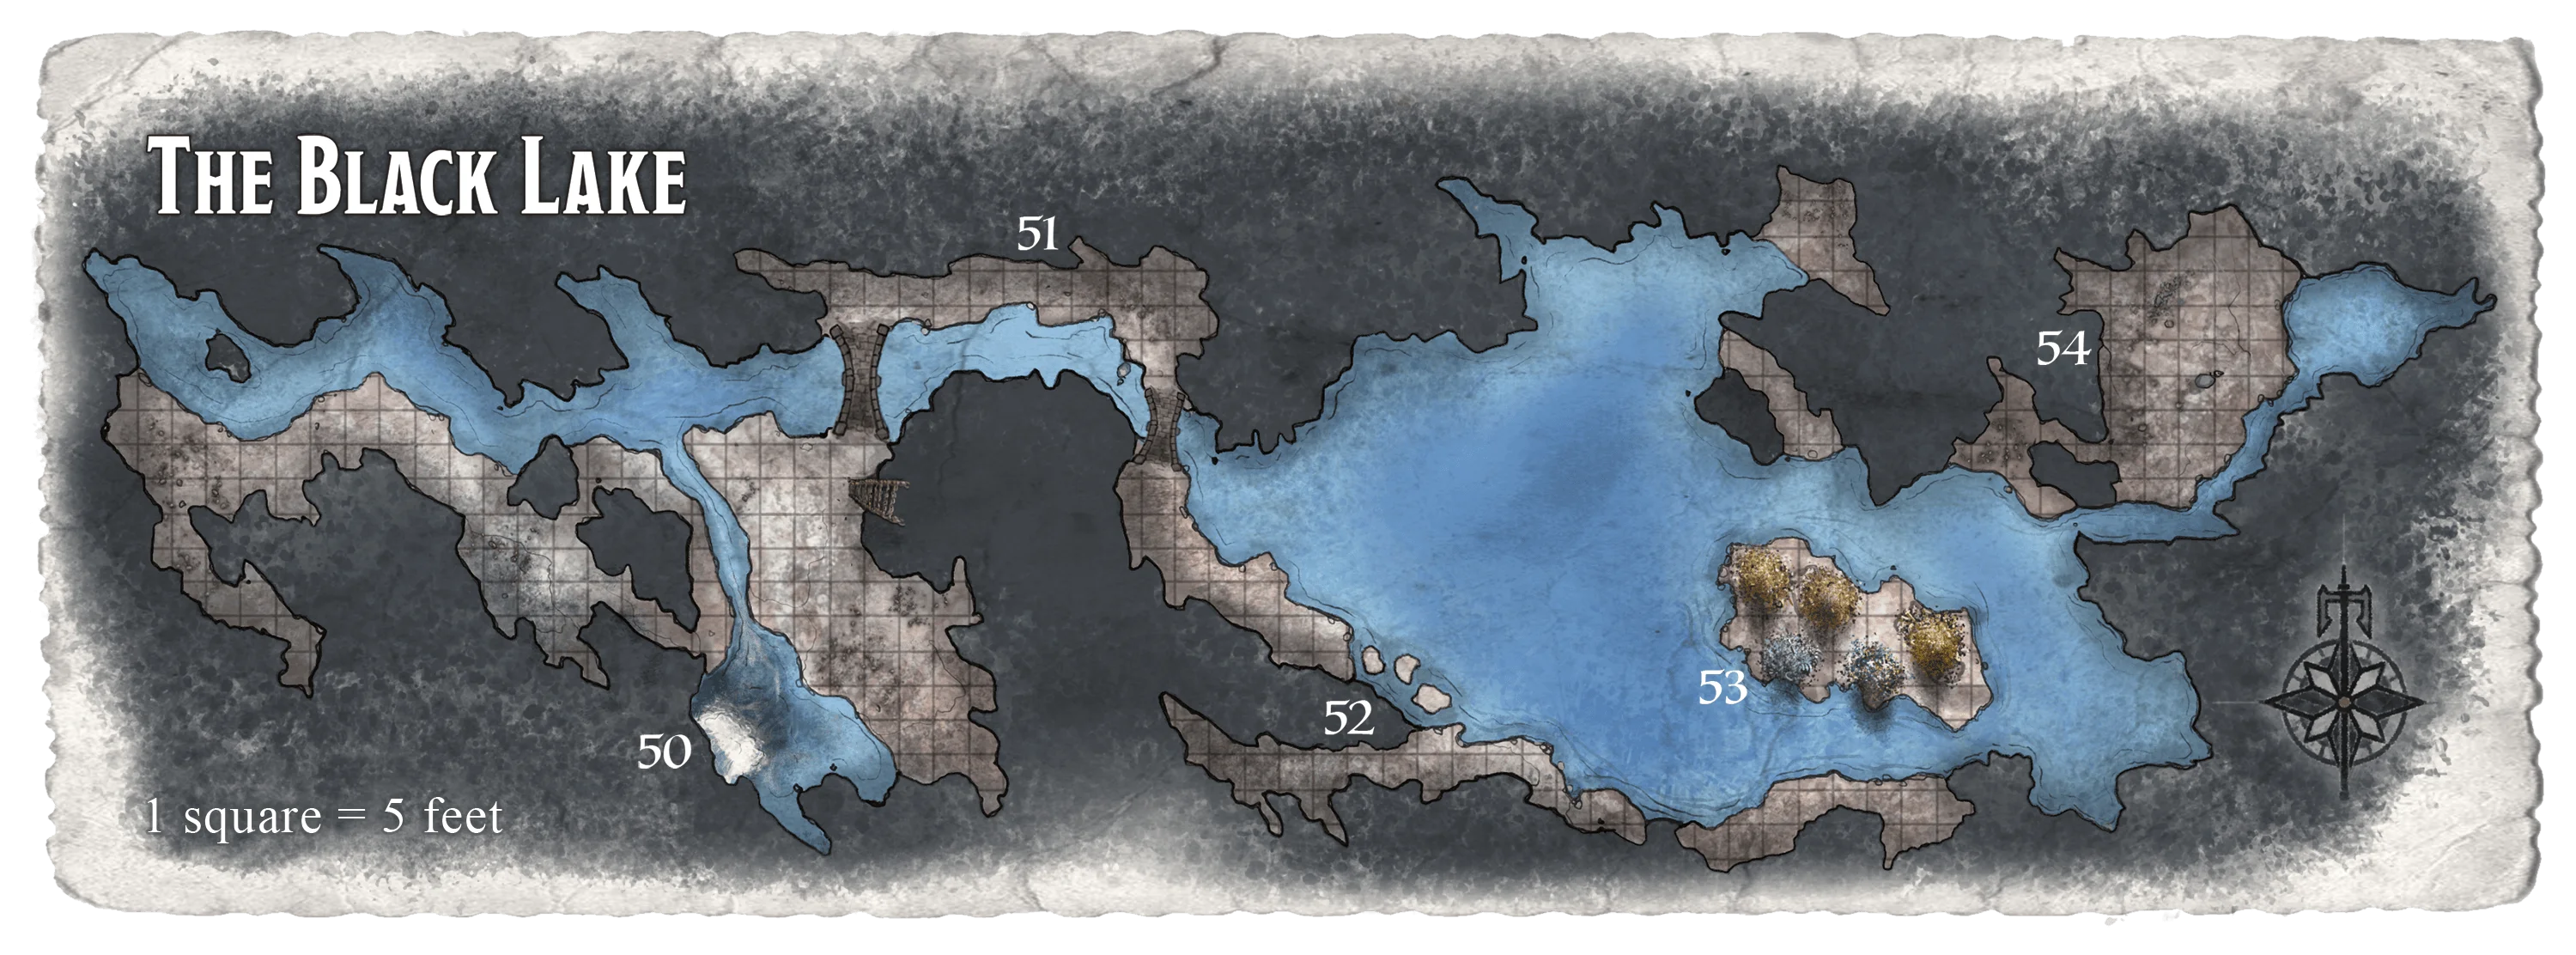

50. The Cascade
The stream in area 38 flows over the edge of the chasm and pours down into a turbulent pool.
A thundering spray of water fills this chamber, pooling and flowing out to join a larger river to the north. The air is damp, and the roar of the waterfall is deafening. A broad ledge heads north toward the river and then turns out of sight to the east. The muddy bank of the pool looks disturbed by tracks of some kind.
A character who makes a successful DC 10 Wisdom (Survival) check identifies the tracks as those of a Large reptilian creature with four feet and a long tail. The tracks lead away from the hard stone of the ledge to the north (where they can't be seen) and into the water.
51. Plascrete Bridges
Durj's followers built two plascrete bridges when they started work on the escape route through this level. The chain ladder that drops from the north ledge of area 38 ends just above the ground in the area south of the western bridge.
If the characters reached this area by using the chain ladder or otherwise descending through the chasm, read or paraphrase the following text. Adjust the information as needed if they arrive here by a different route.
A fast-moving underground river roars from east to west under a plascrete bridge. The bottom of the chain ladder is near the south bank of the river. On the north side of the bridge, a ledge continues to the east.
If the characters go north and cross the bridge, read:
After a short distance, the ledge leading east bends to the south, and a second bridge surmounts the river.
The western bridge is safe, but the bridge to the east is not. It has settled considerably, some of its foundations leaning precariously. Also, the plascrete has a curiously pitted appearance (which was caused by the Nightscale's acid breath). A character who succeeds on a DC 10 Intelligence (Investigation) check can determine that the plascrete was affected by acid, although the source of the acid isn't apparent.
Hazard
The weakened bridge can't take much weight before it collapses. If more than one Small or larger creature is on the bridge at one time, or if a character in heavy armor steps onto it, the arch fails. Any creature on the span must succeed on a DC 10 Dexterity saving throw to catch itself on the ledge. On a failed save, a creature falls, takes 7 (2d6) kinetic damage from falling timbers and stones, and is caught in the river's current (see "Fast-Flowing Water" above).
52. The Nightscale's Lair
When the characters first approach the southeastern shore of the lake, the juvenile Nightscale is dozing on her hoard on the island (area 53). The beast is immediately alerted to their presence if the characters make noise, carry light sources, or trigger the collapse of the bridge. Otherwise, the characters don't draw the beast's attention unless they move all the way to the ledge directly south of area 53.
The dilapidated bridge leads to another ledge that winds southeast alongside a very large lake, apparently the source of the underground river. The cavern is quite large; the lake's far shore is lost in shadow, and the echoes of water seem to indicate a very sizable cave.
Creature
When the Nightscale becomes aware of intruders, the beast slips into the water, quietly swimming to a point near the three stepping stones shown on the map. Any character watching the lake can make a Wisdom (Perception) check contested by the beast's Dexterity (Stealth) check. On a successful check, the character catches a glimpse of a serpentine form moving in the darkness.
The beast takes full advantage of her aquatic environment and never offers an easy target to enemies. She begins combat at a range of 20 to 30 feet, raising only her head and part of her neck above the water (granting her three-quarters cover) and spitting acid. Then she submerges and waits for her acid spit to recharge. The Nightscale doesn't resort to melee combat unless she is confronted underwater. If the beast is reduced to 40 hit points or fewer, she tries to escape through the passage in area 54.
Negotiation
Although the Nightscale is semi-sentient and possess rudimentary communicative ability via telepathy, she isn't inclined to parley with the characters unless they surrender, give her all of their treasure, and throw their arms and armor in the lake. If the characters seriously injure her, the Nightscale might bargain to buy time so she can later move her hoard. Only when she is near death does she abandon her treasure.
53. The Nightscale's Hoard
When the characters come into view of the island for the first time, read:
A short distance offshore sits a small isle thirty or forty feet across. Stalagmites thrust up at the ceiling above, and the dark waters lap quietly at its shores. Several spots on its surface shine even in the gloom, suggesting the promise of treasure to be had.
The Nightscale keeps her treasure on the small island in the lake, and she spends most of her time resting here. If the characters have avoided attracting her attention so far and want to approach the island, they can do so quietly if every character's Dexterity (Stealth) check meets or exceeds the beast's passive Perception score.
Treasure
The Nightscale has accumulated considerable wealth from her plunder of Choruk'Ed, having gathered the corpses of many fallen Mandalorians and stripping them of their black-tinted armor before consuming their remains. Her hoard contains 24,500 credits-worth of black-tinted durasteel, fleximetal and beskar plating (a total of 300 lbs.); two garnets worth 200 credits each; a black pearl worth 500 credits; a vambrace of homing missiles; a beskar vibroaxe bearing Durj's smith-mark; a Nightscale shield; a medpac; and a mutagen of magnetic levitation.
54. The Beast's Passage
Beneath the surface of a small pool is an underwater passage that links the Black Lake to the Dark Mere on the east side of the Stone Tooth. The submerged passage is about 700 feet long.
Transporting the Treasure
Because the valuable plating used for the Mandalorians' armor takes up much of a party's overall carry weight, the party may have to make a few trips to take all the rewards out of the hoard. Even so, the use of a speeder truck (see appendix C) can make transporting these items easier once they are out of the stronghold.
In addition, even if the Shadow Smiths within the Foundry were previously appeased, they may see this as an opportunity to recoup their losses in appeasing the Nightscale beast (at the GM's discretion). As such, the party may need to prepare to fight or sneak their way back out past the Smiths while transporting their treasure.
Aftermath
The characters have overcome Choruk'Ed's dangerous inhabitants and looted the Nightscale beast's lair. What next?
Resolving the Character Hooks
If the characters return to Blasyn Outpost, their fame as adventurers spreads. Citizens hail them on the street, and some might approach them with problems that can lead to further adventures. The characters can continue to use the town and Blasyndel itself as a base of operations. Other developments depend on what got them here and how they leave.
Follow the Map
While the characters are exploring the stronghold, they might find another map, perhaps on the body of an adventurer from the previous expedition, or in the library in area 49. It could lead to a different dungeon, a planet-city in some system far away, or an as-yet-unknown location rumored to hide a fabulous treasure.
Next Tale from the Yawning Maw
If you would like to continue from this adventure to Hidden Shrine of the Massassi, have the party discover notes from Lord Troja in area 49 on the religious activities of a Massassi tribe on Yavin 4, including coordinates he noted for 'future study'.
If the party requires further incentive, further research reveals records of a lost Massassi temple on Yavin 4 whose builders were said to revere an unknown deity, with the temple itself rumored to hold powerful artifacts.
Track the Broken Blade
If the characters were sent to retrieve weapons for Baron Ahl Thon, they can bring him the beskar-alloy vibroblade from area 22, the beskar vibroaxe in area 53, the techaxe from area 14, and the heavy blaster rifle from area 23. All bear Durj's smith-mark; Baron Ahl Thon pays 5,000 credits above the market price for each mundane weapon; 10,000 credits for the beskar-alloy vibroblade; and 60,000 credits for the beskar vibroaxe, if the characters are willing to sell.
Vanquish the Trandoshan Raiders
The characters can return to Blasyn Outpost at any time to collect the bounty for trandoshans they kill or capture. If the characters eliminate all the trandoshans in the stronghold, the mayor honors them with a celebration attended by the eminent citizens of the outpost. The characters have established valuable contacts who can aid them in their later endeavors.
Mandalorian Heritage
Any Mandalorians who successfully liberate the weapons and plating forged by Durj and his Nightscales will likely want to avoid handing them over to Baron Ahl Thon, and may seek to return them to Mandalore or a Mandalorian settlement to be returned to their rightful owners (though this is not absolute). They may also intend to let other Mandalorians know that Durj was honored by his enemies and given a warrior's burial in his old fortress.
Further Adventures
You can build an entire campaign around the Shadow Smiths that occupy the Foundry. Perhaps they came here from a hidden redoubt of their own within the Outer Rim. Your answers to the following questions form the basis for further adventures:
- How did the ugnaughts get into the complex?
- What is the mysterious project they are working on?
- Did Durj know of or anticipate the Shadow Smiths' existence?
- Do the Shadow Smiths have some of Durj's items? If so, are they guarding them or using them?
You can also use this adventure to sow the seeds of the characters' next activity. Perhaps the party encounters a legend of a powerful treasure from Choruk'Ed's fall, buried in the stronghold of a pirate warlord. Maybe the remaining trandoshan raiders are terrorizing a nearby area, or a powerful marauder wields a legendary weapon that was crafted by Durj Ne'tra.
If the party killed the juvenile Nightscale, it is also possible that the original Nightscale beast would learn of its offspring's death through the Force, and begin rampaging against settlements to search for the murderers of its child. Such a beast would likely be equivalent in difficulty to an Adult or even Ancient Black Dragon from D&D 5e, providing a harrowing threat for the party to take on.
Whatever form they take, the repercussions of the characters' descent into Choruk'Ed have the potential to affect their lives for years to come.
Forging New Equipment
If any party members wish to utilize this plating or the alloys used to construct it for their own equipment, they must follow the rules outlined in Wretched Hives for armor materials, sacrificing that amount of credits-worth from what they have recovered (for example, re-forging the plating onto a set of heavy armor requires a sacrifice of 6,000 credits worth of the recovered plating). The attachment or reforging must be done by someone proficient in armormech's implements, whether that being a party member or an armormech in Blasyn Outpost.
Parts of the beskar plating can also be reforged into beskar weaponry at the GM's discretion. In this instance, this will be equivalent to crafting an enhanced item, and will require the party member to track down the knowledge necessary to do so. The most likely place to find this (aside from going to Mandalore or a Mandalorian settlement) is the Bladeworks in area 37, though the Shadow Smiths are likely to jealously guard this knowledge for their own uses.
A copy of the Wretched Hives armor-material cost table is provided below, as well as what materials can be taken from the hoard:
Armor Type Cost Increase
Armor Type Cost Increase Light armor 1,000 cr Medium armor 2,000 cr Heavy armor 6,000 cr
Armor Type Cost Increase Light physical shield 250 cr Medium physical shield 750 cr Heavy physical shield 1,500 cr Note: Armormech services undertaken by third parties in Blasyn Outpost often carry a service fee of 10% of the cost increase, even if the client provided their own material.
Materials
Beskar
Armor and shields made from beskar gain the regulated property, but also the strength 11 property. If the armor or shield would already have the strength property, instead increase the strength number by 2.
Durasteel
Durasteel armor has the impermeable 2 and rigid properties. Durasteel shields have the interlocking and imbalanced properties.
Fleximetal
Fleximetal armor and shields gain the avoidant 1 property, but also the strength 11 property. If the armor or shield would already have the strength property, instead increase the strength number by 2.
Appendix A: Enhanced Items
A collection of enhanced items found across the adventure.
Power Cipher
Cipher, varies
A power cipher is an item that contains the machinations of a single power, imbued by the Force or built of technology. If your class is able to learn this power, you can activate the cipher and cast its power. Otherwise, the cipher is unusable. Casting the power by activating the cipher requires the power’s normal casting time.
If your class is able to learn the power but at a higher level than you can normally cast, you must make an ability check using your powercasting ability to determine whether you cast it successfully. The DC equals 10 + the power's level. On a failed check, the cipher is rendered permanently unusable with no other effect.
Once the power is cast, it is spent from the cipher, and the cipher itself disintegrates.
The level of the power in the cipher determines the power's saving throw DC and attack bonus, as well as the cipher's rarity, as shown in the Power Cipher table.
Power Cipher
| Power Level | Rarity | Save DC | Attack Bonus |
|---|---|---|---|
| At-will | Standard | 13 | +5 |
| 1st | Standard | 13 | +5 |
| 2nd | Premium | 13 | +5 |
| 3rd | Premium | 15 | +7 |
| 4th | Prototype | 15 | +7 |
| 5th | Prototype | 17 | +9 |
| 6th | Advanced | 17 | +9 |
| 7th | Advanced | 18 | +10 |
| 8th | Advanced | 18 | +10 |
| 9th | Legendary | 19 | +11 |
A cipher can take many forms. For a tech power such as explosion, a tech cipher containing it could be a simple grenade, or a small, one-use rocket launcher. Just as there are many ways to describe the form a tech power takes, there are just as many ways to describe their ciphers. A force cipher is likely more complicated to describe, but some options include it being an ancient scroll, a strange holocron, a Sith amulet, a brittle kyber crystal (unsuited for a lightsaber) that releases a stored power when crushed, and so on.
Use of Ciphers in the Adventure
The 'Power Cipher' enhanced item is the creation of Aziz, intended as a SW5e replacement for spell scrolls. Make sure your players understand that these items are spell scrolls in all but name, and that the equipment used for them should not be used in ways other than recreating the original power's effects.
Lightfoil (Fine)
Weapon (lightfoil), premium, 3 lb.
You have a +1 bonus to attack and damage rolls made with this enhanced weapon.
Found In: Area 12
Mutagen of Climbing
Consumable (substance), standard
When you drink this liquid mutagen, your palms grow miniature bards and you gain a climbing speed equal to your walking speed for 1 hour. During this time, you have advantage on Strength (Athletics) checks you make to climb.
The liquid mutagen is separated into brown, silver, and gray layers resembling bands of stone. Shaking the small tank fails to mix the colors.
Mutagen of Water Breathing
Consumable (substance), premium
You can breathe underwater for 1 hour after drinking this liquid mutagen, as it temporarily adds amphibian gills to your neck.
This mutagen's cloudy green fluid smells of the sea and has a jellyfish-like bubble floating in it.
Beskar-Alloy Vibroblade
Weapon (vibroblade), premium, 3 lb.
You have a +1 bonus to attack and damage rolls made with this enhanced weapon.
Made from a steel alloy containing traces of beskar, this weapon is not as powerful as a pure beskar weapon yet still exceeds the quality of most commercial blades.
Found In: Area 22
Mutagen of Invisibility
Consumable (substance), advanced
When you drink this liquid mutagen, you become invisible for 1 hour as your personal magnetic field begins to reflect light. Anything you wear or carry is invisible with you, covered by this field. The effect ends early if you attack or cast a power.
This liquid mutagen's container looks empty, but feels as though it holds liquid.
Found In: Area 32
Ring of Tech Storing MK III
Adventuring gear (finger), prototype
Requires attunement
This ring stores tech powers cast into it, holding them until the attuned wearer uses them. The ring can store up to 5 levels worth of tech powers at a time. When found, it contains 1d6 - 1 levels of stored tech powers chosen by the GM.
Any creature can cast a tech power of 1st through 5th level into the ring by touching the ring as the tech power is cast. The tech power has no effect, other than to be stored in the ring. If the ring can’t hold the tech power, the tech power is expended without effect. The level of the slot used to cast the tech power determines how much space it uses.
While wearing this ring, you can cast any tech power stored in it. The tech power uses the slot level, tech save DC, tech attack bonus, and techcasting ability of the original caster, but is otherwise treated as if you cast the tech power. The tech power cast from the ring is no longer stored in it, freeing up space.
Found In: Area 33
If 1 or more tech powers are stored in the ring when found, the powers have the following traits:
- Tech save DC = 14
- Tech attack modifier = +6
- Techcasting ability = Intelligence
Mutagen of Mogu Strength
Consumable (substance), premium
When you drink this liquid mutagen, your Strength score changes to 21 for 1 hour. The potion has no effect on you if your Strength is equal to or greater than that score.
This mutagen's transparent liquid was synthesized from the DNA of a mogu.
Found In: Area 37
Vambrace of Homing Rockets
Adventuring Gear, premium
This vambrace has 7 charges. While holding it, you can use an action to expend 1 or more of its charges to cast the homing rockets tech power from it. For 1 charge, you cast the 1st-level version of the power. You can increase the power level by one for each additional charge you expend.
The vambrace regains 1d6 + 1 expended charges daily at dawn. If you expend the vambrace's last charge, roll a d20. On a 1, the vambrace short-circuits and is destroyed.
This ancient Mandalorian vambrace utilizes a predecessor of the 'whistling bird' missiles and partially resembles those used by contemporary Mandalorians, though it lacks many features of its later designs.
Found In: Area 53
Beskar Vibroaxe
Weapon (vibroaxe), prototype, 3 lb.
You have a +1 bonus to attack and damage rolls made with this enhanced weapon, and when you hit a creature with a melee weapon attack using this weapon, it deals an extra 1d6 kinetic damage.
Forged from pure beskar alloy, this vibroaxe was created by Durj to give to his strongest Nightscale. The warrior who wielded this weapon was said to have once cleaved five armored pirates in half with one swing.
Found In: Area 53
Nightscale Shield
Shield (medium physical shield), premium, 3 lb.
You have a +1 bonus to AC while wielding this enhanced shield, which also has the regulated property.
Reinforced by a layer of beskar, this shield was utilized by Nightscales who would advance into oncoming laserfire before unleashing close-range blasts of flame.
Found In: Area 53
Mutagen of Magnetic Levitation
Consumable (substance), advanced
When you drink this liquid mutagen, you gain a flying speed equal to your walking speed for 1 hour and can hover, as you control your magnetic field to repel and stabilize yourself in relation to other objects. If you're in the air when the potion wears off, you fall unless you have some other means of staying aloft.
This mutagen's clear liquid appears to have a single bubble perfectly stabilized in its centre at all times, regardless of the liquid's shape or volume.
Found In: Area 53
Mutagen and Droids
As mechanical beings, droid player characters typically do not have a method of imbiding food or drink, preventing them from gaining the benefits of mutagens and other substance items.
At the GM's discretion, player character droids may be automatically installed with organic-synthesizing compartments that allow them to process such materials (later 'expelling' the refuse from the same compartment) - in this way, they may also benefit from substance items such as mutagens.
Appendix B: Creature Statistics
These creatures are sorted by categories relevant to the adventure. Many of them may have similar names to creatures featured in other adventures or creatures in the SW5e Hypercodex, but most are simply adapted versions of the creatures found in the original adventure module or in the Dungeons and Dragons 5e Monster Manual. Versions of creatures taken from other SW5e authors are credited at the end of this document.
Miscellaneous
Commoner
The standard template for most Galactic citizens.
Commoner
Small or medium humanoid (any race), any alignment
- Armor Class 10
- Hit Points 4 (1d8)
- Speed 30 ft.
STR DEX CON INT WIS CHA 10 (+0) 10 (+0) 10 (+0) 10 (+0) 10 (+0) 10 (+0)
- Senses passive Perception 10
- Languages any one language (usually Basic)
- Challenge 0 (0 or 10 XP), PB +2
Actions
Improvised Weapon. Melee or Ranged Weapon Attack: +2 to hit, reach 5 ft. or range 20/60 ft., one target. Hit: 2 (1d4) kinetic damage.
Appears in: Blasyn Outpost, Area 6
Militia
When called on by the mayor, volunteers of the Blasyn Outpost militia take up arms to protect the outpost. These commoners wear combat suits (gaining 11 AC) and gain the following actions:
Light Pistol. Ranged Weapon Attack: +2 to hit, range 40/160 ft., one target. Hit: 2 (1d4) energy damage.
Vibrostaff. Melee Weapon Attack: +2 to hit, reach 5 ft., one target. Hit: 3 (1d6) kinetic damage, or 5 (2d4) kinetic damage if wielded in two hands.
Noble
A higher-class citizen with minor combat training.
Noble
Small or medium humanoid (any race), any alignment
- Armor Class 15 (weave armor)
- Hit Points 9 (2d8)
- Speed 30 ft.
STR DEX CON INT WIS CHA 11 (+0) 12 (+1) 11 (+0) 12 (+1) 14 (+2) 16 (+3)
- Skills Deception +5, Insight +4, Persuasion +5
- Senses passive Perception 12
- Languages any two languages
- Challenge 1/8 (25 XP), PB +2
Actions
Vibrorapier. Melee Weapon Attack: +3 to hit, reach 5 ft., one target. Hit: 5 (1d8+1) kinetic damage.
Blaster Pistol. Ranged Weapon Attack: +3 to hit, range 50/200 ft., one target. Hit: 4 (1d6+1) energy damage.
Reactions
Parry. The noble adds 2 to its AC against one melee attack that would hit it. To do so, the noble must see the attacker and be wielding a melee weapon.
Appears in: Blasyn Outpost
Security Guard
An enforcer commonly found in smaller settlements across the galaxy.
Security Guard
Small or medium humanoid (any race), any alignment
- Armor Class 15 (mesh armor, medium physical shield)
- Hit Points 11 (2d8+2)
- Speed 30 ft.
STR DEX CON INT WIS CHA 13 (+1) 12 (+1) 12 (+1) 10 (+0) 11 (+0) 10 (+0)
- Skills Perception +2
- Senses passive Perception 12
- Languages any one language (usually Basic)
- Challenge 1/8 (25 XP), PB +2
Actions
Blaster Pistol. Ranged Weapon Attack: +3 to hit, range 50/200 ft., one target. Hit: 4 (1d6+1) energy damage.
Shield Bash. Melee Weapon Attack: +3 to hit, reach 5 ft., one target. Hit: 3 (1d4+1) kinetic damage.
Appears in: Blasyn Outpost
Veteran
A skilled fighter that often leads troopers or guards.
Veteran
Small or medium humanoid (any race), any alignment
- Armor Class 17 (assault armor)
- Hit Points 58 (9d8+18)
- Speed 30 ft.
STR DEX CON INT WIS CHA 15 (+2) 14 (+2) 14 (+2) 10 (+0) 11 (+0) 10 (+0)
- Skills Athletics +4, Perception +2
- Senses passive Perception 12
- Languages any one language (usually Basic)
- Challenge 3 (700 XP), PB +2
Actions
Multiattack. The veteran makes two heavy blaster rifle attacks or two vibroblade attacks.
Heavy Blaster Rifle. Ranged Weapon Attack: +4 to hit, range 100/400 ft., one target. Hit: 7 (2d4+2) energy damage.
Vibroblade. Melee Weapon Attack: +4 to hit, reach 5 ft., one target. Hit: 6 (1d8+2) kinetic damage, or 7 (1d10+2) kinetic damage if used with two hands.
Appears in: Blasyn Outpost
Nurse Droid
A type of Class I medical droid designed for physical aid and, in necessary circumstances, restraint.
Nurse Droid
Medium droid (class I), lawful balanced
- Armor Class 10
- Hit Points 9 (2d8)
- Speed 30 ft.
STR DEX CON INT WIS CHA 14 (+2) 10 (+0) 10 (+0) 12 (+1) 10 (+0) 9 (-1)
- Skills Athletics +3, Medicine +2, Technology +4
- Damage Vulnerabilities ion
- Damage Resistances necrotic, poison, psychic
- Condition Immunities poisoned, diseased
- Senses passive Perception 12
- Languages Galactic Basic, any one other language
- Challenge 1/4 (50 XP), PB +2
Techcasting. The droid is a 1st-level techcaster (tech save DC 11, +3 to hit with power attacks, 4 tech points). The droid knows the following powers:
At-will: minor defribrillation, mobile lights, production values
1st-level: kolto pack, stack the deck, toxin scanActions
Restrain. Melee Weapon Attack: +3 to hit, reach 5 ft., one target. Hit: 4 (1d4+2) kinetic damage and the target is grappled (escape DC 11). While grappled, the target is restrained.
Appears in: Blasyn Outpost
Physician
Though many doctors across the galaxy may only be comparable to intelligent commoners, a truly effective physician has the capability to treat any kind of wound on any kind of species in any kind of situation - even combat.
Physician
Small or medium humanoid (any race), any alignment
- Armor Class 13 (mesh armor)
- Hit Points 27 (5d8+5)
- Speed 30 ft.
STR DEX CON INT WIS CHA 10 (+0) 10 (+0) 12 (+1) 16 (+3) 14 (+2) 12 (+1)
- Skills Medicine +6, Persuasion +3, Lore +5
- Senses passive Perception 12
- Languages any four languages
- Challenge 2 (450 XP), PB +2
Weaponized Defibrillator. As a bonus action, the physician can expend 2 tech points to cause its melee weapon attacks to deal an extra 10 (3d6) enhanced electrical damage to a target on a hit. This benefit lasts until the end of the turn. If the physician expends additional tech points, the extra damage increases by 1d6 for each point above 2.
Techcasting. The physician is a 5th-level techcaster (tech save DC 13, +5 to hit with power attacks, 20 tech points). The doctor knows the following powers:
At-will: minor defribrillation, mobile lights, production values
1st-level: kolto pack, toxin scan, tracer bolt
2nd-level: kolto dispenser, toxin purge
3rd-level: diminish tech, slow-release medpacActions
Blaster Pistol. Ranged Weapon Attack: +3 to hit, range 50/200 ft., one target. Hit: 4 (1d6+1) energy damage.
Vibroscalpel. Melee Weapon Attack: +3 to hit, reach 5 ft., one target. Hit: 3 (1d4+1) kinetic damage.
Appears in: Blasyn Outpost
Beasts
Cave Sketto
Miniature reptiles that hunt during the night and sleep during the day unless disturbed. Diminuitive cousins of their counterparts from the deserts of Tatooine, these sketto possess a similar taste for blood and are just as capable of siphoning it despite their smaller size.
Cave Sketto
Tiny beast, unaligned
- Armor Class 14 (natural armor)
- Hit Points 2 (1d4)
- Speed 10 ft., fly 40 ft.
STR DEX CON INT WIS CHA 4 (-3) 16 (+3) 11 (+0) 2 (-4) 8 (-1) 6 (-2)
- Senses darkvision 60 ft., passive Perception 9
- Languages -
- Challenge 1/8 (25 XP), PB +2
Sunlight Sensitivity. While in sunlight, the sketto has disadvantage on attack rolls, as well as on Wisdom (Perception) checks that rely on sight.
Actions
Blood Drain. Melee Weapon Attack: +5 to hit, reach 5 ft., one target. Hit: 5 (1d4+3) kinetic damage, and the sketto attaches to the target. While attached, the sketto doesn't attack. Instead, at the start of each of the sketto's turns, the target loses 5 (1d4 + 3) hit points due to blood loss. The sketto can detach itself by spending 5 feet of its movement. It does so after it drains 10 hit points of blood from the target or the target dies. A creature, including the target, can use its action to detach the sketto.
Appears in: Wilderness Encounters, Area 10, Area 15a, Area 16
Garu-Bear
A common type of carniform found across the galaxy, the garu-bear prowls through forest undergrowth and climbs up trees in order to catch prey.
Garu-Bear
Large beast, unaligned
- Armor Class 11 (natural armor)
- Hit Points 34 (4d10+12)
- Speed 40 ft., climb 30 ft.
STR DEX CON INT WIS CHA 19 (+4) 10 (+0) 16 (+3) 2 (-4) 13 (+1) 7 (-2)
- Skills Perception +3
- Senses passive Perception 13
- Languages -
- Challenge 1 (200 XP), PB +2
Keen Smell. The garu-bear has advantage on Wisdom (Perception) checks that rely on smell.
Actions
Multiattack. The garu-bear makes two attacks: one with its bite and one with its claws.
Bite. Melee Weapon Attack: +6 to hit, reach 5 ft., one target. Hit: 8 (1d8+4) kinetic damage.
Claws. Melee Weapon Attack: +6 to hit, reach 5 ft., one target. Hit: 11 (2d6+4) kinetic damage.
Appears in: Wilderness Encounters, Area 21
Juvenile Cave Sleen
The juvenile form of the cave sleen is comparable in size to the sleens seen on swamp planets such as Dagobah, though their lack of physical development undermines their capability.
Cave Sleen, Juvenile
Large beast, unaligned
- Armor Class 12 (natural armor)
- Hit Points 19 (3d10+3)
- Speed 30 ft., swim 30 ft.
STR DEX CON INT WIS CHA 15 (+2) 12 (+1) 13 (+1) 2 (-4) 10 (+0) 5 (-3)
- Skills Perception +3
- Senses darkvision 30 ft., passive Perception 13
- Languages -
- Challenge 1/4 (200 XP), PB +2
Hold Breath. The sleen can hold its breath for up to 15 minutes.
Actions
Bite. Melee Weapon Attack: +4 to hit, reach 5 ft., one target. Hit: 6 (1d8+2) kinetic damage.
Appears in: Area 19
Cave Sleen
Larger and more ferocious than its swamp-dwelling cousins, an adult cave sleen can grow to enormous sizes and if left unchecked, can even begin hunting humanoids to satisfy its appetite.
Cave Sleen
Huge beast, unaligned
- Armor Class 14 (natural armor)
- Hit Points 66 (7d12+21)
- Speed 30 ft., swim 50 ft.
STR DEX CON INT WIS CHA 21 (+5) 9 (-1) 17 (+3) 2 (-4) 10 (+0) 7 (-2)
- Skills Perception +3, Stealth +3
- Senses darkvision 60 ft., passive Perception 10
- Languages -
- Challenge 4 (1,100 XP), PB +2
Hold Breath. The sleen can hold its breath for up to 30 minutes.
Actions
Multiattack. The lizard makes two attacks: one with its bite and one with its tail. One attack can be replaced by Swallow.
Bite. Melee Weapon Attack: +7 to hit, reach 5 ft., one target. Hit: 16 (2d10+5) kinetic damage and the target is grappled (escape DC 15). Until this grapple ends, the target is restrained, and the lizard can't bite another target.
Tail. Melee Weapon Attack: +7 to hit, reach 10 ft., one target. Hit: 12 (2d6+5) kinetic damage. If the target is a creature, it must succeed on a DC 15 Strength saving throw or be knocked prone.
Swallow. Melee Weapon Attack: +7 to hit, reach 5 ft., one Medium or smaller creature the lizard is grappling. Hit: 16 (2d10 + 5) piercing damage. The target is swallowed, and the grapple ends. The swallowed target is blinded and restrained, it has total cover against attacks and other effects outside the lizard, and it takes 10 (3d6) acid damage at the start of each of the lizard's turns. The lizard can have only one target swallowed at a time.
If the lizard dies, a swallowed creature is no longer restrained by it and can escape from the corpse using 10 feet of movement, exiting prone.
Appears in: Area 20
K'Lor'Slug
The k'lor'slug is a worm-like beast propelled by several pairs of legs and possessing a gaping, circular maw of teeth used to poison and paralyze enemies. The variant found on Blasyndel is more dangerous than many of its offworld cousins, using its Tunneler trait to conceal themselves in rock and ambush unsuspecting prey.
K'Lor'Slug
Medium beast, unaligned
- Armor Class 14 (natural armor)
- Hit Points 32 (5d8+10)
- Speed 30 ft., burrow 30 ft., climb 30 ft.
STR DEX CON INT WIS CHA 8 (-1) 16 (+3) 14 (+2) 2 (-4) 13 (+1) 2 (-4)
- Skills Perception +3
- Damage Immunities poison
- Condition Immunities poisoned
- Senses blindsight 30 ft., passive Perception 13
- Languages -
- Challenge 2 (450 XP), PB +2
Swarm Tactics. The k’lor’slug has advantage on an attack roll against a creature if at least one of the k’lor’slug’s allies is within 5 feet of the creature and the ally isn’t incapacitated.
Tunneler. The k'lor'slug can burrow through solid rock at half it burrowing speed and leaves a 5-foot-diameter tunnel in its wake.
Actions
Stabbing Forelimbs. Melee Weapon Attack: +5 to hit, reach 10 ft., one creature. Hit: 7 (1d8+3) kinetic damage.
Bite. Melee Weapon Attack: +5 to hit, reach 5 ft., one target. Hit: 4 (1d4+2) kinetic damage, and the target must succeed on a DC 13 Constitution saving throw or take 13 (4d6) poison damage. If the poison damage reduces the target to 0 hit points, the target is stable but poisoned for 1 hour, even after regaining hit points, and is paralyzed while poisoned in this way.
Appears in: Wilderness Encounters, Area 24, Area 26
Mogu
The mogu is a bipedal carnivore and predator covered head-to-toe in brown fur. Identifiable by its inward-curved cranial horns, the mogu blends into the surrounding woodland to stalk its prey, then begins a violent and relentless assault when their guard is down.
Mogu
Large beast, unaligned
- Armor Class 13 (natural armor)
- Hit Points 45 (6d10+12)
- Speed 40 ft.
STR DEX CON INT WIS CHA 18 (+4) 14 (+2) 15 (+2) 5 (-3) 12 (+1) 11 (+0)
- Saving Throws Con +5
- Skills Athletics +6, Perception +3, Stealth +3
- Senses darkvision 60 ft., passive Perception 13
- Challenge 3 (700 XP), PB +2
Keen Smell. The mogu has advantage on Wisdom (Perception) checks that rely on smell.
Reckless. At the start of its turn, the mogu can gain advantage on all melee weapon attack rolls during that turn, but attack rolls against it also have advantage until the start of its next turn.
Forest Camouflage. The mogu has advantage on Dexterity (Stealth) checks made to hide in forested terrain.
Actions
Multiattack. The mogu makes two claw attacks. If it successfully grapples a creature with its first claw attack, they can replace the second attack with a slam attack.
Claw. Melee Weapon Attack: +6 to hit, reach 5 ft., one target. Hit: 11 (2d6+4) kinetic damage. If the target is a creature, it becomes grappled (escape DC 14). The mogu has two claws, and each claw can only grapple one creature at a time.
Slam. The mogu attempts to slam one creature it is grappling against a solid surface or another creature within 5 feet. Each creature targeted must make on a DC 14 Dexterity saving throw, taking 11 (2d10) damage on a failure or half that damage on a success. After this attack finishes, the grapple ends.
Throw Boulder. Ranged Weapon Attack: +6 to hit, range 30/60, one target. Hit: 17 (2d12+4) kinetic damage. If the target is a creature, it must succeed a DC 14 Strength saving throw or be knocked prone.
Reactions
Revenge. When the mogu is dealt 10 damage or more by a single attack and survives, it can make a claw attack against the attacker.
Appears in: Wilderness Encounters
Adult Dianoga
A primitive species of water-dwelling cephalopods, dianoga dwell and thrive in water sources across the galaxy. Though possessing intelligence and a unique, humming language, most interactions with dianoga are of a violent nature due to their omnivorous nature.
It is possible, though difficult, to negotiate with a dianoga through offerings of food or a fresh source of water. In such a case, the dianoga can be persuaded to allow passage or even target other creatures if effective communication is possible.
Dianoga, Adult
Huge beast, unaligned
- Armor Class 14 (natural armor)
- Hit Points 105 (10d12+40)
- Speed 15 ft., swim 60 ft.
STR DEX CON INT WIS CHA 18 (+4) 15 (+2) 19 (+4) 6 (-2) 13 (+1) 6 (-2)
- Saving Throws Con +7, Wis +4
- Skills Stealth +3
- Senses darkvision 60 ft., passive Perception 11
- Languages Dianoga
- Challenge 5 (1,800 XP), PB +3
Grasping Tentacles. The dianoga can have up to seven tentacles at a time. Each tentacle can be attacked (AC 20; 10 hit points; immunity to poison and psychic damage). Destroying a tentacle deals no damage to the dianoga, which can extrude a replacement tentacle on its next turn. A tentacle can also be broken if a creature takes an action and succeeds on a DC 15 Strength check against it.
Limited Amphibiousness. The dianoga can breathe air and water, but it needs to be submerged at least once every 4 hours to avoid suffocating.
Regeneration. The dianoga regains 10 hit points at the start of its turn if it has at least 1 hit point.
Actions
Multiattack. The dianoga makes three attacks: two with its tentacles and one with its bite.
Bite. Melee Weapon Attack: +7 to hit, reach 5 ft., one target. Hit: 13 (2d8+4) kinetic damage. If the target is a creature, it must succeed on a DC 15 Constitution saving throw or be poisoned for 1 minute. Until the poison ends, the target is paralyzed. The target can repeat the saving throw at the end of each of its turns, ending the poison on itself on a success.
Tentacles. Melee Weapon Attack: +7 to hit, reach 10 ft., one target. Hit: 8 (1d8+4) kinetic damage, and the target is grappled (escape DC 15). Until this grapple ends, the target is restrained.
Tentacle Slam. The dianoga slams creatures grappled by it into each other or a solid surface. Each creature must succeed on a DC 15 Constitution saving throw or take 11 (2d6+4) kinetic damage and be stunned until the end of the dianoga's next turn. On a successful save, the target takes half the kinetic damage and isn't stunned.
Appears in: Area 33
The Nightscale
An ancient beast revered millenia ago by the Du-Wav natives of Blasyndel, the Nightscale earns its name from its midnight-black scales that run across its body. It was considered a terrifying god to be appeased, requesting tribute from the natives and threatening to destroy their halls if left unsatisfied. Descriptions of its form indicate that it physically resembles a krayt dragon of Tatooine, though with a more amphibious structure.
When Lord Troja arrived in Stone Tooth, he discovered the Nightscale to be both surprisingly intelligent and possessing force sensitivity, using telepathy to communicate its demands to the natives. Seeing the beast as a potentially invaluable test subject, Troja travelled to the Black Lake under the guise of offering tribute to the beast. Sensing his intent, however, the beast instead devoured him, leaving the creations he left behind to fester within Stone Tooth.
The Nightscale currently inhabiting the Black Lake is the juvenile offspring of the beast that once lurked within, which has since left for other parts of the planet. Though not yet as powerful as its parent, its natural strength and capabilities become readily apparent to any who cross its path.
The armor it hoards was gathered by its parent almost two centuries ago, when the pirates who raided Choruk'Ed fled after discovering the beast lurking beneath them and abandoned many valuables in the process. Though the exact reason is not known, it is possible the Nightscale sees the black armor pieces as parts of another Nightscale, and keeps them nearby in hopes that they will one day 'wake up'.
Nightscale, Juvenile
Large beast, chaotic evil
- Armor Class 18 (natural armor)
- Hit Points 127 (15d10+45)
- Speed 40 ft., climb 40 ft., swim 40 ft.
STR DEX CON INT WIS CHA 19 (+4) 14 (+2) 17 (+3) 12 (+1) 11 (+0) 15 (+2)
- Saving Throws Dex +5, Con +6, Wis +3, Cha +5
- Skills Perception +6, Stealth +5
- Damage Immunities acid
- Senses blindsight 30 ft., darkvision 120 ft., passive Perception 16
- Languages telepathy 120 ft. (heard as the target creature's first language)
- Challenge 7 (2,900 XP), PB +3
Amphibious. The nightscale can breathe air and water.
Force Telepathy. The nightscale can communicate telepathically with other creatures within its line of sight up to 120 ft. They cannot communicate with droids in this way unless the droid is capable of force-casting.
Innate Forcecasting. The nightscale’s forcecasting ability is Charisma (force save DC 13). It can innately cast the following force powers:
1/Day: force blind/deafen, sense emotionActions
Multiattack. The nightscale makes three attacks: one with its bite and two with its claws.
Bite. Melee Weapon Attack: +7 to hit, reach 10 ft., one target. Hit: 15 (2d10+4) kinetic damage plus 4 (1d8) acid damage.
Claw. Melee Weapon Attack: +7 to hit, reach 5 ft., one target. Hit: 11 (2d6+4) kinetic damage.
Acid Spit (Recharge 5-6). The nightscale spits acid in a 30-foot line that is 5 feet wide. Each creature in that line must make a DC 14 Dexterity saving throw, taking 49 (11d8) acid damage on a failed save, or half as much damage on a successful one.
Appears in: Area 52
Trandoshan Hunters
The trandoshans that inhabit Choruk'Ed's upper levels are aspiring hunters, hoping to develop their tracking and fighting prowess enough to take on more powerful beasts or even other prized sentients such as the Wookiees, their ancient enemy. Through hunting, the aspirants hope to eventually attain sufficient Jagganath points to appease their deity, the Scorekeeper, and live a rewarding afterlife.
Under the joint leadership of Great Ulesk, Old Yarassk and Burkuss, these trandoshans have been oppressing the settlements surrounding Stone Tooth as part of a 'boot camp' exercise, preparing them to join other trandoshan warriors in the great hunt. These hunters speak in gutteral tones and hisses, regularly drawing out the letter 's' in their speech.
Trandoshan Raiders
The core fighting force of Great Ulesk's gang, the raiders of Choruk'Ed are prideful and vicious, unwilling to back down from a fight. Although what Jagganath points they have accumulated are minimal, they are loathe to surrender or be captured, prepared to fight to the death if necessary.
Trandoshan Raider
Medium humanoid (trandoshan), chaotic dark
- Armor Class 14 (mesh armor)
- Hit Points 11 (2d8+2)
- Speed 30 ft.
STR DEX CON INT WIS CHA 15 (+2) 12 (+1) 12 (+1) 10 (+0) 12 (+1) 9 (-1)
- Skills Athletics +5, Perception +3, Survival +3
- Senses darkvision 60 ft., passive Perception 13
- Languages Galactic Basic, Dosh
- Challenge 1/2 (100 XP), PB +2
Jagganath Training. The trandoshan deals one extra die of damage with its techaxe attack (included).
Keen Sight. The trandoshan has advantage on Wisdom (Perception) checks that rely on sight.
Regeneration. The trandoshan regains 2 hit points at the start of its turn if it has at least 1 hit point.
Actions
Techaxe. Melee or Ranged Weapon Attack: +4 to hit, reach 5 ft. or range 25/75 ft., one creature. Hit: 9 (2d6+2) kinetic damage.
Scattergun Burst. The trandoshan targets a 10-foot area it can see within 30 feet. Each creature in the area must make a DC 11 Dexterity saving throw or take 4 (1d6+1) kinetic damage.
Appears in: Wilderness Encounters, Wait and Watch, Area 1, Area 2, Area 3, Area 4, Area 5, Area 9, Area 11, Area 14
Variant: Trandoshan Marksmen
Trandoshan raiders set up for marksmen duty have the following changes:
Blaster Rifle. Ranged Weapon Attack: +3 to hit, range 105/420 ft., one creature. Hit: 5 (1d8+1) energy damage.
Burkuss
Burkuss acts as one of the raiding party's leaders, alongside Old Yarassk and Great Ulesk. Born with Force-sensitivity, her parents saw her gift as a blessing from the Scorekeeper, and molded her to serve a hunting party as soon as she came of age.
As a shaman, Burkuss uses her gifts to predict conditions for hunts and foresee potential dangers. She is also capable of performing hunting herself, having used her gifts to gather many Jagganath points over her lifetime.
Burkuss
Medium humanoid (trandoshan), chaotic dark
- Armor Class 16 (weave armor, light physical shield)
- Hit Points 43 (7d8+12)
- Speed 30 ft.
STR DEX CON INT WIS CHA 16 (+3) 12 (+1) 12 (+1) 10 (+0) 12 (+1) 14 (+2)
- Skills Athletics +5, Survival +3, Lore +1
- Senses darkvision 60 ft., passive Perception 13
- Languages Galactic Basic, Dosh
- Challenge 2 (450 XP), PB +2
Forcecasting. The trandoshan is a 3rd-level forcecaster (force save DC 12, +4 to hit with power attacks, 4 force points). The trandoshan knows the following powers:
At-will: guidance, resistance, sound trick
1st-level: malacia, valor
2nd-level: animate weapon, danger senseScorekeeper's Blessing. The trandoshan deals an extra 4 (1d8) damage when it hits with a weapon attack (included in the attacks).
Keen Sight. The trandoshan has advantage on Wisdom (Perception) checks that rely on sight.
Regeneration. The trandoshan regains 9 hit points at the start of its turn if it has at least 1 hit point.
Actions
Vibrospear. Melee or Ranged Weapon Attack: +5 to hit, reach 5 ft. or range 25/75 ft., one creature. Hit: 10 (1d6+3 plus 1d8) kinetic damage, or 12 (2d8+3) kinetic damage if wielded with two hands.
Appears in: Area 9
Old Yarassk
The elite Old Yarassk is the acting huntmaster for the raiding party in Choruk'Ed, providing much of the core guidance surrounding combat and tracking. A prolific hunter in his time, Yarassk accumulated a wealth of Jagganath points and has settled into near-retirement to await his final judgement.
Yarassk's role in the hunting party is to dispense conventional wisdom about the hunt and teach refined hunting techniques. Despite his age, Yarassk remains a more formidable opponent than many of his younger students.
Old Yarassk
Medium humanoid (trandoshan), chaotic dark
- Armor Class 16 (weave armor, light shield generator)
- Hit Points 39 (6d8+12)
- Speed 30 ft.
STR DEX CON INT WIS CHA 17 (+3) 14 (+2) 15 (+2) 11 (+0) 14 (+2) 10 (+0)
- Skills Athletics +5, Perception +4, Survival +4
- Senses darkvision 60 ft., passive Perception 14
- Languages Galactic Basic, Dosh
- Challenge 2 (450 XP), PB +2
Jagganath Training. The trandoshan deals one extra die of damage with its techaxe attack (included).
Keen Sight. The trandoshan has advantage on Wisdom (Perception) checks that rely on sight.
Regeneration. The trandoshan regains 8 hit points at the start of its turn if it has at least 1 hit point.
Actions
Multiatack. The trandoshan makes two techaxe attacks.
Techaxe. Melee or Ranged Weapon Attack: +5 to hit, reach 5 ft. or range 25/75 ft., one creature. Hit: 10 (2d6+3) kinetic damage.
Scattergun Burst. The trandoshan targets a 10-foot area it can see within 30 feet. Each creature in the area must make a DC 12 Dexterity saving throw or take 5 (1d6+2) kinetic damage.
Appears in: Area 14
Great Ulesk
A mutant trandoshan who acts as one of three leaders for the raiding party in Choruk'Ed. Due to a history abusing muscle-growth substances, Ulesk is a towering and bulky figure that can easily overpower many of his fellow trandoshans, though he lacks finesse and mental fidelity. To facilitate his hunting, he trained two kath hounds to act as both his guards and trackers, and wields an oversized vibroaxe.
Ulesk's role in the hunting party involves acting as muscle to hold down larger beasts, and showing other raiders the value of a trained beast using his kath hounds.
Great Ulesk
Large humanoid (trandoshan), chaotic dark
- Armor Class 12 (mesh armor)
- Hit Points 51 (6d10+18)
- Speed 40 ft.
STR DEX CON INT WIS CHA 19 (+4) 8 (-1) 16 (+3) 5 (-3) 7 (-2) 7 (-2)
- Skills Athletics +6, Animal Handling +2
- Senses darkvision 60 ft., passive Perception 13
- Languages Galactic Basic, Dosh
- Challenge 2 (450 XP), PB +2
Keen Sight. The trandoshan has advantage on Wisdom (Perception) checks that rely on sight.
Regeneration. The trandoshan regains 10 hit points at the start of its turn if it has at least 1 hit point.
Actions
Vibroaxe. Melee Weapon Attack: +6 to hit, reach 5 ft., one creature. Hit: 17 (2d12+4) kinetic damage.
Techaxe. Melee or Ranged Weapon Attack: +6 to hit, reach 5 ft. or range 25/75 ft., one creature. Hit: 11 (2d6+4) kinetic damage.
Appears in: Area 12
Mutated Kath Hound
The kath hounds trained by Great Ulesk, Vask and Thrass, have undergone training and growth mutations by Great Ulesk to be used in tracking and restraining prey. Though they lack the horns of other kath hound breeds, their sheer size and vitality make up for this during the hunt.
Kath Hound, Mutated
Large beast, unaligned
- Armor Class 14 (natural armor)
- Hit Points 37 (5d10+10)
- Speed 50 ft.
STR DEX CON INT WIS CHA 17 (+3) 15 (+2) 15 (+2) 3 (-4) 12 (+1) 7 (-2)
- Skills Perception +3, Stealth +4
- Senses darkvision 30 ft., passive Perception 13
- Languages -
- Challenge 1 (200 XP), PB +2
Keen Hearing and Smell. The hound has advantage on Wisdom (Perception) checks that rely on hearing or smell.
Pack Tactics. The hound has advantage on an attack roll against a creature if at least one of the hound's allies is within 5 feet of the creature and the ally isn't incapacitated.
Actions
Bite. Melee Weapon Attack: +5 to hit, reach 5 ft., one creature. Hit: 10 (2d6+3) kinetic damage. If the target is a creature, it must succeed on a DC 13 Strength saving throw or be knocked prone.
Appears in: Area 12
Creations of Lord Troja
Many millenia before the Mandalorians' arrival on Blasyndel, a Sith alchemist named Lord Troja descended below Stone Tooth for reasons unknown. The remnants of his activity still linger even in the present day.
Troghouls
Variants on the sith-spawn known as rakghouls, the troghouls are the result of experimentation by Lord Troja. Misshapen, fleshy mutants with clawed appendages, they lack any plague-spreading capabilities while compensating with the abilities to blend into their environment and secrete an odor at close range to dissuade predators.
The original troghouls were mutated from a native humanoid species of Blasyndel called the Du-Wav, cave dwellers who carved out a small settlement beneath Stone Tooth. When Troja and his protocol droid arrived on Blasyndel to seek out lifeforms, they were astounded by his displays of sorcery. Believing him a messenger of their gods, they welcomed him and allowed him to conduct 'rituals' that he claimed would bring them blessings.
In truth, these rituals were nothing more than a pretense for experimentation with Sith alchemy, twisting the bodies of the Du-Wav brought to Troja and often killing them. Though they soon saw through the trickery, their awe turned to fear as Troja used his sorcery and the hidden functions of his droid to ensure their cooperation. Before long, the Du-Wav living beneath Stone Tooth had either fled or been turned into hideous mutants barely resembling their former selves.
After Lord Troja and his droid mysteriously disappeared, the remaining troghouls left their former home and dispersed into the subterrenean caverns beneath Blasyndel, where they developed over the millenia into their current form. The tribe found within the Glitterhame are distinguished from others on Blasyndel by their leader - a force-sensitive troghoul named Kaarghaz.
Troghoul
Medium aberration (sithspawn), chaotic dark
- Armor Class 11 (natural armor)
- Hit Points 13 (2d8+4)
- Speed 30 ft.
STR DEX CON INT WIS CHA 14 (+2) 10 (+0) 14 (+2) 3 (-4) 6 (-2) 5 (-3)
- Skills Stealth +2
- Senses darkvision 60 ft., passive Perception 8
- Languages understands Sith but cannot speak it
- Challenge 1/4 (50 XP), PB +2
Chameleon Skin. The troghoul has advantage on Dexterity (Stealth) checks made to hide.
Sith-born. Dark forcecasters, pureblood Sith and massassi have advantage on Charisma checks against the troghoul.
Stench. Any creature other than a troghoul that starts its turn within 5 feet of the troghoul must succeed on a DC 12 Constitution saving throw or be poisoned until the start of the creature's next turn. On a successful saving throw, the creature is immune to the stench of all troghouls for 1 hour.
Sunlight Sensitivity. While in sunlight, the troghoul has disadvantage on attack rolls, as well as on Wisdom (Perception) checks that rely on sight.
Actions
Multiattack. The troghoul makes three claw attacks.
Claw. Melee Weapon Attack: +4 to hit, reach 5 ft., one target. Hit: 4 (1d4+2) kinetic damage.
Appears in: Wilderness Encounters, Area 17, Area 18, Area 19, Area 21
Karrghaz
Karrghaz acts as the chief of the troghoul tribe within the Glitterhame, ruling through physical fortitude and use of the Force. He has the following changes:
Armor Class 13 (natural armor)
Hit Points 39 (6d8+12)
Ability Scores CHA 15 (+2)
Languages Sith
Challenge Rating 2 (450 XP)
They also gain the following trait:Forcecasting. Kaarghaz is a 4th-level forcecaster (force save DC 12, +4 to hit with power attacks, 16 force points). Kaarghaz knows the following powers:
At-will: enfeeble, force push/pull, shock, slow, sound trick
1st-level: cloud mind, force current, force reflect
2nd-level: force camouflage, forked lightning*
*The force power forked lightning (created by HugeHuman) can be found in 'Expanded Force Powers'.
Sithspawn Ooze
While Lord Troja's experiments usually resulted in death or success, one unique result emerged from his efforts. While attempting to infuse a Du-Wav test subject with the properties of stone (hoping to create subjects with incredible durability), the subject instead broke apart at a molecular level, dissolving into an oozing amorphous jelly of stony texture.
Despite this, Troja observed that the ooze maintained an inkling of sentience and made plans to study it further. however, the ooze soon escaped its confinements by corroding the bars of its cage and escaped into the caverns below Stone Tooth, where it has persisted for possible millenia. Over time, the lingering effects of Sith alchemy caused the ooze to develop higher intelligence and burgeoning psychic capabilities.
Sithspawn Ooze
Medium aberration (sithspawn), unaligned
- Armor Class 8
- Hit Points 22 (3d8+9)
- Speed 10 ft., climb 10 ft.
STR DEX CON INT WIS CHA 12 (+1) 6 (-2) 16 (+3) 6 (-2) 6 (-2) 2 (-4)
- Skills Stealth +2
- Damage Resistances acid, energy, cold, fire
- Condition Immunities blinded, charmed, deafened, exhaustion, frightened, prone
- Senses blindsight 60 ft. (blind beyond this radius), passive Perception 8
- Challenge 1/2 (100 XP), PB +2
Amorphous. The ooze can move through a space as narrow as 1 inch wide without squeezing.
Corrode Metal. Any unenhanced weapon made of metal that hits the ooze corrodes. After dealing damage, the weapon takes a permanent and cumulative −1 penalty to damage rolls. If its penalty drops to −5, the weapon is destroyed. Unenhanced ammunition made of metal that hits the ooze is destroyed after dealing damage.
The ooze can eat through 2-inch-thick, unenhanced metal in 1 round.
False Appearance. While the ooze remains motionless, it is indistinguishable from an oily pool or wet rock.
Sith-born. Dark forcecasters, pureblood Sith and massassi have advantage on Animal Handling checks against the sithspawn ooze.
Actions
Pseudopod. Melee Weapon Attack: +3 to hit, reach 5 ft., one target. Hit: 4 (1d6+1) kinetic damage plus 7 (2d6) acid damage, and if the target is wearing unenhanced metal armor, its armor is partly corroded and takes a permanent and cumulative −1 penalty to the AC it offers. The armor is destroyed if the penalty reduces its AC to 10.
Psychic Crush (Recharge 5–6). The ooze targets one creature that it can sense within 60 feet of it. The target must make a DC 10 Intelligence saving throw, taking 10 (3d6) psychic damage on a failed save, or half as much damage on a successful one.
Appears in: Area 30
IDL-4 / Idela
A protocol droid of ancient design, IDL-4 or "Idela" traveled with her master to the isolated moon of Blasyndel, where they discovered and began living among the native Du-Wav people. However, IDL-4's secondary purpose was that of mental and physical torture, which her master - a Sith alchemist named Lord Troja - put to regular use in his experimentation of the Du-Wav people.
In her most commonly seen form, Idela resembles a class III protocol droid of unknown make, with her genial manner and stilted movements concealing her capabilities.
As those she targets come to trust her, she finds ways to manipulate groups apart and isolate at least one individual - once she has accomplished this, she sets about dominating their will and targeting their mental state to reduce them to gibbering madmen as soon as possible.
If her true nature is discovered too early or she otherwise faces the risk of destruction, Idela quickly attempts to forcefully set her opponents against each other with hypnosis and enters her true form, using her stealth field generator and a pair of jet thrusters embedded in her legs to hide away until the coast is clear and she can re-emerge to continue to indulge her sadistic whims.
IDL-4 / Idela
Medium droid (class IV), lawful dark
- Armor Class 15 (armor plating)
- Hit Points 66 (12d8+12)
- Speed 30 ft., fly 60 ft.
STR DEX CON INT WIS CHA 8 (-1) 17 (+3) 13 (+1) 15 (+2) 12 (+1) 20 (+5)
- Skills Deception +9, Insight +5, Perception +5, Persuasion +9, Stealth +7
- Damage Vulnerabilities ion
- Damage Resistances necrotic, poison, psychic; kinetic, ion or energy damage from unenhanced attacks
- Condition Immunities poisoned, diseased
- Senses darkvison 60 ft., passive Perception 15
- Languages Almost all registered languages (10 chance of missing data)
- Challenge 4 (1,100 XP), PB +2
Direct Signal. The droid can silently communicate with any creature it can see within 60 ft. that is a droid or is wearing equipment that receives verbal transmissions. This communication functions like telepathy for eligible creatures. Like telepathy, this is considered an enhanced effect and can be blocked by powers such as scrambling field or master force immunity.
Transformer. The droid can use its action to transform into a class-III protocol droid, or back into its true form. Concealing its jet thrusters, the droid loses its flying speed. Other than its speed, its statistics are the same in each form. Any equipment it is wearing or carrying isn't transformed. It reverts to its true form if it dies.
Hypnotic Bond. The droid ignores the range and sight restrictions on its Direct Signal trait when communicating with a creature it has charmed. The two don't even need to be on the same planet.
Actions
Jab (Class IV Form Only). Melee Weapon Attack: +5 to hit, reach 5 ft., one target. Hit: 6 (1d6 + 3) kinetic damage.
Hypnotize. One humanoid the droid can see within 30 feet of it must succeed on a DC 15 Wisdom saving throw or be charmed as an enhanced effect for 1 day. The charmed target obeys the droid's verbal or Direct Signal commands. If the target suffers any harm or receives a suicidal command, it can repeat the saving throw, ending the effect on a success. If the target successfully saves against the effect, or if the effect on it ends, the target is immune to this droid's Hypnotize for the next 24 hours.
The droid can have only one target charmed at a time. If it charms another, the effect on the previous target ends.Mind Probe. The droid places its hand on the head of a creature charmed by it or a willing creature. The target must make a DC 15 Constitution saving throw against this attack, taking 32 (5d10 + 5) psychic damage on a failed save, or half as much damage on a successful one. The target's hit point maximum is reduced by an amount equal to the damage taken. This reduction lasts until the target finishes a long rest. The target dies if this effect reduces its hit point maximum to 0.
Stealth Field Generator. The droid becomes invisible. Anything the droid is carrying is invisible as long as it is on the droid. The droid may end the invisibility as a free action. The invisibility ends if the droid attacks or uses Hypnotize.
Appears in: Area 49
Shadow Smiths
The 'Shadow Smiths' are a clandestine organization of ugnaughts that seek out ancient metallurgy and smithing techniques lost to history, hoping to replicate their designs either for personal use or to sell to the highest bidder. Preferring not to rely on outside assistance, Shadow Smith agents travel the galaxy in squads wearing specially-designed exosuits, which provide both defensive and offensive tools.
These exosuits contain cloaking devices and can expand in size to become miniature mech-walkers for their wearers during combat, during which their gauntlets can transform into battle drills and shields. The suits are also linked to the vital signs of their encoded users, and any given suit will destroy itself if the owner dies or is separated from it without the correct procedures being enacted, making reverse-engineering extremely difficult.
Shadow Smith
Most Shadow Smiths found in the field have essential technological experience, but eschew the use of tech powers in favor of developing and relying on their exosuits' capabilities in combat.
Shadow Smith
Medium humanoid (ugnaught), lawful dark
- Armor Class 16 (medium exosuit, medium physical shield)
- Hit Points 26 (4d8+4)
- Speed 25 ft.
STR DEX CON INT WIS CHA 14 (+2) 11 (+0) 14 (+4) 12 (+1) 10 (+0) 9 (-1)
- Damage Resistances acid
- Senses darkvision 120 ft., passive Perception 10
- Languages Basic, Ugnaught
- Challenge 1 (200 XP), PB +2
Circuitry. While wearing their exosuit, the ugnaught has disadvantage on saving throws against effects that would deal ion or lightning damage.
Exosuit Defense. While wearing their exosuit, the ugnaught has advantage on saving throws against poison and tech powers, as well as to resist being charmed or paralyzed.
Actions
Enlarge (1/Rest). For 1 minute, the ugnaught's exosuit increases in size, bolstering its capabilities. While enlarged, the ugnaught is Large, doubles its damage dice on melee or thrown weapon attacks (included in the attacks), and makes Strength checks and Strength saving throws with advantage. If the ugnaught lacks the room to become Large, it attains the maximum size possible in the space available.
Battle Drill. Melee Weapon Attack: +4 to hit, reach 5 ft., one target. Hit: 6 (1d8+2) kinetic damage, or 11 (2d8+2) kinetic damage if enlarged.
Drill Shot. Ranged Weapon Attack: +4 to hit, range 25/75 ft., one target. Hit: 5 (1d6+2) kinetic damage, or 9 (2d6+2) kinetic damage if enlarged.
Cloak (1/Rest). The ugnaught's exosuit activates a cloaking field and turns invisible until it attacks, casts a power, or uses its Enlarge, or until its concentration is broken, up to 1 hour (as if concentrating on a power). Any equipment the ugnaught wears or carries is invisible with it.
Snurre
An experienced techcasting engineer, Snurre is a Shadow Smith with the following changes:
Hit Points 45 (7d8+14)
Ability Scores INT 14 (+2)
Challenge Rating 2 (450 XP)
He also gains the following trait:Techcasting. Snurre is a 3rd-level techcaster (tech save DC 12, +4 to hit with power attacks, 12 tech points). Snurre knows the following powers:
At-will: detonator, electroshock, minor hologram, on/off
1st-level: energy shield, flash, hologram
2nd-level: hold droid, shatter
Nimir
The battle-hardened leader of the Shadow Smith cell in Choruk'Ed, Nimir is a Shadow Smith with the following changes:
Armor Class 17 (heavy exosuit)
Hit Points 52 (8d8+16)
Challenge Rating 2 (450 XP)
She also gains the following traits:Multiattack. Nimir makes two integrated vibrosword attacks.
Integrated Vibrosword. Melee Weapon Attack: +4 to hit, reach 5 ft., one target. Hit: 9 (2d6+2) kinetic damage, or 16 (4d6+2) kinetic damage if enlarged.
Shadow Smith Operative
Some Shadow Smiths train as operatives to augment the capabilities of their teams. Such operatives design their exosuits to be more lightweight, lowering their armoring and weapon damage in exchange for speed and agility.
Shadow Smith Operative
Medium humanoid (ugnaught), lawful dark
- Armor Class 15 (light exosuit)
- Hit Points 33 (6d8+6)
- Speed 25 ft.
STR DEX CON INT WIS CHA 10 (+0) 16 (+3) 12 (+1) 12 (+1) 10 (+0) 13 (+1)
- Skills Deception +5, Insight +2, Investigation +5, Perception +4, Persuasion +3, Sleight of Hand +5, Stealth +7
- Damage Resistances acid
- Senses darkvision 120 ft., passive Perception 10
- Languages Basic, Ugnaught
- Challenge 2 (450 XP), PB +2
Circuitry. While wearing their exosuit, the ugnaught has disadvantage on saving throws against effects that would deal ion or lightning damage.
Cunning Action. On each of its turns, the ugnaught can use a bonus action to take the Dash, Disengage, or Hide action.
Exosuit Defense. While wearing their exosuit, the ugnaught has advantage on saving throws against poison and tech powers, as well as to resist being charmed or paralyzed.
Sneak Attack. Once per turn, the ugnaught can deal an extra 7 (2d6) damage when it hits a target with a weapon attack and has advantage on the attack roll, or when the target is within 5 feet of an ally of the ugnaught that isn't incapacitated and the ugnaught doesn't have disadvantage on the attack roll.
Actions
Multiattack. The ugnaught makes two battle drill attacks.
Enlarge (1/Rest). For 1 minute, the ugnaught's exosuit increases in size, bolstering its capabilities. While enlarged, the ugnaught is Large, doubles its damage dice on melee or thrown weapon attacks (included in the attacks), and makes Strength checks and Strength saving throws with advantage. If the ugnaught lacks the room to become Large, it attains the maximum size possible in the space available.
Integrated Techblade. Melee Weapon Attack: +5 to hit, reach 5 ft., one target. Hit: 6 (1d6+3) kinetic damage, or 10 (2d6+3) kinetic damage if enlarged.
Mounted Blaster. Ranged Weapon Attack: +5 to hit, range 30/120 ft., one target. Hit: 5 (1d6+3) energy damage.
Cloak (1/Rest). The ugnaught's exosuit activates a cloaking field and turns invisible until it attacks, casts a power, or uses its Enlarge, or until its concentration is broken, up to 1 hour (as if concentrating on a power). Any equipment the ugnaught wears or carries is invisible with it.
Appears in: Area 36
Ugnaughts without Exosuits
The Shadow Smiths wear their exosuits at almost all times, both for combat and to facilitate smithing activity. If an ugnaught removes or is taken out of their exosuit, they receive the following changes:
- Their size becomes Small.
- Their armor class becomes 10 + their Dexterity modifier.
- Their current and maximum hit points are halved (minus Constitution modifier).
- Their Strength and Constitution scores become 10.
- Their darkvision is reduced to 60 ft.
- They lose the Circuitry and Exosuit Defense traits.
- They lose all listed actions and can only make unarmed strikes, which deal 1d6 kinetic damage.
Additionally, whether in or out of their exosuits, Shadow Smiths are considered to be proficient in armormech's implements, armstech's implements and tinker's implements. Every Shadow Smith has a 20% chance of carrying one of these tools on them if searched.
Players using Exosuits
Although the exosuits are not designed to be used by players (as indicated by their effective self-destruction upon the user's death), it is almost inevitable someone will want to repurpose or create one of their own - you as the GM may even voluntarily give them the opportunity to do so.
To best accomodate this type of development, it is recommended to look into the Armormech Engineer archetype for inspiration on developing a working exosuit for players.
MSE-6-series Repair Droid
The MSE-6-series Repair Droid (or "mouse droid") is a common fixture of stations and outposts across the galaxy. Commonly programmed with simple repair and guidance tasks, mouse droids often work in groups to accomplish more complex objectives.
MSE-6-series Repair Droid
Tiny droid (tracker), unaligned
- Armor Class 10
- Hit Points 2 (1d4)
- Speed 30 ft.
STR DEX CON INT WIS CHA 7 (-2) 11 (+0) 9 (-1) 13 (+1) 10 (+0) 7 (-2)
- Damage Vulnerabilities ion
- Damage Resistances necrotic, poison, psychic
- Condition Immunities poisoned, diseased
- Senses darkvision 30 ft., passive Perception 10
- Languages Binary, understands Basic but cannot speak it
- Challenge 0 (0 or 10 XP), PB +2
Circuitry. The mouse droid has disadvantage on saving throws against effects that would deal ion or lightning damage.
Interfaced Collaboration Protocol. Whenever a creature interfaces with this droid via the tracker droid interface tech power, it can interface with up to one additional eligible tracker droid without expending additional tech points. If multiple mouse droids are interfaced, this only applies to one of them.
Actions
Ram. Melee Weapon Attack: +0 to hit, reach 5 ft., one target that the mouse droid has moved at least 5 feet towards. Hit: 1 kinetic damage.
Appears in: Area 37
Arun-Dyl and His Creations
Arun-Dyl served as an advisor to Durj Ne'tra during their war against the pirates of the Outer Rim. A brilliant engineer in his own right, Arun-Dyl also possessed minor force-sensitivity that he used to augment his technical skill, and learned multiple languages including Basic, Mando'a, Huttese, Binary and Sith.
After witnessing the slaughter of his brethren and going mad with despair, Arun-Dyl constructed a number of traps and automatons to protect against the long-past invasion. After being killed by an ancient torture droid he foolishly reactivated, his indulgence in the dark side during his madness bound him to the Foundry as yet another defense against invaders in the form of a dark side spirit.
Dark Side Spirit
When force-wielders die, many simply lose their consciousness and pass on into the Living Force that binds all beings. Some, however, use their connection to an aspect of the Force to stay bound to the material realm.
Dark side spirits are born from those whose binding comes from unfinished business or a lust for eternal life. While spirits formed from the light are free to travel the galaxy as desired, dark side spirits are commonly bound to a location that was important to them in life. However, this binding also grants them power to use against those who would trespass on their sacred site.
Dark Side Spirit
Medium undead, neutral dark
- Armor Class 13 (natural armor)
- Hit Points 49 (9d8+9)
- Speed 30 ft., fly 40 ft. (hover)
STR DEX CON INT WIS CHA 6 (-2) 17 (+3) 12 (+1) 17 (+3) 15 (+2) 16 (+3)
- Saving Throws Int +5, Wis +4
- Skills Perception +4, Stealth +5
- Damage Resistances acid, fire, lightning, sonic, ion; kinetic and energy from unenhanced weapons
- Damage Immunities cold, necrotic, poison
- Condition Immunities charmed, frightened, grappled, poisoned, prone, restrained, disease
- Senses darkvision 60 ft., passive Perception 14
- Languages Any languages it knew in life
- Challenge 4 (1,100 XP), PB +2
Incorporeal Movement. The spirit can move through other creatures and objects as if they were difficult terrain. It takes 5 (1d10) force damage if it ends its turn inside an object.
Tech Resistance. The spirit has advantage on saving throws against tech powers and other tech effects.
Actions
Maddening Touch. Melee Power Attack: +5 to hit, reach 5 ft., one target. Hit: 17 (4d6+3) psychic damage.
Whispers of Madness. The spirit chooses up to three creatures it can see within 60 feet of it. Each target must succeed on a DC 13 Wisdom saving throw, taking 7 (1d8+3) psychic damage on a failed save, and must use its reaction to make a melee weapon attack against one creature of the spirit's choice that the spirit can see. On a successful save, it takes half as much damage.
Howling Delirium (Recharge 6). Each creature within 30 feet of the spirit that can hear it must make a DC 13 Wisdom saving throw. On a failed save, a target takes 12 (2d8+3) psychic damage, and is stunned until the end of its next turn. On a successful save, it takes half as much damage and isn't stunned.
Deathly Wail (1/Day). The spirit releases a dark wail, provided that it isn't in sunlight. This wail has no effect on droids, constructs, and undead. All other creatures within 30 feet of it that can hear it must make a DC 13 Constitution saving throw. On a failure, a creature drops to 0 hit points. On a success, a creature takes 10 (3d6) psychic damage.
Appears in: Area 43
Automaton Table
A metal table with basic droid parts steathily integrated into it by Arun-Dyl, as part of a mad bid to protect the compound.
Automaton Table
Large construct, unaligned
- Armor Class 15 (natural armor)
- Hit Points 39 (6d10+6)
- Speed 40 ft.
STR DEX CON INT WIS CHA 18 (+4) 8 (-1) 13 (+1) 1 (-5) 3 (-4) 1 (-5)
- Damage Vulnerabilities ion
- Damage Resistances necrotic
- Damage Immunities poison, psychic
- Condition Immunities blinded, charmed, deafened, diseased, exhaustion, frightened, paralyzed, petrified, poisoned
- Senses blindsight 60 ft. (blind beyond this radius), passive Perception 6
- Languages understands Mando'a but cannot speak it
- Challenge 2 (450 XP), PB +2
Nullification Susceptibility. The table is incapacitated while in the area of a scrambling field or master force immunity power. If targeted by diminish tech, the table must succeed on a Constitution saving throw against the caster's tech save DC or fall unconscious for 1 minute.
Charge. If the table moves at least 20 feet straight toward a target and then hits it with a ram attack on the same turn, the target takes an extra 9 (2d8) bludgeoning damage. If the target is a creature, it must succeed on a DC 15 Strength saving throw or be knocked prone.
False Appearance. While the table remains motionless, it is indistinguishable from a normal table.
Actions
Ram. Melee Weapon Attack: +6, reach 5 ft., one target. Hit: 13 (2d8+4) kinetic damage.
Appears in: Area 41
Automaton Comrade
These battle droids were programmed by Arun-Dyl to believe they are Mandalorian defenders of the outpost - as such, they only speak Mando'a and refer to each other as "vod" (meaning comrade). Their chassis are dyed black with painted-on details to resemble Mandalorian armor, but the droids are not reinforced in any way.
Automaton Comrade
Medium droid (class IV), unaligned
- Armor Class 14 (natural armor)
- Hit Points 7 (2d8-2)
- Speed 30 ft.
STR DEX CON INT WIS CHA 9 (-1) 14 (+2) 9 (-1) 13 (+1) 10 (+0) 7 (-2)
- Damage Vulnerabilities ion
- Damage Resistances necrotic, poison, psychic
- Condition Immunities poisoned, diseased
- Senses darkvision 60 ft., passive Perception 10
- Languages Basic, Mando'a, Binary
- Challenge 1/4 (50 XP), PB +2
Battle Droid Swarm. When an ally of the automaton hits a hostile creature that it can see with a weapon attack, the automaton can use its reaction to make one weapon attack, with disadvantage, against that creature.
Circuitry. The automaton has disadvantage on saving throws against effects that would deal ion or lightning damage.
Actions
Blaster Rifle. Ranged Weapon Attack: +4 to hit, range 100/400 ft., one target. Hit: 6 (1d8+2) energy damage.
Stock Strike. Melee Weapon Attack: +1 to hit, reach 5 ft., one target. Hit: 1 (1d4-1) kinetic damage.
Appears in: Area 45
Automaton Armor
This heavy exoskeleton of Mandalorian make contains a security droid designed for hand-to-hand combat. Like the battle droids, it only speaks Mando'a and refers to intruders as "aru'ese" (enemies).
Automaton Armor
Medium droid (class IV), unaligned
- Armor Class 18 (heavy exoskeleton)
- Hit Points 33 (6d8+6)
- Speed 25 ft.
STR DEX CON INT WIS CHA 14 (+2) 11 (+0) 13 (+1) 1 (-5) 3 (-4) 1 (-5)
- Damage Vulnerabilities ion
- Damage Resistances necrotic
- Damage Immunities poison, psychic
- Condition Immunities blinded, charmed, deafened, diseased, exhaustion, frightened, paralyzed, petrified, poisoned
- Senses blindsight 60 ft. (blind beyond this radius), passive Perception 6
- Languages understands Mando'a but cannot speak it
- Challenge 1 (200 XP), PB +2
Nullification Susceptibility. The armor is incapacitated while in the area of a scrambling field or master force immunity power. If targeted by diminish tech, the armor must succeed on a Constitution saving throw against the caster's tech save DC or fall unconscious for 1 minute.
False Appearance. While the armor remains motionless, it is indistinguishable from a normal suit of armor.
Actions
Multiattack. The armor makes two melee attacks.
Slam. Melee Weapon Attack: +4, reach 5 ft., one target. Hit: 5 (1d6+2) kinetic damage.
Appears in: Area 48
Pirate Droids
As Durj Ne'tra made his last stand at Choruk'Ed's shrine, he was finally defeated when a group of elite mercenaries - former Mandalorians - made a decisive push against him. Despite the losses he incurred for the other pirate gangs, the mercenaries kept any vengeful pirates at bay to ensure they could pay their respects for the fallen warrior.
Placing him atop the shrine's altar with his last possessions, they interred an assassin droid and two security droids to act as guardians for his resting place. They inscribed a final testament to his efforts on the door and warned the other pirates that the droids would not spare anyone who entered - in doing so, they ensured that only the brave or foolish would dare enter such hallowed ground.
IG-series Assassin Droid
Assassin droids of the IG-series are often considered some of the deadliest models in the galaxy, with stories told of models that walk through hostile territory in a straight line and come out as the sole survivors. While the efficiency of any given unit can vary dramatically, few consider underestimating an IG unit in combat.
IG-series Assassin Droid
Medium droid (class IV), unaligned
- Armor Class 15 (armor plating)
- Hit Points 45 (7d8+14)
- Speed 30 ft.
STR DEX CON INT WIS CHA 14 (+2) 17 (+3) 15 (+2) 14 (+2) 13 (+1) 7 (-2)
- Damage Vulnerabilities ion
- Damage Resistances necrotic, poison, psychic
- Condition Immunities poisoned, diseased
- Senses darkvision 60 ft., passive Perception 13
- Languages Basic, Huttese, Binary
- Challenge 3 (700 XP), PB +2
Circuitry. The droid has disadvantage on saving throws against effects that would deal ion or lightning damage.
Cunning Action. On each of its turns, the droid can use a bonus action to take the Dash, Disengage, or Hide action.
Sneak Attack (1/Turn). Once per turn, the droid can deal an extra 7 (2d6) damage to a creature it hits with a weapon attack if that creature is within 5 feet of an ally of the droid that isn’t incapacitated.
Actions
Sniper Rifle. Ranged Weapon Attack: +4 to hit, range 100/400 ft., one target. Hit: 9 (1d12+3) energy damage.
Stock Strike. Melee Weapon Attack: +4 to hit, reach 5 ft., one target. Hit: 4 (1d4+2) kinetic damage.
Appears in: Area 42
Loadlifter Droid
While labor droids are typically reserved for their intended purpose, many get repurposed for use by bounty hunter guilds and pirate gangs as cheap and powerful droid muscle. Though lacking built-in combat capability, loadlifter droids are a popular choice due to their large frame and powerful hydraulics.
Loadlifter Droid
Large droid (class V), unaligned
- Armor Class 11 (armor plating)
- Hit Points 59 (7d8+14)
- Speed 40 ft.
STR DEX CON INT WIS CHA 19 (+4) 8 (-1) 16 (+3) 5 (-3) 7 (-2) 7 (-2)
- Damage Vulnerabilities ion
- Damage Resistances necrotic, poison, psychic
- Condition Immunities poisoned, diseased
- Senses darkvision 60 ft., passive Perception 13
- Languages understands but cannot speak Basic, Huttese, and Binary
- Challenge 2 (250 XP), PB +2
Circuitry. The droid has disadvantage on saving throws against effects that would deal ion or lightning damage.
Loadlifter. The droid is considered to be Huge for the purposes of determining its carrying capacity.
Actions
Slam. Melee Weapon Attack: +6 to hit, reach 5 ft., one target. Hit: 13 (2d8+4) kinetic damage.
Debris Throw. Ranged Weapon Attack: +4 to hit, range 30/120 ft., one target. Hit: 11 (2d6+4) kinetic damage.
Appears in: Area 42
Appendix C: Miscellaneous
Additional details that cannot be fit into the adventure itself can be found here, including adaptations of existing 5e rules and optional content for the adventure.
Object Armor Classes
As such, here is an updated version of the DMG's Object Armor Class table for use with this adventure, alongside an accompanying hit point table:
Object Armor Class
Substance AC Polymer (cloth, fiber, wool) 11 Crystalline (gems, glass, ice) 13 Composite (wood, plasteel) 15 Ceramic (stone, plascrete) 17 Metal (iron, flexisteel, durasteel) 19 Beskar 21 Phrik 23
Object Hit Points
Size Fragile Resilient Tiny (cup, lock) 2 (1d4) 5 (2d4) Small (chest, helmet) 3 (1d6) 10 (3d6) Medium (crate, table) 4 (1d8) 18 (4d8) Large (speeder bike, 10-ft.-by-10-ft. window) 5 (1d10) 27 (5d10)
Refer to the "Objects" section in part 4 of the D&D Basic Rules for further guidance on running attacks against objects and dealing with Huge and Gargantuan objects.
Expanded Pneumatic Doors
At your discretion, many of the doors installed by the Mandalorians who settled in Stone Tooth may use pneumatic mechanisms to electronically slide open instead of hinges, mimicking the type of automatic door seen more commonly throughout Star Wars media. These doors are typically those described as being made of plasteel, durasteel or other industrial building material.
If you decide to incorporate this feature into this adventure, make sure your players understand how pneumatic doors differ from hinged ones as detailed below. Though this shouldn't change the overall approach to dungeon crawling, here are some additional details about the pneumatic doors that most civilized Star Wars characters would know:
Pneumatic Doors
A non-secret pneumatic door found in Stone Tooth typically features a control panel in each relevant room, typically situated to the right of the door frame on a wall or raised terminal. This control panel has two key features; a toggle switch and a button.
The toggle switch can be swapped between 'open' and 'closed' settings. When the toggle is on 'open', the door automatically opens as soon as any creature comes within 5 feet of it. When the toggle is on 'closed', the button on the control panel must be pressed in order for the door to open. Most doors in Stone Tooth are set to 'closed' by default.
Some pneumatic doors (usually for personal rooms or entryways) also have a security panel attached to the main console, containing a cylindrical access point. The security lock can be activated by any code cylinder that holds the appropriate codes, allowing the user to toggle the door's lock status.
When a code cylinder containing appropriate codes is inserted while the door is 'closed', rotating it left will toggle the door between locked and unlocked. An unlocked door operates as normal, while a locked door cannot be toggled to 'open' and can only be opened with the correct codes. Rotating the code cylinder right does nothing on an unlocked door, but will allow a locked door to be opened temporarily.
Security kits provide electronic lockpicks that can impersonate a code cylinder and activate nodes that confirm correct data. The use of a security spike in tandem with this kit can temporarily reset the lock's reading to allow for another attempt.
Attacking the Door Panel
Due to the varied technological designs of door panels, it can be difficult to predict whether blasting or smashing a pneumatic door's control panel will have the desired effect. If a player character or creature decides to make an attack against a door panel without a security panel to achieve an effect (closing the door and destroying the button, making the door stay open permanently, etc.), they must make a DC 13 Intelligence (Technology) check. On a success, the attack has the desired effect until the door panel is repaired; on a failure, the opposite effect happens. In either case, the panel must be repaired before the door can be affected in this way again.
If the door panel has a security lock attached and the desired effect is to change the lock status, the DC for the Intelligence (Technology) check instead matches the DC for triggering the lock with a security kit (if stated; otherwise, this defaults to DC 17). This can be attempted even if the player has already failed a previous check to unlock or lock the door with a security kit. As with the main controls, a destroyed security lock cannot be affected until it is repaired.
Speeder Trucks
When traveling toward Stone Tooth, the party may want to look into the use of mounts or vehicles to ease their travel and reduce the risk of encounters. As mount purchase services are missing from the Player's Handbook at the time of writing, this optional feature is available if the GM is willing to implement these services.
Speeder Trucks
The model of landspeeder used by the miners of Blasyn Outpost is designed to transport mining equipment and to accommodate the dense forests and rough terrain of Blasyndel, which prevents them from traveling at the high speeds common of most landspeeders. As such, the M-73 speeder truck (referred to by locals as a 'mule') is the best vehicle option the players have for navigating to the Stone Tooth. The statistics for the speeder truck are provided below:
With the use of a speeder truck, the party can travel roughly three times as fast even when accounting for difficult terrain (such as trees and hills), traveling at 6 mph at a slow pace; 8 mph at a normal pace; or 10 mph at a fast pace. They also do not suffer the disadvantages of exhaustion, allowing them to safely make the journey anywhere between 3-to-5 hours.
Due to their current rarity due to trandoshan raids, these speeder trucks are only available for rent instead of purchase (unless the party makes an extravagant offer at over 10x the renting price). The rent for a week's use is 500 credits and can be paid for multiple weeks in advance; if the agreed time passes without the rental being returned, the outstanding fees are collected upon its return.
Adventure Hook Expansion
If implementing this feature, consider expanding the 'Vanquish the Trandoshan Raiders' adventure hook with the following details:
Whilst attacking miners from Blasyn Outpost, trandoshan raiders have managed to commander the miners' speeder trucks, limiting the outpost's available vehicles. If the party discover any stolen speeder trucks while traveling to Stone Tooth, the outpost's vehicle depot is willing to offer a reward for safely liberating it from the raiders and either transmitting its coordinates for retrieval or returning it manually, at a rate of 2,500 credits per truck recovered. Destroyed trucks do not count toward this reward.
When implementing this, consider limiting the available speeder truck encounters to a total of one or two, most likely in the possession of the trandoshan patrols from "Wait and Watch". It can be assumed or even shown as part of the party's investigations that all other speeder trucks have been destroyed or reclaimed by other outposts.
M-73 Speeder Truck
Huge construct, unaligned
- Armor Class 14 (armor plating)
- Hit Points 95 (10d12+30)
- Speed 50 ft.
STR DEX CON INT WIS CHA 15 (+2) 12 (+1) 16 (+3) 10 (+0) 10 (+0) 9 (-1)
- Saving Throws STR +5
- Damage Vulnerabilities ion
- Damage Resistances psychic
- Damage Immunities poison, necrotic
- Condition Immunities poisoned, frightened, petrified, restrained, incapacitated, stunned, prone, blinded, charmed, disease
- Senses passive Perception 12
- Languages Basic, Dathomirian, Huttese
- Challenge 2 (450 XP), PB +2
Circuitry. The truck has disadvantage on saving throws against effects that would deal ion or lightning damage.
Freedom of Movement. The truck ignores difficult terrain, and effects can’t reduce its speed. It can spend 5 feet of movement to escape from being grappled.
Piloted. The truck requires an active pilot to take any actions, and if the pilot is subjected to any conditions that the truck is not immune to, the construct is also subjected to those conditions. The pilot may take their own action or one of the actions granted by the truck.
Transport. The truck can transport a maximum of 6 passengers, to a total of 7 adding the current pilot.
Vulnerable Interior. The truck’s interior is vulnerable to damage done by grenades, mines and charges, unless it is immune to that damage. It also automatically fails all Dexterity saving throws from such effects that occur in its interior.
Actions
Ram. Melee Weapon Attack: +4 to hit, reach 5 ft., one target that the truck has moved 10 feet toward. Hit: 15 (2d12+2) kinetic damage and the target must make a DC 13 Strength saving throw or be knocked prone.
Appears in: Wilderness Encounters, Wait and Watch
Durj's Equipment
To reflect the original adventure, the normal version of area 42 features a battle against two CR2 loader droids and one CR3 assassin droid, providing a tough challenge for parties who wish to search Durj's final resting place. However, the rewards for clearing this challenge can feel underwhelming, particularly as it is the final resting place of the adventure's central historical figure.
To further incentivize players into taking on the challenge, consider having one or multiple of the following enhanced items be left with Durj's corpse; these items tie into his history as a Mandalorian armorer and provide powerful boons to those willing to take on his tomb guards.
Mandalorian Armorer's Implements
Adventuring gear (armormech's implements), advanced
Requires attunement by a creature proficient in armormech's implements
This enhanced item consists of a pair of Mandalorian armorer's implements - a gravity hammer and a pair of magnetic tongs, both made from pure beskar alloy. These tools can be used separately from one another; however, if either tool is more than 100 feet away for at least 24 hours, any attunement to the implements will end and must be re-established over an uninterrupted short rest while holding both tools.
While attuned to and using these implements during crafting downtime, you can craft unenhanced armor and shields twice as fast (e.g. 500 cr increments per day instead of 250 cr). Additionally, you can add +1 to any checks made using your proficiency in armormech's implements, and costs expended to apply armor materials during crafting downtime are halved.
These tools also serve a secondary purpose as enhanced melee weaponry. When treated as weapons (with automatic proficiency if attuned), the tools have the following base properties:
Name Type Cost Weight Damage Properties Gravity Hammer Martial Vibroweapon - 1.75 1d6 kinetic Brutal 1, Disguised, Light Magnetic Tongs Martial Vibroweapon - 1.50 1d6 kinetic Disarming, Disguised, Light
Additionally, you gain +1 to damage and attack rolls made with these enhanced weapons, and when you hit a creature with a melee weapon attack using one of these weapons, it deals an extra 1d4 kinetic damage.
This gravity hammer and pair of magnetic tongs served as tools of a Mandalorian armorer, to whom the extensive and clandestine secrets of beskar forging were entrusted. Robust crafting tools in their own right, they often also served as the primary arms of a Mandalorian armorer when they engaged in warfare.
Found In: Area 42
Nightscale Armorer's Beskar'Gam
Armor (heavy exoskeleton), prototype
Requires attunement
This armor grants a +1 bonus to AC and has the impermeable 2 (space suit, hazard suit) and regulated properties.
Durj's personal set of armor, dyed black like those of his fellow Nightscales, was forged with greater quantities of beskar than those of his allies.
Found In: Area 42
Nightscale Armorer's Helmet
Adventuring Gear (head), premium
Requires attunement
This helmet comes equipped with a headcomm and holorecorder. Additionally, while wearing this helmet, you have darkvision out to 60 feet.
Durj's helmet is crowned with ornamental horns, a symbol of his role within Mandalorian society.
Found In: Area 42
Set Bonus
If a player is attuned to and wearing both the Nightscale Armorer's Beskar'Gam and Helmet, they gain the following set bonus:
- You gain advantage on Wisdom (Perception) checks that rely on sight within 60 feet. Additionally, this set grants a +1 bonus to AC.
If using the Mandalorian Vestments set bonuses from 'The Mandalorian Codex', these two items count as having the 'Mandalorian Vestments' property.
Shadow Smiths
For further intrigue, consider having the Shadow Smiths in the Foundry covet the Implements for their own purposes, as having access to such robust tools would hasten their secret project further. If you choose to implement this, consider having Gharr in area 36, Snurre in area 37 or Nimir in area 39 recruit the party to enter the monument, defeat the droids present and retrieve the tools of Durj, potentially offering to share information about their secret project in exchange.
If the party retrieves the tools and refuse to hand them over, the ugnaughts turn hostile and will pursue the characters throughout the dungeon, though they will not go through areas they know or believe to be dangerous. If the players do not kill all the ugnaughts and successfully leave Choruk'Ed with the tools, the remainder will report to their superiors offworld about the party. This can serve as an opportunity to extend the campaign further as the larger Shadow Smith organization chases the party's possession.
Greater Challenge
While these boons can be significant, providing one or multiple of them may be too much for the room's current challenge. To make the battle more worthy of its rewards, consider implementing more assassin and loadlifer droids, or increasing the power of existing ones.
Expanded Force Powers
Below is a copy of the forked lightning force power found in HugeHuman's Expanded Force Powers document:
Forked Lightning (2nd-level dark side power)
Prerequisite: Sustained Lightning
Casting Time: 1 action
Range: 60 feet
Duration: Instantaneous
You create three arcs of lightning that streak toward targets of your choice within range. Make a ranged force attack for each arc. On a hit, the target takes 1d12 lightning damage. If two or more arcs hit the same target, it must make a Constitution saving throw. On a failed save, it becomes shocked until the end of its next turn.
Force Potency: When you cast this power using a force slot of 3rd level or higher, you create two additional bolts for each slot level above 2nd.
This power is used by the troghoul chief Kaarghaz and should only be made available to players at the DM's discretion.
Credits
Content
The Forge of Fury (5e) - Tales from the Yawning Portal, Wizards of the Coast, 2017.
Official SW5e Content - Steev and all other contributors
Power Ciphers Enhanced Item - Aziz, 'Power Ciphers'
Cave Sketto Statistics - nate_ndo, 'Scum & Villany' (adaptation of the Sketto)
K'lor'slug Statistics - BaelishPasta, 'Scum & Villany' (adaptation of the Lesser K'lor'slug)
Mogu Statistics - BaelishPasta, 'Scum & Villany' (adaptation of the Snow Wampa)
Adult Dianoga Statistics - Rick Fisto, 'Scum & Villany'
Trandoshan Traits - Jawa, 'Scum & Villany'
Mutated Kath Hound Statistics - cascadecascade, 'Scum & Villany' (adaptation of the Kath Hound)
Forked Lightning Force Power - HugeHuman, 'Expanded Force Powers'
MSE-6-Series Repair Droid Statistics - Sharp, 'Mouse Droid' (adaptation of the Mouse Droid)
Dark Side Spirit Statistics - Rick Fisto, 'Scum & Villany'
Automaton Comrade Statistics - Steev, 'Scum & Villany' (adaptation of the B1 Battle Droid)
IG-Series Assassin Droid Statistics - Steev, 'Scum & Villany' (adaptation of the IG-86 Assassin Droid)
M-73 Speeder Truck Statistics - EmersonBiggins, 'Desperate Rebellion' (adaptation of the A-A5 Speeder Truck)
Mandalorian Item Traits and Mandalorian Vestments - Drake Ryzer, 'The Mandalorian Codex'
Images
Mandalorian Armorer Art (Cover/pg 1) - https://www.reddit.com/r/ImaginaryJedi/comments/dxa5gt/the_mandalorian_blacksmith_by_conrado_iacono/ (original artist's Artstation page is unavailable)
Forge of Fury Maps (pg 8, 10, 17, 18, 23, 26 & 33) - Tales from the Yawning Portal, Wizards of the Coast, 2017.