
A D&D adventure for 5e by Daniel Steinmann
The Hollow Marvel is a dungeon adventure module for D&D 5e. It is designed as a 3-5 hour adventure for 4-6 Characters of levels 4-6. However, depending on the choices of the DM, group composition, APL, background stories and time to spare, it is possible to adapt this dungeon for any other RP-System and for any setting. If you think that the encounters are too difficult or too easy, feel free to change them. The ultimate goal of a dungeon-crawl is for you and your players to have fun. If you're having fun, you are doing your job correctly as a DM. Everything in the dungeon module is up to interpretation, modification, and improvisation at your table.
DUNGEONS & DRAGONS, D&D, Wizards of the Coast, and all other Wizards of the Coast product names, and their respective logos are trademarks of Wizards of the Coast in the USA and other countries. This work contains material that is copyright Wizards of the Coast and/or other authors. Such material is used with permission under the Community Content Agreement for Dungeon Masters Guild. All other original material in this work is copyright 2019 by Introcaso LLC and published under the Community Content Agreement for Dungeon Masters Guild.
Dungeon History
Long time ago, Stabelle Deqora, a female magician, artificer and engineer was obsessed with her work. In her studio, she worked for nobles, for governments, monarchs and the like and created party accessories that delighted people everywhere. During the great war she was approached by fans who asked for commissions. She found out later that these commissions were used to modify war machines. After that, she swore to built harmless, steampunk creations only, with a mixture of arcane energy and steam.
In order to make sure that her work wouldn't be used for weapons of death, she constructed another secret studio from gleaming brass and bronze gears. In her facility, she swore she would finish an airship as her masterpiece during her lifetime. Hunted by her need for cognition, and her passion, she made out a challenge for all of her fans: To find, enter and use her airship. Although she was quite famous and known for her work, nobody believed she could pull it off. Many thought this airship was a myth and Stabelle may have lost her mind, as genius and madness are often intertwined.
But the airship exists. Her masterpiece of an airship moves around through the air and protects her work, her plans and her inventions. If it fell into the wrong hands, it would mean trouble for the rest of the world. It is somewhere out there, cloaked, floating through the air and waiting for courageous adventurers to be found.
Outline
The PCs may have gathered clues about Stabelle's studio during a previous adventure and may have found a curious device. This device decloaks the ship and summons a ladder that is let down to the ground. Through this ladder, the ship can be entered.
Main antagonist: GlidOS
Stabelle Deqora was no fool: Even though she made sure the Hollow Marvel would only be discovered by fans of her art and therefore could be assumed to be quite safe, she made clear that the secrets inside could not be easily uncovered by brigands or criminals - just in case. Therefore, the Hollow Marvel has a steampunk equivalent of a security system intact and running, although not very stable.
The name of the security system is GlidOS (or whatever name the DM desires) and she can be really annoying. Stabelle Deqora made use of the spell Message that can be heard throughout the ship through little nodes, made of speaking tubes and mechanical amplifiers that are located at the ceiling of some of the rooms. She enchanted the devices with the spell Scrying as well.
She also built an intelligent machine with a thorough understanding of the security system and an understanding of the ship: A steampunk-golem called Whitley. Whitley is usually quite helpful and wants to take care of the ship and repairs it when it becomes necessary.
Whitley has a problem, though: GlidOS has gone rogue. The energy of the ship slightly diminished over time. Furthermore, a group of gremlins escaped from one of Stabelle’s facilities where she built the airship. They damaged some wires, which led to a malfunction in the security system. Now GlidOS tries to take control of the ship and tries figure out how to solve this problem. She built a trap for Whitley and gave him an electrical shock when he recharged in the crew quarters.
When the PCs arrive, GlidOS changes her plans. GlidOS wants to trick the PCs to restore the power source and to get rid of Whitley. After that, she plans to get rid of the PCs as well.
Plot and summary
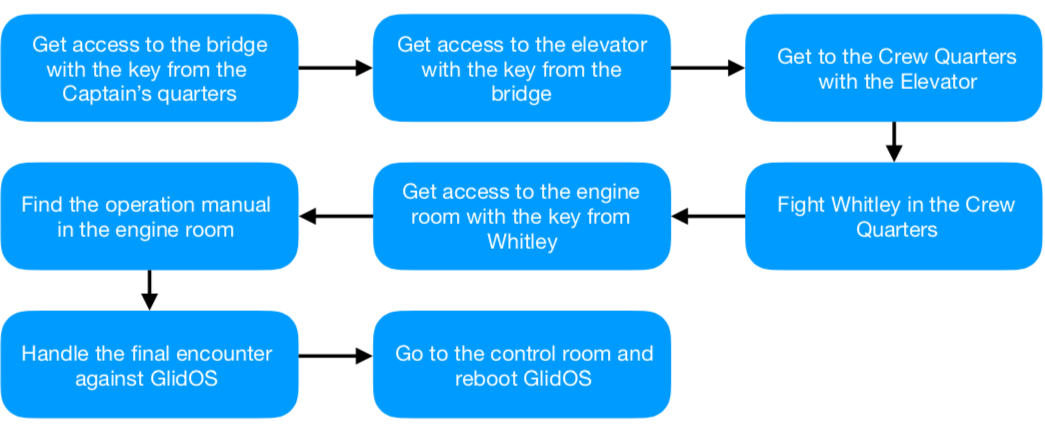
The whole airship is a puzzle and a dungeon in itself. There are several objectives the PCs need to undertake in order to make the airship their own:
- Enter the ship with the help of the device found in one of Stabelle’s facilities during a previous adventure.
- Find different keys to gain access to various rooms inside the dungeon.
- Power the Condenser Orb on the bridge by repairing the damaged wires in the engine room or by taking another fully powered Condenser Orb from the engine room to the bridge.
- Find the operation manual in order to operate the ship properly and in order to reset the security system.
- Find the key to access Stabelle’s vault.
- Survive the final boss encounter and escape with the ship
The flowchart on page 2 is supposed to help navigating the adventure.
Roleplaying GlidOS
GlidOS is a terrible, lying, manipulative artificial being (think of „HAL9000“ from "2001: A space Odyssey", „AUTO“ from Wall-E or „GladOS“ from Portal). Make sure to roleplay GlidOS with a calm, neutral voice, perhaps slightly uneasy, although she might say evil things from time to time (Those who played Horizon: Zero Dawn and the DLC might have a slight advantage here). Whitley has a robotical voice, mainly neutral in nature, but has some peaks in his voice from time to time.
GlidOS's Story
GlidOS tries to lure the PCs into a trap. Her story goes as follows: She was ordered by her master Stabelle Deqora to guard the airship until a worthy being enters it and takes it as their own (true). But GlidOS failed: Stabelle’s servant Whitley, a steampunk-golem, has gone rogue (lie) and tried to overtake the ship (lie).
He wants to see GlidOS gone and cut off her energy supply (lie) with the help of some gremlins who damaged several wires (true). GlidOS managed to defend herself against Whitley (lie) and trapped him in the crew quarters (true).
She explains that, as Whitley has gone rogue (lie), he will be ready to attack the intruders if they enter his space (not necessarily), so they have to be careful and kill him as soon as possible (lie). Because her energy runs low, she is not able to tell the security system to leave the PCs alone (basically true, although fishy). So she warns the PCs, they may have to face several attacks during their descent into the ship (true). She apologizes for this (lie).
The Airship
General descriptions
The airship has all the features of a standard airship from Ebberon. It is an elemental vessel that looks similar to an oceangoing ship, but is replete with control fins and rudders rather than sails. The ship does not rely on wings for lift, however. It is able to fly equally well on the sides or even upside down. The airship cannot actually land. The ring of the elemental prevents the bottom of the hull from getting closer than 10 feet to the ground. It has to dock at a special dock at one of Stabbele’s facilities. This gives the adventuring party another hook for further adventures, as they have to recharge and refill the airship.
Main Deck
The ship’s main deck runs between the foredeck (with pooping possibilities) and the bridge. The main deck is surrounded by a ring around the hull, suspended on four struts jutting outward. The airship can move in all three dimensions, with or without the aid of the wind.
The ship’s clock, a brass-and-copper object, hangs at the hull of the bridge. The foredeck is a slightly raised deck with stairs that stands some 5 feet above the main deck. The railing contains several holes and magical cannons that are not functioning at the moment. The bridge stands several feet above ground with a balcony surrounding it. It can be accessed from the main deck through a ladder and a door at its back or via an elevator (which is not functioning or accessible right now.
Developments: The main deck is the entrance of the dungeon. It is only accessible through a ladder that drops down when a device from Stabelle’s facility is pressed. The ship decloaks and a ladder is summoned to enter the main deck. When the PCs first arrive at the ship, GlidOS greets them with a question what the security password is. The PCs won't know the password, so GlidOS sees them as intruders. She unleashes 3 Tridones (MM, p.225) to see how strong the PCs are. When the PCs are victorious, she speaks to them and tells them her story (see "Roleplaying GlidOS" and "GlidOS's Story"). She apologizes for any inconvenience and says she tries to help, but is barely able to.
Captain’s Quarters
The door to the Captain’s quarters is locked and can be accessed through the device from Stabelle’s facility, but not by pressing the device, but by putting it into an indent. The indent is placed where usually the keyhole would be.
There are two walls in this room that divide the Captain’s quarters even further. Both internal doors are unlocked. The main room contains a bed, several chairs and a desk. The Captain’s cabin is richly decorated, its walls covered with intricate carvings. Two rich carpets flank the bed. The furniture has some ornaments on it. You can see a soft carpet lying on the floor of the second room with a liquor bar. The third room has the appearance of an office. The desk here is unoccupied, with several papers scattered on it.
There is a money pouch laying on the desk containing 300 gp. There are three marbles located here that are needed for the puzzle in the main control room. Any PC reading the documents on the desk will deduce that Stabellle had mixed feelings about GlidOS and Whitley.
Stabelle writes that she hopes that GlidOS works as intended and that she an Whitley will work nicely together. The office desk holds also the key to the bridge.
Bridge
The bridge is locked and can only be accessed with a key found in the Captain’s quarters. On the outside, the bridge can be reached from the main deck through climbing another ladder to a balcony that surrounds the bridge. As soon as the PCs get access to the elevator, the bridge can also be reached from the main deck throught the elevator.
A large steering wheel dominates the room. You can see a Podium behind it that holds a sphere of obsidian color. A shallow spark lies within the center of the sphere giving away a subtle humming. The whole room is surrounded by a windshield, enabling the helmsman to get a 360° view. At the front of the room there is a control unit, consisting of levers, buttons and sliders of bronze and copper. It smells of copper and iron. The room gains access through two doors total, one of which you entered, the other entrance is a metallic double sided door.
Developments: The obsidian orb in the middle is the condenser orb, powering the ship. PCs who search the room can deduce several things.
GlidOS tells the PCs to observe the orb and see that she only has little power left. With some of her energy left, she will grant them access to some parts of the control unit on the bridge so that they can use the elevator (the double sided door). The PCs can also see a map of the ship hanging on the wall and can see how many rooms the dungeon contains. They can also find two marbles needed for the puzzle in the main control room. How the control unit is going to be used fully is unknown to the PCs for now.
Central Elevator
There is one central elevator to the whole complex, connecting the bridge with the other decks/rooms. Its interiors consist of metallic instruments and levers. Some of the levers need a special key to access the different decks. There is also a numerical pad with several runes embossed upon them.
Developments: The elevator has a special security barrier in it. For now, the PCs can only reach the storing room and the crew quarters with the kitchen. The vault, engine room and main control room need a special key/password to be reached. GlidOS doesn't know where the keys are. Truth is: Whitley has got the key to the engine room. Inside the engine room, some of the documents give away the combination needed on the runic number pad to access the main control room. The vault can only be accessed after the security system has been rebooted through the main control room.
Storing
This chamber is crammed with chests and neatly ordered weapon racks. There are several iron, copper and metal chests, covered in a thin wood veneer.
The chests have superior locks and they contain materials, foods, and other things a ship might need.
Crew quarters and kitchen
This room contains several beds and footlockers. The cramped and chaotic kitchen holds several wooden worktables, cupboards, and stoves against the port wall, as well as virtually every cooking utensil needed, as well as other materials like meat cleavers, knives and the like. The kitchen is a madness of dust, materials and knives. Some cauldrons are lying around. A huge array of spices mingle with barrels, with unknown interior. Some cupboards are here as well.
Developments: Whitley is inside this room. He stands motionless turning his back to the PCs and blinks in a red light. GlidOS will warn the PCs of Whitley and his power. The armor plating on Whitley’s back has been removed. Anyone examining the back can make a DC 15 Intelligence (Investigation) check and will find a switch on success.
Pressing it causes Whitley to reboot. As soon as the PCs see this button, Whitley will attack them, assuming they work for GlidOS. Depending on group composition and APL, Whitley has the stats of a clay (MM, p.168), flesh (MM p.169), iron (MM, p.170) or stone golem (MM, p.170). The appearance is comparable to an iron golem. During the fight, he will say things like „HAVE TO PROTECT STABELLE’S SHIP“, „MALFUNCTION IN THE SHIP“, „HAVE TO REPAIR THE SHIP“. The key here is to talk to Whitley and to convince him that the PCs are friendly and mean him and the ship no harm. Whitley will stop attacking them for a short amount of time and the PCs can try to reach the switch. After that, Whitley will reboot. He can’t tell them much, only that he was wandering around the ship as usual and tried to repair some wires down in the engine room, because they had been damaged by gremlins. He wanted to recharge in the crew quarters and then everything went black for him. Whitley will give the PCs the key to the engine room. He is missing the key/password to the main control room and to the vault, however. He doesn’t remember where he put it. Upon examining Whitley's place to recharge, the PCs can see that the area has been severely damaged.
The PCs get one marble for the puzzle in the main control room from Whitley.
Engine room
Predominantly, this room is much louder and warmer than all of the other rooms. Several servos, similar to the ones in the main control room are scattering around. Large tables are standing around, they are covered in schematics, gears and other equipment.
Developments: Upon observing the room thoroughly, the PCs find the place where the gremlins damaged the wires. Several vents and cables are damaged and arcane sparks flash around the area. 5 gremlins lurk in the shadows and attack the PCs when they examine the wires and vents.
When the fight is over, GlidOS tells the PCs how to repair the wires and/or how to recharge the Condenser orb. If the PCs follow her explanations, she will thank them. After that, she tells the PCs that she remembers where she put the secret key to access the vault. This is a lie. She tries to get the PCs to the main deck in order to finish them off in a combat encounter (see page 5). When the PCs examine the room further, they find the rest of the marbles needed for the puzzle in the main control room. In addition, they find several documents and the operation manual. Inside, they can find the instructions needed to operate the control unit in the main control room. Finally, they find the combination for the runic number pad in the elevator to access the main control room.
Main control room
It should be mentioned that the main control room is only accessible if the PCs got the combination for the runic number pad from the engine room. Although the DM is free to let the PCs access this room right away, it was designed to be part of the final combat encounter with GlidOS.
This spherical room is very dark. There are some light sources coming from sources that look similar to the spark on the bridge. A subtle humming is still hearable. The floors and ceiling contain several copper and bronze pipes and wires. Glass squares are mounted on the walls, filled with a light blue liquid. It shows some images. It is very warm in this room and it smells strongly of rust, copper and the like. You can see a couple of controls under the screens, similar to the levers, buttons and wires on the bridge.
Developments: The large screens on the wall show whatever GlidOS sees. The PCs need the instruction manual from the engine room to operate the control panel. However, Stabelle's descriptions are not easy to follow. If the PCs use the correct pages for the main control room, they need to solve a puzzle in order to reboot the security system. The puzzle is taken from Nerzugal's DMs Toolkit 2 ("Colored Marbles Puzzle") and goes like this:
On the control panel, there is a 3x3 grid. The security system resets, when marbles are placed in a particular order in the slots of the grid. The colors of the marbles are: Red, Blue, Yellow, Green, Orange, Violet, White and Black. The Instruction manual has got the following instructions: GlidOS Security System Reboot parameters:
- Orange is below Blue
- Blue is right of White
- Black is right of Green
- Green is right of Violet
- Violet is below Black
- Red is left of Yellow and above White
- Yellow is left of Orange and below Violet
- White is below Green and above Yellow
| Red | Green |
|---|---|
| Violet | White |
| ------ | Yellow |
| Black |
|---|
| Blue |
| Orange |
DM Note
You can use another puzzle if you like. This is just a proposition.
Vault
There are dozens of crates stacked together in this large room. You can hear a loud humming and working sounds. Several servos, little four-legged clockwork lifters, move round the room and rummaging the crates and moving them from one place to another.
Developments: The lifter and the servos won’t react to the party, as long as they rebooted the vault. With a thorough search of the vault, the PCs can retrieve the following treasure (DMs can adjust as needed): 300 cp, 3000 sp, 2900 gp, 80 pp, 2 x Bloodstone (50 gp), Carnelian (50 gp), Chalcedony (50 gp), 3 x Jasper (50 gp), Moonstone (50 gp), 2 x Star rose quartz (50 gp), 2 x Zircon (50 gp).They can find the following magic items:
- Chapeau of magnetic inversion (wonderous item, uncommon)
- Pyrotechnic weapon (uncommon)
- Eye gear (uncommon)
- Charged ring (rare)
- Tesla Rod (rare)
- Mechanical arachnid (rare)
These items were made by /u/CrafticusPrime and are taken from here Although Stabelle’s story is a pacifistic one, the DM can choose to introduce additional weaponry, e. g. firearms. It would add another layer to Stabelle’s past. May be, she was not as pacifistic as everyone thought? May be she only wanted to produce toys and art, but couldn’t let go of her previous work? May be she decided that she would hide weaponry rather than destroy it? Alternatively, if steampunk is not your thing, you can use the following magic items instead of the ones described earlier:
- Adamantine Armor (plate) (uncommon, dmg p.150);
- +1 Weapon (halberd) (uncommon, dmg p.213);
- Ring of Swimming (uncommon, dmg p.193);
- Bracers of Defense (rare, dmg p.156);
- Boots of Speed (rare, dmg p.155);
- +2 Rod of the Pact Keeper (rare, dmg p.197).
GlidOS (Final encounter)
The fight against GlidOS is going to be the final encounter or the final room of the whole dungeon. As such, it should be climactic and at the same time engaging for all players. There are two variants presented here to run this fight. Both approaches work, it does not matter for the encounter which variant the DM chooses. It is completely dependent on group composition, player immersion, tactical thinking skills of the players, etc.
Variant 1: Fight on the main deck
When the PCs are finished with their tasks in the engine room, GlidOS thanks them and asks them to go to the main deck and to get the key to the vault from her as a reward. As soon as the PCs do this, GlidOS attacks the PCs on the main deck. This variant will be more epic as the PCs are fighting an arcane/steampunk AI in the air with the imminent danger of falling off the main deck. However, the PCs might not get the idea that they have to enter the main control room or they may be hesitant to split the party.
Variant 2: Fight in the main control room
If the PCs got suspicious of GlidOS during the dungeon crawl (which they should!), it is very well possible that the PCs want to go straight to the main control room and try to make use of the instruction manual. If they do so, the fight takes place there. This is not as epic as variant 1, but can be very challenging: Some of the PCs will straight out fight the drones, others may defend the PCs who solve the riddle and some should try to reboot GlidOS through solving the riddle.
The DM can still decide to run Variant 1 and have GlidOS manipulate the elevator to open its doors on the main deck.
Combat
Obviously, GlidOS cannot participate in a fight herself. So she mainly uses servos, drones and lair actions to defend herself against the PCs. Don't forget to use taunts! The fight takes place in 3 waves:
First Wave
3 Servos and 3 Tridrones (MM, p.224) attack the players
Second Wave
3 Duodrones and 3 Tridrones (MM, p.225) attack the players
Third Wave
2 Quadrones (MM, p.226) and 2 Pentadrones (MM, p.226) attack the players.
Lair Actions
GlidOS can use 2 lair actions per round. One on initiative count 18, the other on initiative count 10 (She can’t use the same lair actions two times in a row). Her lair actions are as follows:
Poison Gas
GlidOS runs gas through several vents through the ground. Every PC has to make a DC 12 CON Saving throw or suffers 2D4 damage and becomes poisoned.
Obscure Sight
GlidOS darkens the whole area, making it obscured until the top of the next round. All PCs without darkvision are considered blinded.
Snaring
GlidOS orders several wires to appear that ensnare creatures. PCs have to make a DC 13 DEX save to avoid the wires. Once trapped, a PC can use their action to make another STR (Athletics) or DEX (Acrobatics) of DC 13 to break free.
Heal Dampening
GlidOS sends off a shockwave that prevents healing, stops a target, or targets from healing for the round.
Spell Dampening
GlidOS sends off a flash of light that dampens spell effects. Spells act as if targets have advantage on saves, or resistance to the damage type.
PC Tactics
The PCs may have different approaches for this fight. Some may just want to attack the drones, some may take a look around to look for weaknesses in GlidOS's defenses. But the only possibility to defeat GlidOS is by solving the marble puzzle in the main control room while simultaneously engaging the security defenses. The DM should give subtle clues that the fight against GlidOS will get them nowhere and might very well lead to their death. Sooner or later, they should look for workarounds and different tactics. If using Variant 1 of the fight (see above), the DM should be lenient: Whatever the PCs have in mind to get to the main control room despite GlidOS taking control of the ship should work for them.
DM Note
The main purpose of the final encounter is to encourage tactical thinking and to keep the PCs engaged. The GlidOS encounter was designed to have all the PCs involved and work as a team. At the end, they should feel that they have earned the Hollow Marvel. If the DM has the impression that the PCs slice through the waves too quickly, they can add more waves with different combinations of drones. You can even use an hourglass to give the encounter more time pressure and narrative drive.
Conclusion
If the PCs manage to reboot GlidOS, she turns normal again. The fight ends and the Hollow Marvel now belongs to the PCs. They can access the vault, grab the treasure that is hidden inside and now have got a flying stronghold to call their own. They even have a robot butler (Whitley).
Appendix A: New Monsters
Gremlin
Small beast, unaligned
- Armor Class 11
- Hit Points 27 (5D8 +5)
- Speed 40ft.
STR DEX CON INT WIS CHA 12 (+1) 13 (+1) 13 (+1) 3 (-4) 13 (+1) 6 (-2)
- Senses darkvision 60ft., passive perception 11
- Languages --
- Challenge 1/2 (100 XP)
Actions
Claws. Melee Weapon Attack: +3 to hit, reach 5 ft., one target. Hit: 5 (1d8 + 1) slashing damage.
Siphon. The gremlin drains aether from an arcane-powered device it can see within 5 feet of it. If the object isn’t being worn or carried, the touch automatically drains aether. If the object is being worn or carried by a creature, the creature must succeed on a DC 11 Dexterity saving throw to keep it out of the gremlin’s reach. If the arcane-powered device grants any bonus (to attack rolls, damage rolls, Armor Class, and so on), that bonus is reduced by 1. If the device has charges, it loses 1 charge. Otherwise, it stops functioning for 1 round. Left unhindered, a gremlin can completely destroy an arcane-powered device.
Servo
Tiny construct, unaligned
- Armor Class 11
- Hit Points 10 (3D4+3)
- Speed 20ft.
STR DEX CON INT WIS CHA 4 (-3) 11 (+0) 12 (+1) 3 (-4) 10 (+0) 7 (-2)
- Damage Immunities poison
- Condition Immunities charmed, poisoned
- Senses passive perception 10
- Languages --
- Challenge 0 (10 Xp)
Actions
Claw. Melee Weapon Attack: +0 to hit, reach 5 ft., one target. Hit: 1 slashing damage.
The Hollow
Marvel
This dungeon crawl adventure draws inspiration from "The Legend of Zelda: Skyward Sword", "2001: A Space Odyssey", "WALL-E", "Portal 1 and 2", "Final Fantasy" series, "Horizon: Zero Dawn" and others.
For use with the fith edition of Dungeons & Dragons, Player's Handbook, Monster Manual and Dungeon Master's Guide.